Advertisement
Quick Links
S-LINE THREE-POINT INTERNAL MICROMETER
Thank you for purchasing the S-Line THREE-Point Internal Micrometer.
Please read this manual thoroughly before use for proper operation. Ring gauge calibration standard is not included for
zero-setting, please prepare appropriate ring gauge as required by the instrumentʼs measurement range.
FEATURES
●
3 Point measurement gives high accuracy measurement of internal diameter.
SPECIFICATIONS
Model No.
●
Maximum permissible error : 4μm
MCA-0608S
●
Operating Temperature Range : 15〜40℃
MCA-0810S
●
Storage Temperature Range
0〜50℃
:
MCA-10125S
MCA-12516S
MCA-1620S
MC-2025IPS
MC-2535IPS
MC-3550IPS
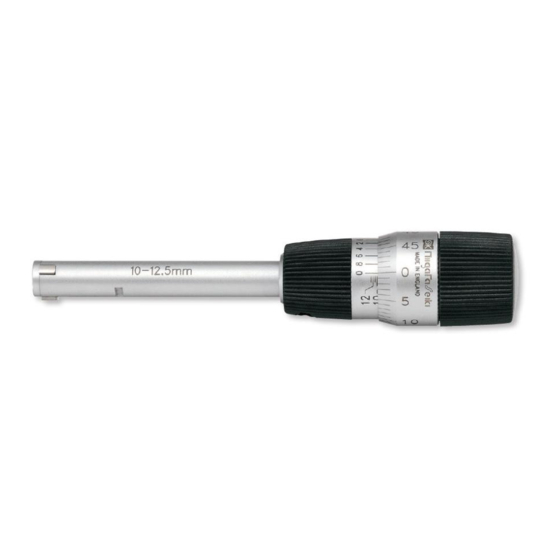
PART IDENTIFICATION
Sleeve
Gauge Head
20-25mm
Rod
Probe tips
0-Point Adjustment Screw
READING THE SCALE
■Resolution = 0.002mm
( e.g. ) MCA-1620S
Thimble Scale
Vernier Scale
②Reference Line past
③Vernier Scale aligns
the 6
at 6 on the Thimble
0
5
10
Reference Line
①Sleeve reading greater than 16
Sleeve Scale
①
16 . 0
Sleeve Scale Reading
:
②
. 06
Thimble Scale Reading
:
③
. 006
Vernier Scale Reading
:
16 . 066
(mm)
Reading
:
CAUTION
●
Always wipe measuring surfaces with a cloth to remove any dirt before use.
●
Do not turn spindle more than 0.5mm above upper measurement range.
●
If probe tips do not return after Thimble is loosened, please use hand in dust free glove to push in.
●
This is a precision instrument, handle with care. Do not drop or subject to excessive forces.
●
Please do not disassemble or modify.
●
Keep instrument away from direct sunlight or high temperatures such as in a car, or near a stove or heat source.
●
Remove dust and cutting chips after use and apply rust preventative oil to metallic surfaces. Please keep out of reach of children.
●
Please do not use organic solvents to clean the body of the instrument.
●
Keep instrument away from water and oil.
●
Only use as directed. Improper use may cause accident or injury.
INSTRUCTION MANUAL
Model No. : MCA - ***** S / MC - **** IPS <combined>
Measurement
Resolution
Measuring Surface
Range
( mm )
( mm )
Material
〜
6
8
〜
8
10
Alloy Tool Steel
〜
10
12.5
0.002
〜
12.5
16
〜
16
20
〜
20
25
Carbide Tip
〜
25
35
0.005
〜
35
50
Thimble
【ACCESSORIES】
・Allen Wrench
45
0
・Key
※Included for use when
5
adjusting for wear of
micrometer screw.
Reference Line
Ratchet Stop
( Ring gauge calibration standard is
( Constant Force Mechanism )
not included. )
■Resolution = 0.005mm
Sleeve Scale
Thimble Scale
Reference Line
45
0
5
Read the Thimble Scale at the Reference Line
20. 0
Sleeve Scale Reading
. 015
Thimble Scale Reading
20. 015
Reading
ZERO-POINT SETTING
① Prepare instrument and ring gauge for calibration by cleaning
measurement head and ring gauge inner diameter with
appropriate cleaner.
② Insert the measurement head into the ring gauge and turn
Spindle until the measuring surfaces make contact with the
inside of the ring gauge. Continue turning until Ratchet Stop
"clicks" 1~3 times.
Weight
( g )
"Click, Click"
95
105
115
140
155
305
325
465
Determine if the scale
reading matches the
ring gauge size.
Ring gauge
calibration standard
( e.g. ) 20.005mm
OPERATION
① Remove any grease and dust
from the measuring surfaces with
a clean cloth, such as a lens
( e.g. ) MC-2025IPS
cleaning cloth. Make sure no
foreign objects are adhered to
the surfaces.
② Insert the measurement head into
object to be measured and turn
Spindle until the measuring
surfaces make contact with the
inside diameter. Continue turning
until Ratchet Stop "clicks" 1~3
times.
③ Read the measured value
following the "Reading the Scale"
procedure above.
(mm)
TROUBLESHOOTING
ERROR CONDITION
Measured value is wrong
Probe tips do not return
※If issue does not resolve, or if you have any questions, please contact distributor or place of purchase.
※Please note, manufacturer is unable to respond to inquires or provide service directly.
Please contact distributor or place of purchase.
※Use ring gauge appropriate for instrument measuring range.
③ Determine if the micrometer reading from the Spindle Scale
and Thimble matches the size of the ring gauge calibration
standard.
④ If they do not match, without moving Thimble from position
set in step ② above, perform the following procedure.
1 ) Tighten the 0-Point Adjustment
Screw using the supplied Allen
Wrench to prevent the Thimble
from turning.
Ratchet Stop
Locking the Thimble
Thimble
Sleeve
2 ) Using the Allen Wrench, loosen
the screw above the Ratchet Stop
0-Point
until the Thimble is able to move
Adjustment Screw
again. Turn the Thimble to adjust
the reading to the proper setting.
Thimble moves again
Adjust Thimble to match
value of ring gauge
3 ) Tighten the screw above the Ratchet Stop, then loosen the
0-Point Adjustment Screw. Zero-setting is now complete.
MICROMETER SCREW WEAR ADJUSTMENT
Wear on the micrometer screw in the sleeve will affect accuracy
of the measurement. Please adjust using the key provide as
required.
① Remove the Thimble by rotating as shown.
"Click, Click"
② Insert the Key into the notches in the exposed brass nut.
③ Rotate the Key in the clockwise direction a little at a time.
( Over-tightening will make the Thimble hard to turn )
20-25mm
Sleeve
④ Replace Thimble and then perform the zero-point setting
procedure described above.
Object to be measured
CORRECTIVE ACTION
●
Clean measuring surfaces with cloth.
●
Check to insure zero-point is correct. Please reset zero-point.
●
If micrometer nut seems worn, please adjust using the above
procedure.
●
Please push in by hand in dust free glove.
0-Point
Adjustment Screw
Allen Wrench
Tighten
Allen Wrench
Loosen
Ratchet Stop
Tighten
Key
45
0
5
Thimble
Nut
Remove
Niigata seiki Co., Ltd.
5-3-14, Tsukanome, Sanjo, Niigata, Japan, 955-0055
Tel. : +81-256-33-5522 Fax. : +81-256-33-5518
MAIL intl.sales@niigataseiki.co.jp
URL
http://www.niigataseiki.co.jp
Advertisement

Related Manuals for Niigata seiki S Series


Summary of Contents for Niigata seiki S Series
- Page 1 Probe tips do not return ● Please push in by hand in dust free glove. Niigata seiki Co., Ltd. ● Please do not use organic solvents to clean the body of the instrument. ※If issue does not resolve, or if you have any questions, please contact distributor or place of purchase.
- Page 2 Sライン三点マイクロメータ 取扱説明 書 原点の調整 ※測定範囲内のリングゲージをご用意ください。 ①測定子を含めた測定部と、お手持ちの基準リングゲージ ③リングゲージに表示されている寸法値と、スリーブ・ 品番 : MCA- ***** S/MC- **** IPS 〈 兼用〉 の内径をパーツクリーナーなどの洗浄剤で洗浄します。 シンブルの目盛が指している数値が一致していれば、 この度はSライン三点マイクロメータシリーズをお買上げいただきありがとうございます。 0点が合っています。 ②測定部をリングゲージの内径に入れ、ラチェットス ご使用前に、本書をよくお読みいただき正しくお使いくださいますようお願い申し上げます。 基準のリングゲージは付属されておりませんので、原点の調整には測定範囲内のリングゲージをご用意ください。 トップを回します。測定子とリングゲージの内径が接 ④一致していない場合は、②の状態からシンブルを動か 触し、ラチェットストップが『カチカチ』と1〜3回 さないように、以下の手順で0点を合わせてください。 特 長 特 長 内径を3点で測定するため、より精度の高い測定が可能です。 鳴ったところで停止してください。 ● 1)シンブルが回らなくなる まで、0点調整ねじを付 0点調整ねじ 質量 ( g ) 仕 様 最大許容誤差:4μm 品 番...