Advertisement
Quick Links
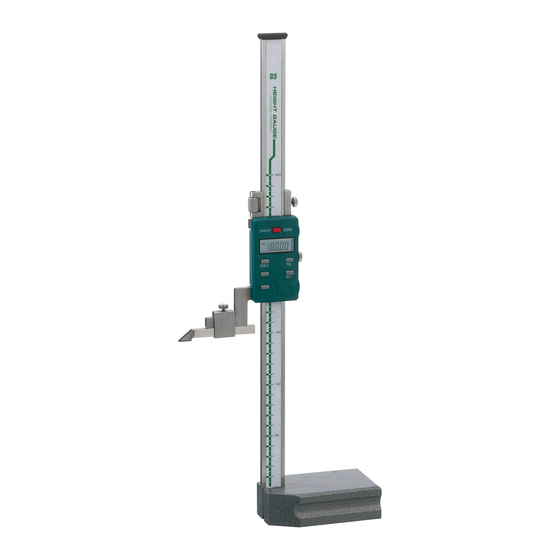
DIGITAL HEIGHT GAUGE
Thank you for purchasing the Digital Height Gauge.
Please read this manual thoroughly before use for proper operation.
PART IDENTIFICATION
【ACCESSORIES】
Post
Indicator Mounting Arm
Indicator Clamp Screw
VH-30D
φ8mm
Mounting Hole
( with φ6mm collet )
VH-60D
Fine Adjust Lock Screw
Fine Adjust Carriage
[ ON/OFF/ZERO ] Button
Carriage Lock Screw
LCD Display
[ HOLD ] Button
[ TOL ] Button
Scribe Clamp Screw
[ SET ] Button
Jaw
Battery Cover
Scribe
Measuring Surface
( w/ Carbide Tip )
Scribe Clamp
Base Reference Plane
PREPARATIONS BEFORE USE
1
Inserting Battery
1. Open Battery Cover by sliding in direction of arrow (
2. Insert battery with positive ( + ) side facing out.
3. Replace Battery Cover.
Caution:
Only use SR44 Silver Oxide Battery.
※Remove battery if Instrument will not be used for a
long period of time. Batteries may leak if left in
unused instrument for an extended period.
2
Installing the Scribe
1. Loosen the Scribe Clamp Screw and insert onto Jaw.
( Figure : ① )
2. Insert the Scribe to desired overhang and secure by
tightening the Scribe Clamp Screw. ( Figure : ② )
①
Scribe Clamp Screw
Scribe Clamp
Jaw
Scribe
②
Scribe Clamp Screw
Scribe
Overhang Adjustment
INSTRUCTION MANUAL
Model No.: VH-30D / VH-60D
APPLICATIONS and FEATURES
●
Ideal for measuring and marking work for molds, jigs, and tooling.
●
Accessory arm for mounting φ8mm or φ6mm dial indicator.
●
Easy to ready digital display.
●
●
Origin can be set at any position.
●
TOL function for convenient inspection work.
●
HOLD function.
SPECIFICATIONS
VH-30D
Measurement Range
0 -300 mm
Resolution
±0.04mm
※
Maximum permissible error
Fine Adjustment Range
Display
Weight
approx. 2.6kg
Operating Temperature Range
・Indicator Mounting Arm
・Scribe Clamp
Accessories
・SR44 Silver Oxide Battery ( for test )
※Not including quantization error ( ±1count )
NOTES
・Before using for the first time, please wipe off the corrosion
protectant cloth.
Base
・This is a precision instrument, handle with care. Do not drop
or subject to excessive forces.
・Please avoid damage to post. Also, do not scratch instrument,
for example by writing ID number.
・Keep away from direct sunlight. Do not store instrument in
extreme temperatures.
・When measuring using a dial indicator in place of scribe,
listed values for Maximum permissible error may not be
achieved.
3
Indicator Mounting Arm
) .
The Indicator Mounting Arm is used to mount a dial indicator ( sold separately )
in place of the Scribe.
1. Loosen the Indicator Clamp Screw, insert the indicator shaft, and
secure by tightening the clamp screw.
※
For indicators with a φ6mm mounting shaft, please attach using
φ6mm collet.
2. Loosen the Scribe Clamp Screw and clamp onto the Jaw.
3. Insert the Indicator Mounting Arm into the clamp, and tighten Clamp
Screw at the desired amount of overhang.
VH-30D
Scribe
Clamp Screw
Dial Indicator
( sold separately )
Indicator Clamp Screw
Indicator Mounting Arm
Scribe Clamp
VH-60D
Scribe
Clamp Screw
Dial Indicator
Indicator
( sold separately )
Mounting Arm
Scribe Clamp
MEASURING
1
Absolute Measurement
<combined>
1. Press the [ ON/OFF/ZERO ] Button to turn on the power.
2. Bring the scribe down to the surface plate ( the base reference
plane ) and make good contact. ( Figure:1 )
3. Press the [ ON/OFF/ZERO ] Button to set the LCD display to
"0.00mm"
4. Position the scribe to the workpiece to take a measurement.
2
Comparative ( Relative ) Measurement
Preset function.
1. Press the [ ON/OFF/ZERO ] Button to turn on the power.
2. Measure the reference surface and press the [ ON/OFF/ZERO ]
Button to set the LCD display to "0.00mm"
3. Measure the surface to be compared, and the measurement
relative to the reference surface will be displayed.
VH-30D
0-600mm
3
0.01mm
Fine Adjust Feed Operation
±0.06mm
1. Tighten the Fine Adjust Lock Screw, and loosen the Carriage
approx. 8mm
Lock Screw. ( Figure:2 )
5 digit LCD
2. Turn the Fine Adjust Carriage to the desired height setting.
approx.5.0kg
0~40ºC
・Scribe
・φ6mm Collet
BUTTON OPERATION
1
ON/OFF/ZERO Button
●
Press when power is off ....................... Power ON
●
Press when power is on ....................... Display value reset
●
Press and hold when power is on ........ Power OFF
HOLD Button ( Freeze display )
2
Press the [ HOLD ] Button to freeze the display value. "H" icon will
display on LCD to indicate hold.
3
SET Button ( Preset value )
[ SET ] Button allows you to preset a value.
1. When [ SET ] Button is pressed, "SET" icon will blink on LCD.
2. Long press of the [ SET ] Button selects which character to
modify. Release the button when the desired character is
blinking, and a short press modifies the number at that
position. When the "SET" icon is blinking, press [ SET ] again to
store the value.
The preset value is now entered.
※ When [ ON/OFF/ZERO ] Button is pressed, the display will be
set to the preset value.
To return the preset to "0.00mm," enter that value using the
above procedure, or toggle power by removing and
replacing the battery.
TROUBLESHOOTING
Q. Nothing is displayed, or the numbers are flashing.
A. Is the battery running low?
Q. With power on, the number on the LCD does not change as
the carriage is moved.
A. Please reset by removing battery for about 30sec., and then
Jaw
replacing.
Q. Nothing happens when buttons are pressed.
A. Is the battery inserted properly?
SERVICE
●
If height gauge is not working properly, or if you have any
questions, please contact distributor or place of purchase.
●
Please note, manufacturer is unable to respond to inquires or
provide service directly. Please contact distributor or place of
Jaw
purchase.
[ ON/OFF/ZERO ]
Button
LCD Display
Scribe
Surface Plate
Measuring Surface
Reference Plane
( Figure:1 )
Fine Adjust Lock Screw
1
Tighten
Fine Adjust Carriage
Carriage Lock Screw
2
Loosen
( Figure:2 )
4
TOL Button ( Setting tolerance range )
The [ TOL ] Button is used to confirm that a measured value is
within a specified range of tolerance.
1. When you press the [ TOL ] Button, "
" is displayed on the
LCD, and "SET" icon will blink.
In this state the maximum value for the tolerance range is set.
2. Long press of the [ TOL ] Button selects which character will
blink, and a short press modifies the value at that position.
Continue to enter the desired value and return the blinking to
the "SET" icon. Press [ TOL ] again to continue.
3. "
" will display on LCD; repeat the procedure from step 2 to
set the minimum value for the tolerance range.
4. When complete and the "SET" icon is blinking, press [ TOL ] .
Tolerance range is now set.
5. While taking measurements in tolerance mode,
If the measurement is within the tolerance range, "OK" is
●
displayed on the LCD.
If the measurement is above the tolerance range, "
●
displayed on the LCD.
If the measurement is below the tolerance range, "
●
displayed on the LCD.
※ In tolerance mode, the [ ON/OFF/ZERO ] Button does not
function. To use the [ ON/OFF/ZERO ] Button, press [ TOL ] to
cancel tolerance mode.
【LCD Display】
Niigata seiki Co., Ltd.
5-3-14, Tsukanome, Sanjo, Niigata, Japan, 955-0055
Tel. : +81-256-33-5522 Fax. : +81-256-33-5518
MAIL intl.sales@niigataseiki.co.jp
URL http://www.niigataseiki.co.jp
Base
" is
" is
Advertisement

Related Manuals for Niigata seiki VH-30D


Summary of Contents for Niigata seiki VH-30D
- Page 1 DIGITAL HEIGHT GAUGE INSTRUCTION MANUAL [ ON/OFF/ZERO ] Button Absolute Measurement Model No.: VH-30D / VH-60D <combined> LCD Display 1. Press the [ ON/OFF/ZERO ] Button to turn on the power. Thank you for purchasing the Digital Height Gauge. 2. Bring the scribe down to the surface plate ( the base reference Please read this manual thoroughly before use for proper operation.
- Page 2 ホルダアーム タを取り付けることができます。 ホルダ止めねじ 2 比較測定 定 盤 測定面 ●読み取りやすいデジタル表示。 基準面 (図1) ●任意の位置で0設定ができます。 ●検査に便利なTOL機能付。 1. ON/OFF/ZEROスイッチを押して、電源を入れます。 VH-30D用 ●数値のプリセット機能付。 ●ホールド機能付。 2. 基準となる被測定物を測定し、 ON/OFF/ZEROスイッチ φ 8 用取付穴 微動止めねじ を押して、 LCD表示部の数値を 「0 .00mm」 にしてください。 仕 様 (φ 6 コレット付) 3. 比較する被測定物を測定してください。基準となる被測定物 締める 1 微動送り車 VH-3 0 D...