Table of Contents
Advertisement
Quick Links
Bad Boy PowerLoader
Mounting System
MODEL: PLBB1
READ ALL INSTRUCTIONS BEFORE USING THE BAD BOY
POWERLOADER MOUNTING SYSTEM
NOTE: Failure to read instructions before use could result in injury or death.
Instructions for Installation and Use:
PLEASE NOTE: Do not securely tighten bolts and/or nuts until the PLBB1 & the PL250 are
completely installed on your vehicle.
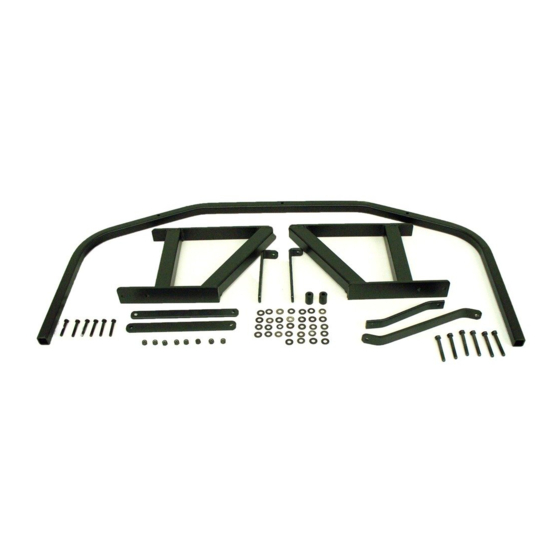
Contents: See Fig. 1
1 – Brush Guard Rail
2 – PowerLoader Mounts
2 – "L" Braces
2 – Basket Support straps
1 – 12" "Z" Brace
1 – 8" "Z" Brace
2 – 5/16" X 3" U-Bolts
10– 5/16" Lock Nuts
32 – Flat Washers
8 – ¼ "Lock Nuts
6 – 5/16"X 2 1/2" Bolts
Fig. 1
6 – ¼ "X 1 ¾ "Bolts
2 – ¼ "X 2" Bolts
2– Nylon Spacers
Advertisement
Table of Contents

Related Manuals for Great day Bad Boy PowerLoader PLBB1


Summary of Contents for Great day Bad Boy PowerLoader PLBB1
- Page 1 Bad Boy PowerLoader Mounting System MODEL: PLBB1 READ ALL INSTRUCTIONS BEFORE USING THE BAD BOY POWERLOADER MOUNTING SYSTEM NOTE: Failure to read instructions before use could result in injury or death. Instructions for Installation and Use: PLEASE NOTE: Do not securely tighten bolts and/or nuts until the PLBB1 & the PL250 are completely installed on your vehicle.
- Page 2 1) Remove Basket from buggy. Note: If you have the new style buggy (see pictures below) it is not necessary to remove basket. Old Style with ¾ “basket support New Style with split basket and roof supports 2) Place brush guard rail on Bad Boy. Using 11/32” drill bit, drill through bad boy brush guard.
- Page 3 4) Drill hole through brush guard rail and front roof support bars. Secure with (2) 5/16“X 2 ½ “bolts. Note: If you have the new style buggy (see page 1 of instruction sheet), drill through front roof support and basket mounting bars. Secure with (2) more 5/16 “X 2 ½...
- Page 4 7) Drill hole through roof support approximately 1” below windshield support studs. (Fig. 9) Fig. 9 8) Attach basket support bracket to roof support bar and attach with (2) ¼” X 1 ¾” bolts. (Fig. 10) Fig. 10 9) Position basket support brace onto basket support tubing and drill through both pieces and attach with (2) ¼”...
- Page 5 Information for the following steps: The old style buggy uses the 8” “Z” brace and the new style buggy uses the 12” “Z” brace. 10) Attach “Z” brace to brush guard rail using (1) ¼” X 1 ¾” bolt. (Fig. 12) Fig.
- Page 6 13) Attach PL250 to power loader mounts using (4) ¼” X 2 ½” bolts, nylon spacers, and wing knobs provided in the PL250 hardware package. (Fig. 16) Fig. 16 14) Install power loader straps between bottom of power loader and bottom of brush guard.
- Page 7 This mounting system is to be used ONLY in combination with the Great Day PowerLoader Model PL250. Please follow all operating instructions and warnings as stated in the instruction sheet provided with the PowerLoader Model PL250. Failure to completely and thoroughly follow all instructions and warnings associated with the Bad Boy PowerLoader Mounting System (model PLBB1) and The PowerLoader (model PL250) could result in serious injury or death.
Need help?
Do you have a question about the Bad Boy PowerLoader PLBB1 and is the answer not in the manual?
Questions and answers