
Subscribe to Our Youtube Channel
Related Manuals for Artec Studuino


Summary of Contents for Artec Studuino
- Page 1 Studuino Block Programming Environment Guide (Part 01) [LEDs, Buzzers, and Sensors] Published 2014/11/01 Revised 2018/06/28...
- Page 2 Version History Date Content 2016/11/01 First version 2017/01/16 Updated for new Studuino website 2017/04/14 Changed access guide based on new Studuino website 2018/01/22 Revised to include software and OS updates 2018/06/28 Updated description of Buzzer values...
-
Page 3: Table Of Contents
Index Getting Started ..................1 Setup ......................1 2.1. Installing Studuino Software ............. 1 2.2. Connecting Parts ................2 LEDs ......................5 3.1. Connecting an LED ................5 3.2. Port Settings ..................5 3.3. Lighting Up an LED ................7 3.4. - Page 4 5.5.1. Connecting a Touch Sensor ................52 5.5.2. Port Settings ....................52 5.5.3. How a Touch Sensor Works ................53 5.5.4. Programming ....................53 5.6. Sound Sensors ................56 5.6.1. Connecting a Sound Sensor ................56 5.6.2. Port Settings ....................56 5.6.3. How a Sound Sensor Works ................57 5.6.4.
-
Page 5: Getting Started
2) Mouse over Software and click Studuino or Studuino mini. 3) If you’ve chosen Studuino, use the next page to choose your system. 4) On the next page, go to the Software section and click the button for your operating system... -
Page 6: Connecting Parts
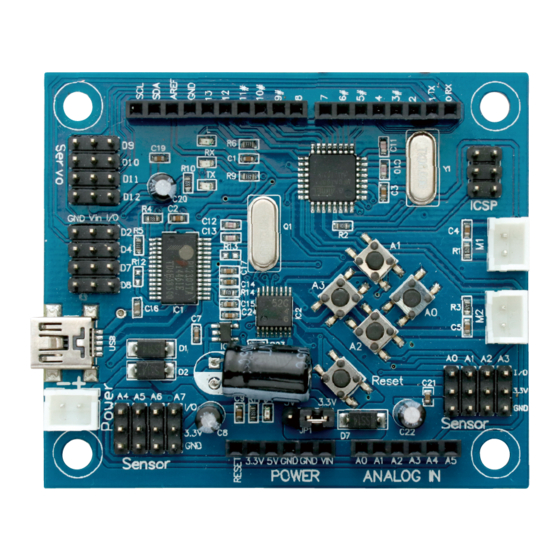
The pictures below show how to plug sensor connecting cables into your Sensors, Buzzers, and LEDs in order to connect them to your Studuino. ★ Every sensor uses a three-wire cable except for the Accelerometer, which uses a four-wire cable. - Page 7 ② Connecting DC Motors Up to two DC Motors can be connected using connectors M1 and M2. ★ DC Motor connectors can only connect one way. ③ Connecting Servomotors Up to eight Servomotors can be connected to the Servomotor connectors. The gray wires of your Servomotor cables should face towards the center of the board.
- Page 8 ④ Connecting a Battery Box Plug your Battery Box into the POWER connector. Sensors, LEDs, Buzzers, and Push-buttons can run on a USB connection, but DC Motors and Servomotors require power from the Battery Box. You’ll also need a Battery Box in order to power devices when the USB cable is disconnected.
-
Page 9: Leds
3. LEDs Learn how to program an LED in this chapter. It covers connecting devices to your Studuino, setting ports, programming in the Block Programming Environment, and transferring data to the board. 3.1. Connecting an LED Connect an LED to Sensor/LED/Buzzer connector A4 on your Studuino. - Page 10 Check A4 under Sensor/LED/Buzzer and choose LED. Check the box here ① ② Click Choose LED ③ ④ Click OK You’ve now set the Studuino ports you’ll be using in the Block Programming Environment.
-
Page 11: Lighting Up An Led
3.3. Lighting Up an LED It’s time to start learning about some programming basics using the block. Click the Motion button in the Command Palette. Now drag to the Script ① Field and connect it to the block. Click ① Command Palette Script Field Drop the block once... - Page 12 Use a USB cable to connect your Studuino to your PC. Now choose Transfer from the ② Run menu to transfer your program. Click ① ② Click Seeing the message below disappear means that your program has been successfully transferred to your Studuino. The LED will light up automatically once the transfer finishes.
-
Page 13: Making An Led Blink
3.4. Making an LED Blink Now we’re going to program your LED to blink based on the program from 3.3. Lighting Up an LED. This section will teach you about repeats by using the block to make your program repeat forever. ①... - Page 14 ② Wait one second ③ Turn off LED ④ Wait one second Use a USB cable to connect your Studuino to your PC. Now choose Transfer from the Run menu to transfer your program. The LED will blink once every second once the transfer finishes.
-
Page 15: Setting A Specific Number Of Blinks
3.5. Setting a Specific Number of Blinks Now we’re going to control the number of times your LED blinks based on the program from 3.4. Making an LED Blink. This section will teach you how to set the number of repeats by using the block. - Page 16 ③ Turn off LED ④ Wait one second Use a USB cable to connect your Studuino to your PC. Now choose Transfer from the Run menu to transfer your program. The LED will blink 10 times in 1-second intervals once the transfer finishes.
- Page 17 ★ Once you’ve transferred a program, you can run it using power from your Battery Box. Unplug your USB cable from the Studuino. Now plug in your Battery Box, turn it on, and check to see if your LED blinks the number of times that you set.
-
Page 18: Changing The Speed Of A Blink
3.6. Changing the Speed of a Blink Now we’re going to control how fast your LED blinks based on the program from 3.5. Setting a Number of Blinks. While you can change the speed of an LED by changing the value in the block, let’s try using a variable to change multiple values at once. - Page 19 ⑤ Wait time (0.5 seconds) Use a USB cable to connect your Studuino to your PC. Now choose Transfer from the Run menu to transfer your program. The LED will blink 10 times in 0.5-second intervals once the transfer finishes.
-
Page 20: Buzzers
Before programming, you'll need to set the ports in the Block Programming Environment to match the parts connected to your Studuino. Select Edit from the menu and choose Port Settings to open the Port Settings dialog box. Check A5 under Sensor/LED/Buzzer and choose Buzzer. -
Page 21: Playing A Buzzer
4.3. Playing a Buzzer Now we're going to make a program that makes the Buzzer play for one second. This section teaches you how to control sound by using the blocks. ★ Choose New under the File menu to open a new program. ①... - Page 22 Drag and drop Now you’ve programmed your Buzzer to play the note E (64), or Mi, for one second. Use a USB cable to connect your Studuino to your PC. Now choose Transfer from the Run menu to transfer your program.
-
Page 23: Playing A Melody
4.4. Playing a Melody Now it’s time to program your Buzzer to play the notes C, C, G, G, A, A, and G, the melody for Twinkle, Twinkle, Little Star. The Buzzer can do this by playing several notes in a row. ①... - Page 24 ④ Repeat step ③ to make seven groups of repeat blocks. Delete the last block and drag any extra blocks back to the Command Palette to delete them. Drag and drop...
- Page 25 Now you’ve programmed your Buzzer to play the melody for Twinkle, Twinkle, Little Star. Use a USB cable to connect your Studuino to your PC. Now choose Transfer from the Run menu to transfer your program. Your Buzzer will play Twinkle, Twinkle, Little Star once the program transfers.
-
Page 26: Using A List To Play Melodies
4.5. Using a List to Play Melodies The program you made in 4.4. Playing a Melody can be simplified by using a list. ●Making a List ① Click the Make a list button in the Variables Palette. Now name it list_note. ①... - Page 27 Now we'll learn how each block controls a list. blocks to the Script Field. Now set them to 0, 12, and 15. ③ Drag three Drag and drop ④ Click and the blocks connected to will be run in order. This will add the values 0, 12, and 15 to the list.
- Page 28 ⑥ Click Click A new second row with a value of 30 will be inserted into the list ⑦ Next, delete the block. Now drag to the Script Field, connect it to your program, and set it to replace the number at row 3 with 6. Drag and drop ⑧...
- Page 29 ⑨ Delete the block. Now drag to the Script Field, connect it to your program, and set it to delete the number at row 2. Drag and drop ⑩ Click Click The value at row 2 will be deleted You can use the steps listed above to modify (add, insert, replace, or delete) values in a list. You can also access the information in the list with the following blocks: Block What it Does...
- Page 30 ● Playing a Melody Using a List Use the blocks shown below with your program from 4.4. Playing a Melody to create a list of notes and play it seven times. We can simplify this program by using a list to set the notes of the blocks.
- Page 31 ⑬ Enter the values shown below into the blocks. These values will be used for the notes. from the Control Palette and connect it to the top of the blocks you made ⑭ Drag in ⑬ . Now click on the ▼ in the block and choose new..
- Page 32 ⑮ from the Control Palette and connect it to Drag . Now click ▼ to choose the init_code function. Choose “init_ Drag and drop code” ⑯ Drag from the Motion Palette and connect it to Drag and drop ⑰ Drag two from the Control Palette and set them to 0.3 and 0.1.
- Page 33 ⑱ Drag from the Variables Palette and connect it to Drag and drop Click the Make a variable button in the Variables Palette. Name the variable number. ⑲ ① Click This dialog box lets you name the function ② Type "number" ③...
- Page 34 Use a USB cable to connect your Studuino to your PC. Now choose Transfer from the Run menu to transfer your program. The Buzzer will play Twinkle, Twinkle, Little Star once the program transfers.
-
Page 35: Push-Buttons And Sensors
5. Push-buttons and Sensors In this section you’ll learn how to program and use Push-buttons, sensors, and LEDs. 5.1. Connecting an LED You’ll need to use an LED, so go ahead and plug one into connector A4 on your Studuino. Gray Black Black Keep an eye on your cables! The gray wire should be on the inside. -
Page 36: Port Settings
Make sure this box is checked 5.2.2. How Push-buttons Work Let’s take a look at how a Push-button works. Use a USB cable to connect your Studuino to your PC. Now choose Test ON from the Run menu. ① Click ② Click You’ll see the Sensor... - Page 37 USB cable and press the onboard Reset button. Pressing the RESET button on the Studuino board while in Test Mode will cause the connection between your Studuino and PC to be interrupted and the message below to appear.
-
Page 38: Programming
5.2.3. Programming In this section we'll be programming your LED to blink when you press a button. We’ll also be learning how to use the block. from the Motion Palette to the Script Field. ① Drag Drag and drop ① Drag from the Motion Palette to the Script Field. - Page 39 ④ block to OFF. Set the new ⑤ Now connect your duplicated blocks to the original ones. ⑥ Drag from the Control Palette to the Script Field. Fit the blocks from ④ into the opening of Drag and drop Drag and drop...
- Page 40 ⑦ Set the number of repeats to 2. ⑧ Drag from the Control Palette to the Script Field. Drag and drop ⑨ Drag from the Operators Palette and add it to the block. Drag and drop...
- Page 41 ⑩ from the Sensing Palette and drop it into the left side of the Drag block. Set the right side to 0. Drag and drop ⑪ Move the blocks from ⑦ into the opening of the block. Drag and drop The block you just made will make your LED blink twice when you press the Push-button and change its value to 0.
- Page 42 ⑫ from the Control Palette to the Script Field. Move the blocks from ⑪ into the Drag opening of the block. Drag and drop Drag and drop ⑬ Connect the group of blocks you made in ⑫ to the block. Drag and drop Now you’ve programmed your LED to blink two times when you press button A0.
- Page 43 Use a USB cable to connect your Studuino to your PC. Now choose Transfer from the Run menu to transfer your program. ① Click ② Click Seeing the message below disappear means that your program has been successfully transferred to your Studuino.
-
Page 44: Light Sensors
Before programming, you'll need to set the ports in the Block Programming Environment to match the parts connected to your Studuino. Select Edit from the menu and choose Port Settings to open the Port Settings dialog box. Check A6 under Sensor/LED/Buzzer and choose Light Sensor. You’ll also need to check A4 and choose LED. -
Page 45: How A Light Sensor Works
How a Light Sensor Works Let’s take a look at your Light Sensor’s values. Use a USB cable to connect your Studuino to your PC. Now choose Test ON from the Run menu. Start Test Mode and you’ll see the Sensor Board displaying [A6] Light Sensor. - Page 46 ② from the Operators Palette and insert it into the Drag block. Drag and drop from the Sensing Palette and drop it into the left side of the ③ Drag block. Set the right side to 50. Drag and drop Since your Light Sensor values respond to the amount of light in the room, look at the Sensor Board to decide which value to put into the right side.
- Page 47 The block you just made will light up the LED when then room is dark (Light Sensor value is less than 50) and turn it off when the room is bright (Light Sensor value is greater than 50 ⑤ to the Script Field. Move the blocks from ④ into the opening of the Drag block.
- Page 48 The blocks currently running will have a white outline. Take a look at the Sensor Board as you cover the Light Sensor with your hand and see how the values change. Choose Transfer from the Run menu to transfer your program to your Studuino. Now you can unplug your USB cable and run your program using the Battery Box.
-
Page 49: Ir Photoreflectors
Before programming, you'll need to set the ports in the Block Programming Environment to match the parts connected to your Studuino. Select Edit from the menu and choose Port Settings to open the Port Settings dialog box. Check A7 under Sensor/LED/Buzzer and choose IR Photoreflector. You’ll also need to check A4 and choose LED. -
Page 50: How An Ir Photoreflector Works
How an IR Photoreflector Works Let’s take a look at your IR Photoreflector’s values. Use a USB cable to connect your Studuino to your PC. Now choose Test ON from the Run menu. Start Test Mode and you’ll see the Sensor Board displaying [A7] IR Photoreflector. -
Page 51: Programming
5.4.4. Programming In this section we'll be programming your LED to blink when an object is close to the IR Photoreflector. We’ll also be learning how to use the block. ① from the Motion Palette to the Script Field. Drag Drag and drop ②... - Page 52 ④ Set the new block to OFF. ⑤ Now connect your duplicated blocks to the original ones. ⑥ Drag from the Control Palette to the Script Field. Drag and drop...
- Page 53 ⑦ Drag from the Operators Palette into the block. Drag and drop ⑧ from the Sensing Palette and drop it into the left side of Drag the block. Set the right side to 15. Now move the blocks from ⑤ into the opening of the ...
- Page 54 ⑨ To make your program start with your LED off, drag from the Motion Palette and . Now set it to OFF. connect it to Drag and drop ⑩ Connect the group of blocks you made in ⑧ to the block.
- Page 55 ⑪ Now let’s check to see if your LED blinks. Make sure your Studuino is connected to your PC. Now choose Test ON from the Run menu. ⑫ Once you’ve opened Test Mode, click Click The program will run in...
-
Page 56: Touch Sensors
Before programming, you'll need to set the ports in the Block Programming Environment to match the parts connected to your Studuino. Select Edit from the menu and choose Port Settings to open the Port Settings dialog box. Uncheck Button A2. Now check A2 under Sensor/LED/Buzzer and choose Touch Sensor. -
Page 57: How A Touch Sensor Works
How a Touch Sensor Works Let’s take a look at your Touch Sensor’s values. Use a USB cable to connect your Studuino to your PC. Now choose Test ON from the Run menu. Start Test Mode and you’ll see the Sensor Board displaying [A2] Touch Sensor. - Page 58 ② Drag from the Control Palette and connect it to Drag and drop ③ Drag from the Operators Palette and into the block. Drag and drop...
- Page 59 Now you’ve programmed your LED to light up when you press the Touch Sensor. Turn off LED Wait until button is pressed Turn on LED Make sure your Studuino is connected to your PC. Now choose Transfer from the Run menu. Check that your LED lights up when you press the Touch Sensor.
-
Page 60: Sound Sensors
Before programming, you'll need to set the ports in the Block Programming Environment to match the parts connected to your Studuino. Select Edit from the menu and choose Port Settings to open the Port Settings dialog box. Uncheck Button A3. Now check A3 under Sensor/LED/Buzzer and choose Sound Sensor. -
Page 61: How A Sound Sensor Works
How a Sound Sensor Works Let’s take a look at your Sound Sensor’s values. Use a USB cable to connect your Studuino to your PC. Now choose Test ON from the Run menu. Start Test Mode and you’ll see the Sensor Board displaying [A3] Sound Sensor. - Page 62 ② Drag from the Control Palette and connect it to the other blocks. Drag and drop ③ Click the block and choose duplicate. ① Uncheck ② Select Duplicate This will duplicate the blocks! ④ Set the new block to OFF.
- Page 63 ⑤ Now connect your duplicated blocks to the original ones. ⑥ Drag from the Control Palette to the Script Field. Drag and drop...
- Page 64 ⑦ from the Operators Palette into the Drag block. Drag and drop ⑧ Drag from the Sensing Palette and drop it into the left side of the block. Set the right side to 30. Drag and drop ⑨ Move the blocks from ⑤ into the opening of the block.
- Page 65 The block you’ve just made tells a blinking LED to turn off when you blow on the Sound Sensor and the value goes over 30. ⑩ Connect the group of blocks you made in ⑨ to the block. ⑪ Drag from the Motion Palette and connect to the block.
- Page 66 Now look at the Sensor Board as you blow on the Sound Sensor and check that the LED turns off when the value goes over 30. Choose Transfer from the Run menu to transfer your program to your Studuino. Now you can unplug your USB cable and run your program using the Battery Box.
Need help?
Do you have a question about the Studuino and is the answer not in the manual?
Questions and answers