Advertisement
Quick Links
Advertisement

Subscribe to Our Youtube Channel
Related Manuals for Artec Doggy Robot


Summary of Contents for Artec Doggy Robot
- Page 1 Doggy Robot Assembly Instructions...
- Page 2 Doggy Robot Contents Studuino Unit LED (red) Reflective IR Photo reflector Infrared Sensor × × × Basic Cube Basic Cube (white) (clear) × × Servomotor Triangle A Triangle A (gray) (clear) × × × USB Cable Battery Box Half B...
- Page 3 Calibration and Setting Connector Numbers Before building your robot, read 6. Using Servomotors in the Studuino Icon Programming Environment Guide (download from http://www.artec-kk.co.jp/robotist/) for instructions on how to calibrate your servomotor. Building your robot without calibrating your servomotor may cause damage or improper functionality.
- Page 4 Doggy Robot Attaching Servomotor for the Legs × × × ① Wider Wider...
- Page 5 Doggy Robot ② Make sure the Studuino unit is inserted correctly! ③ Connect the from the servomotor to their corresponding places on your Studuino unit. Make sure the cables are inserted correctly!
- Page 6 Doggy Robot Attaching Servomotor for the Head × × × Connect the servomotor cables to their corresponding places on your Studuino unit. Wider Make sure the cables are inserted correctly!
- Page 7 Doggy Robot Attaching the Reflective Infrared Sensor × × × × ① Sensor Connecting Cable Gray Gray Circuit board side Sensor side IR Photo reflector Black Black Make sure the cables are inserted correctly! ② Connect the cables from the reflective infrared sensor to A5.
- Page 8 Doggy Robot Assembling the Head × × × × × × ① ②...
- Page 9 Doggy Robot ③ ④ Gray Gray Black Black Make sure the cables are inserted correctly!
- Page 10 Doggy Robot ⑤ Connect the LED (red) cables to A4. Make sure the cables are inserted correctly! ⑥...
- Page 11 Doggy Robot Assembling the Torso × × ①...
- Page 12 Doggy Robot ② ③...
- Page 13 Doggy Robot ④ ⑤...
- Page 14 Doggy Robot Assembling the Torso × × × ①...
- Page 15 Doggy Robot ②...
- Page 16 Doggy Robot Assembling the Torso × × × × × ①...
- Page 17 Doggy Robot ②...
- Page 18 Doggy Robot Assembling the Torso × × ② ①...
- Page 19 Doggy Robot Assembling the Torso × × × Connect the sound sensor cables to A6. Make sure the cables are inserted correctly! Sound Sensor Black Black Gray Gray Make sure the cables are inserted correctly!
- Page 20 Doggy Robot Installing the Battery Box ① ② Connect the cable from the battery box to the POWER section. You should see the battery − + box switch here. POWER POWER Replacing the Batteries ① ② ③ Use a screwdriver (Phillips #1) to open.
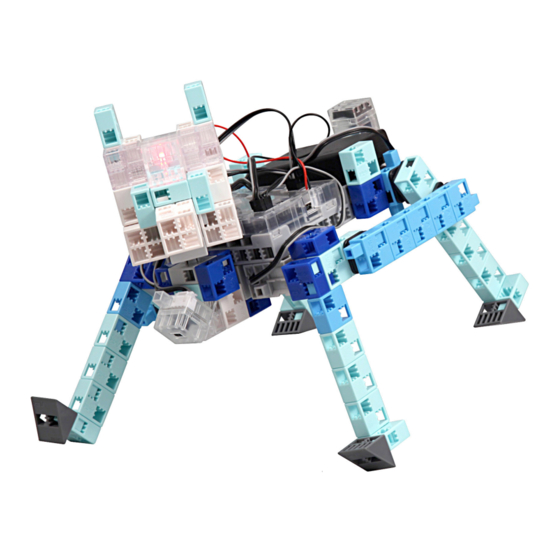
- Page 21 Doggy Robot Completed Doggy Robot Be cautious of cables that could become entangled in the moving parts of the motor and cause the robot to disconnect. Take care when arranging cables. Before operating your robot, check the Assembly Instructions again to confirm your robot has been assembled correctly.
- Page 22 Doggy Robot Operating Your Doggy Robot Install the software from the URL below to setup the Studuino Programming Environment. ★ Proceed to Step 1 when software installation is complete. http://www.artec-kk.co.jp/studuino/ ① Connect the USB cable to the PC and the Studuino unit.
- Page 23 Doggy Robot Operating Your Doggy Robot ⑥ Turn the switch of the battery box on and your robot will start walking. Immediately turn the switch to off if your robot does not begin walking as shown in the picture below. Not doing so may damage the servomotor.
- Page 24 Doggy Robot Sensor Calibration Some sensors may not function properly after you run the program for the first time. If the sensors are malfunctioning, calibrate the sensor settings. Click the Submenu 1 tab to calibrate the sensors and you will see a box to adjust the range settings.
Need help?
Do you have a question about the Doggy Robot and is the answer not in the manual?
Questions and answers