
Subscribe to Our Youtube Channel
Related Manuals for Artec Working Arm Robot


Summary of Contents for Artec Working Arm Robot
- Page 1 Working Arm Robot Assembly Instructions is a registered trademark of Artec Co., Ltd. in multiple countries including Japan, South Korea, Canada, and the USA.
- Page 2 Working Arm Robot Components Studuino Unit Studuino Unit Servomotor Servomotor × × Battery Box Battery Box Reflective Infrared Sensor Reflective Infrared Sensor IR Photoreflector × × Basic Cube (white) Basic Cube (white) Half A (light gray) Half A (light gray)
- Page 3 Working Arm Robot Assembly Instruction Labels 組立説明書のアイコンについて × × Shows the sticker Shows the parts needed number used for each for assembly. Indicates servomotor. the number of parts Use the motor with the needed for assembly. correct sticker number. Working Arm Robot Attaching the Cargo Line ×...
- Page 4 Calibration and Setting Connector Numbers Before building your robot, read 6. Using Servomotors in the Studuino Icon Programming Environment Guide (download from http://www.artec-kk.co.jp/robotist/) for instructions on how to calibrate your servomotor. Building your robot without calibrating your servomotor may cause damage or improper functionality.
-
Page 5: Assembling The Base
Working Arm Robot Assembling the Base × × × × × × × × ① Make sure the Studuino unit is in the correct orientation! ②... - Page 6 Working Arm Robot ③ ④...
- Page 7 Working Arm Robot ⑤ Wider ⑥ ⑦ ×...
- Page 8 Working Arm Robot ⑧ ⑨...
- Page 9 Working Arm Robot ⑩ × ⑪...
- Page 10 Working Arm Robot ⑫ Completed Base...
- Page 11 Working Arm Robot Attaching the Articulated Arm × × × × × ①...
- Page 12 Working Arm Robot ② ③ Install the end of the articulated arm into the rails of the base.
- Page 13 Working Arm Robot Attaching the Cargo Line × × × × × × × × × ① Wider ②...
- Page 14 Working Arm Robot ③ ④ Sensor Connecting Cable Sensor side Circuit board side Black Black Gray Gray IR Photoreflector Make sure the cables are inserted correctly! ⑤...
- Page 15 Working Arm Robot ⑥ ⑦...
- Page 16 Working Arm Robot Assembling Arm Servomotors ×3 × × × Wider Narrower Make three in total.
-
Page 17: Assembling The Arms
Working Arm Robot Assembling the Arms × × × × × × ① Wider Wider ②... - Page 18 Working Arm Robot ③ Wider Wider Wider Wider...
- Page 19 Working Arm Robot ④ Completed Arm...
- Page 20 Working Arm Robot Wiring Your Robot × ① You should see the battery box switch here. ② POWER Connect the cables from the battery box to the section. POWER POWER Lift the arm. + - Make sure the cables are...
- Page 21 Working Arm Robot ③ Connect the reflective infrared sensor to A3. Make sure the cables are inserted correctly! ④ Connect the six cables from the servomotor to their corresponding place on your Studuino unit. Make sure the cables are inserted correctly!
- Page 22 Working Arm Robot Making Cargo × × × Line up four pieces of cargo on the line.
- Page 23 Working Arm Robot Replacing the Batteries ① ② ③ Use a screwdriver (Phillips #1) to open. Insert batteries in the correct polarity. Put the lid of the battery box back in place.
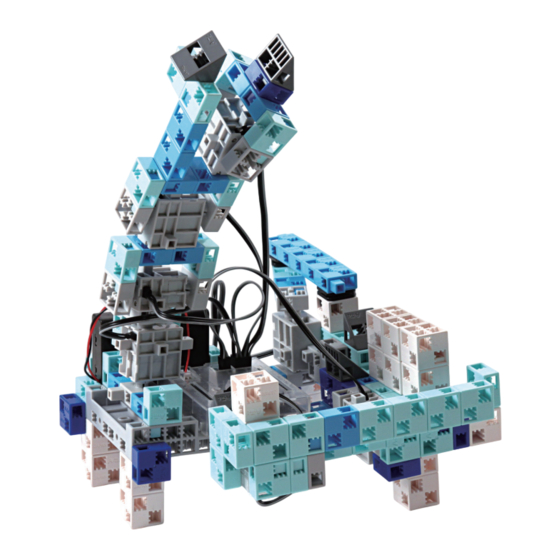
- Page 24 Working Arm Robot Completed Working Arm Robot Before operating your robot, check the Assembly Instructions again to confirm your robot has been assembled correctly. Be cautious of cables that could become entangled in the moving parts of the motor and cause the robot to disconnect.
- Page 25 Working Arm Robot Operating Your Working Arm Robot Install the software from the URL below to setup the Studuino Programming Environment. ★ Proceed to Step 1 when software installation is complete. http://www.artec-kk.co.jp/studuino/ ① Connect the USB cable to the PC and the Studuino unit.
- Page 26 Working Arm Robot Operating Your Working Arm Robot ⑥ Turn the switch of the battery box on and your robot will start working. ● The clamp on your robot's arm should open and close while the line moves up and down.
-
Page 27: Sensor Calibration
Working Arm Robot Sensor Calibration Some sensors may not function properly after you run the program for the first time. If the sensors are malfunctioning, calibrate the sensor settings. Click the corresponding sensor and you will see a box to adjust the range settings. - Page 28 センサー値の条件設定 Depending on where you're using your robot or the amount of power left in your batteries, the program you've downloaded for your Working Arm Robot may not work properly the first time. If this happens you can use our software to calibrate the angles of your servomotors.
Need help?
Do you have a question about the Working Arm Robot and is the answer not in the manual?
Questions and answers