Advertisement
Quick Links
Instruction
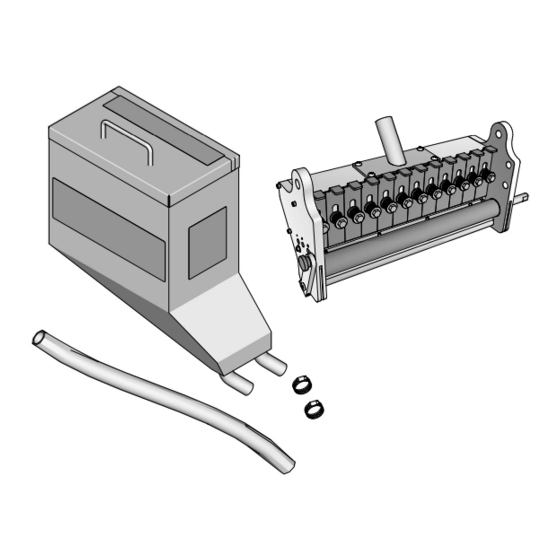
Glass Bead Dispense Kits
For adding a second or wider bead box to the ThermoLazer 200 or 200TC.
To be used on 200/200TC models only.
Models
17B587 Kit: Adds a second 8" (20cm) bead box
17B361 Kit: Adds a second 12" (30cm) bead box
26D188 Kit: Replaces 8" (20cm) or 12" (30cm) bead box with 18" (45cm) bead box
IMPORTANT SAFETY INSTRUCTIONS
Read all warnings and instructions in ThermoLazer Operation manual.
Be familiar with the controls and the proper usage of the equipment.
Save these instructions.
Follow these instructions when adding the second bead box to an existing 8-inch (20cm) or 12-inch (30cm) bead
box or 18-inch (45cm) wide bead box on the ThermoLazer 200 or 200TC. Refer to the ThermoLazer Repair and
Operation manuals as need for additional information.
Related Manuals
Manual in
Description
English
3A1319
ThermoLazer Operation
3A1320
ThermoLazer Repair
ti24490a
334146C
EN
Advertisement

Related Manuals for Graco 17B587


Summary of Contents for Graco 17B587
- Page 1 To be used on 200/200TC models only. Models 17B587 Kit: Adds a second 8” (20cm) bead box 17B361 Kit: Adds a second 12” (30cm) bead box 26D188 Kit: Replaces 8” (20cm) or 12” (30cm) bead box with 18” (45cm) bead box IMPORTANT SAFETY INSTRUCTIONS Read all warnings and instructions in ThermoLazer Operation manual.
- Page 2 Preparation Preparation 4. Cut tie wrap that secures propane line to bead hose. 1. Close manual gas shut-off valve on propane tank. ti24499a 5. Loosen screws on hose clamps and remove bead hose from dispenser and bead hopper. Save for reuse.
- Page 3 Screws are accessible from the propane tank side with screws provided and tighten screws. of the box. 7. Remove bead hopper. Dispose of bead hopper. ti24504a ti24514a 8. 17B587 & 17B361 only: Loosen screw and remove bead dispenser engagement wheel. Dispose of wheel and screw. ti24506a 334146C...
-
Page 4: Installation
Installation Installation 3. Slide bead dispenser engagement wheel pulley onto long axle. 17B587 & 17B361 only 1. Slide rear bead box down through slots on angular brackets to lock into place. ti24523a 4. Secure pulley and wheel into place with retaining ring (engagement wheel with pulley will rotate freely). - Page 5 6. Install belts onto pulleys. 8. Attach pulley guard and tighten two screws. ti24528a ti24520a 9. All Kits (17B587, 17B361 & 26D188): Install new 7. Align pulleys as shown below and tighten screws. dual compartment bead box using screws saved in Preparation Step 6.
- Page 6 Installation 12. Attach bead hose from front bead box to front NOTE: The rear bead dispenser has a higher drop rate dispenser and tighten hose clamps. than the front bead dispenser. ti24529a 334146C...
- Page 7 Notes Notes 334146C...
- Page 8 Parts 17B361, 17B587 Parts 17B361, 17B587 334146C...
- Page 9 123261 SCREW, thumb 16A805 SHAFT, short 123481 SCREW, shoulder, screw, 1/4-20 HOUSING, dispenser 295709 SCREW, cap, socket head 16Y160 Kit 17B587, 8” (20cm) 15X282 HANDLE, adjuster 16Y172 Kit 17B361, 12” (30cm) 110631 SCREW, socket head 16Y168 GASKET, cover 16Y163 BRACKET, left, bead dispenser...
- Page 10 Parts 26D188 Parts 26D188 334146C...
- Page 11 Parts 26D188 Parts List 26D188 Ref. Part Description Qty. Ref. Part Description Qty. 16Y110 CLAMP, bead box 1 100664 SCREW, set, sch 16Y113 SPRING 104034 WASHER, plain 16Y162 BRACKET, right, bead dispenser 105324 SCREW, cap, hex hd 16Y163 BRACKET, left, bead dispenser 105327 NUT, hex 16Y168 GASKET, cover 106084 SCREW, mach, pnh...
- Page 12 Original instructions. This manual contains English. MM 334146 Graco Headquarters: Minneapolis International Offices: Belgium, China, Japan, Korea GRACO INC. AND SUBSIDIARIES • P.O. BOX 1441 • MINNEAPOLIS MN 55440-1441 • USA Copyright 2014, Graco Inc. All Graco manufacturing locations are registered to ISO 9001. www.graco.com...
Need help?
Do you have a question about the 17B587 and is the answer not in the manual?
Questions and answers