
Related Manuals for RabbitCore RCM2000 Series


Summary of Contents for RabbitCore RCM2000 Series
- Page 1 RabbitCore RCM2200 C-Programmable Module with Ethernet Getting Started Manual 019–0096 • 020208–E...
- Page 2 RabbitCore RCM2200 Getting Started Manual Part Number 019-0096 • 0020208–D • Printed in U.S.A. ©2001 Z-World Inc. • All rights reserved. Z-World reserves the right to make changes and improvements to its products without providing notice. Notice to Users Z-WORLD PRODUCTS ARE NOT AUTHORIZED FOR USE AS CRITICAL...
-
Page 3: Table Of Contents
Table of Contents Chapter 1: Introduction & Overview 1.1 RCM2200 Description ........................1 1.1.1 Physical & Electrical Specifications ................... 2 1.2 Development Software........................3 1.3 How to Use This Manual ........................3 1.3.1 Additional Product Information ....................3 1.3.2 Additional Reference Information ....................3 1.3.3 Using Online Documentation ...................... - Page 4 4.8 How to Set Up your Computer’s IP Address for Direct Connect ............. 31 4.9 Run the PINGME.C Demo........................ 32 4.10 Running More Demo Programs With Direct Connect ..............32 4.11 Where Do I Go From Here?......................33 Index Schematics RabbitCore RCM2200...
-
Page 5: Chapter 1: Introduction & Overview
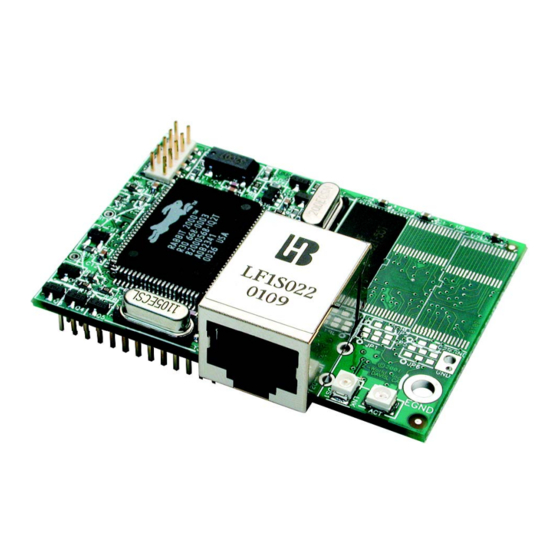
1. I & O NTRODUCTION VERVIEW The RCM2200 is an advanced module that incorporates the pow- erful Rabbit 2000 microprocessor, flash memory, static RAM, ™ digital I/O ports, and a 10Base-T Ethernet port, all on a PCB just half the size of a business card. 1.1 RCM2200 Description The RCM2200 is a small-footprint module designed for use on a motherboard that sup- plies power and interface to real-world I/O devices. -
Page 6: Physical & Electrical Specifications
In addition, a variant of the RCM2200 is available. The RCM2300 omits the Ethernet con- nectivity but offers a much smaller footprint, one-half the size of the RCM2200. Another RabbitCore module can be used to reprogram an RCM2200. This reprogramming (and debugging) can be done via the Internet using Z-World’s RabbitLink network pro- gramming gateway or with Ethernet-equipped RabbitCore RCM2100 and RCM2200 models using Dynamic C’s DeviceMate features. -
Page 7: Development Software
RCM2200 module to effective use. 1.3.1 Additional Product Information Detailed information about the RCM2200 will be found in the RabbitCore RCM2200 User’s Manual, provided on the accompanying CD-ROM in both HTML and Adobe PDF format. -
Page 8: Using Online Documentation
• If you do not have a suitable printer or do not want to print the manual yourself, most retail copy shops (e.g. Kinkos, AlphaGraphics, etc.) will print the manual from the PDF file and bind it for a reasonable charge—about what we would have to charge for a printed and bound manual. RabbitCore RCM2200... -
Page 9: Chapter 2: Hardware Setup
2. H ARDWARE ETUP This chapter describes the RCM2200 hardware in more detail, and explains how to set up and use the accompanying Prototyping Board. NOTE: This chapter (and this manual) assume that you have the RCM2200 Development Kit. If you purchased an RCM2200 module by itself, you will have to adapt the infor- mation in this chapter and elsewhere to your test and development setup. -
Page 10: Prototyping Board
Master Module Switch Switches Voltage Connectors Input Connectors Regulator Power User LEDs RS-232 Signal Header Battery Through-Hole SMT Prototyping Prototyping Area Area Vcc and GND Master Module Slave Module Buses Extension Headers Extension Headers Figure 2. RCM2200/RCM2300 Prototyping Board RabbitCore RCM2200... -
Page 11: Prototyping Board Features
2.2.1 Prototyping Board Features Power Connection —A 3-pin header is provided for connection to the power supply. • Note that it is symmetrical, with both outer pins connected to ground and the center pin connected to the raw V+ input. The cable of the wall transformer provided with the North American version of the development kit ends in a connector that is correctly connected in either orientation. -
Page 12: Prototyping Board Expansion
• Module Extension Headers RabbitCore modules are duplicated at these two sets of headers. Developers can solder wires directly into the appropriate holes, or, for more flexible development, 26-pin header strips can be soldered into place. See Figure 1 for the header pinouts. -
Page 13: Development Hardware Connections
2.3 Development Hardware Connections There are four steps to connecting the Prototyping Board for use with Dynamic C and the sample programs: 1. Attach the RCM2200 module to the Prototyping Board. 2. Connect the programming cable between the RCM2200 module and the workstation PC. 3. -
Page 14: Connect Programming Cable
PC. Make a note of the port to which you connect the cable, as Dynamic C needs to have this parameter configured when it is installed. Figure 5. Connect Programming Cable to RCM2200 NOTE: COM 1 is the default port used by Dynamic C. RabbitCore RCM2200... -
Page 15: Connect Ethernet Network Cable
Area Networks, but exceptional care should be used with IP address settings and all network-related programming and development. We recommend that development and debugging be done on a local network before connecting a RabbitCore system to the Internet. TIP: Checking and debugging the initial setup on a micro-LAN is recommended before connecting the system to a LAN or WAN. -
Page 16: Connect Power
To power down the Prototyping Board, unplug the power connector from J5. You should disconnect power before making any circuit adjustments in the prototyping area, changing any connections to the board, or removing the RabbitCore module from the board. RabbitCore RCM2200... -
Page 17: Where Do I Go From Here
1. Run all of the sample programs described in Section 3.4 to get a basic familiarity with Dynamic C and the RCM2200 module’s capabilities. 2. For further development, refer to the RabbitCore RCM2200 User’s Manual for details of the module’s hardware and software components. - Page 18 RabbitCore RCM2200...
-
Page 19: Chapter 3: Software Installation & Overview
3. S & O OFTWARE NSTALLATION VERVIEW To develop and debug programs for the RCM2200 (and for all other Z-World and Rabbit Semiconductor hardware), you must install and use Dynamic C. This chapter takes you through the installation of Dynamic C, and then provides a tour of its major features with respect to the RCM2200 module. -
Page 20: Hardware Requirements
• At least one free COM (serial) port for communication with the target systems • A 10Base-T Ethernet network interface port (optional if you will not be using the RCM2200’s Ethernet port) • A CD-ROM drive (for software installation) RabbitCore RCM2200... -
Page 21: Installing Dynamic C
3.2 Installing Dynamic C Insert the Dynamic C CD-ROM in the drive on your PC. If autorun is enabled, the CD installation will begin automatically. If autorun is disabled or the installation otherwise does not start, use the Windows menu or Windows Disk Explorer to launch from the root folder Start | Run SETUP.EXE... -
Page 22: Installation Type
(default). Compact Installation — Only Dynamic C will be installed. • Custom Installation — You will be allowed to choose which components are • installed. This choice is useful to install or reinstall just the documentation. RabbitCore RCM2200... -
Page 23: Select Com Port
3.2.3 Select COM Port Dynamic C uses a COM (serial) port to communicate with the target development system. The installation allows you to choose the COM port that will be used. The default selection, as shown in the example above, is COM1. You may select any avail- able port for Dynamic C’s use. -
Page 24: Starting Dynamic C
PC cannot handle the 115,200 bps baud rate. Try changing the baud rate to 57,600 bps as follows. • Locate the dialog in the Dynamic C Serial Options Options > Communications menu. Change the baud rate to 57,600 bps. RabbitCore RCM2200... -
Page 25: Sample Programs
To help familiarize you with the RCM2200 modules, Dynamic C includes several sample programs. Loading, executing and studying these programs will give you a solid hands-on overview of the RabbitCore’s capabilities, as well as a quick start with Dynamic C as an application development tool. - Page 26 RabbitCore RCM2200...
-
Page 27: Chapter 4: Using The Tcp/Ip Features
4. U TCP/IP F SING THE EATURES 4.1 TCP/IP Connections Before proceeding you will need to have the following items. • If you don’t have Ethernet access, you will need at least a 10Base-T Ethernet card (available from your favorite computer supplier) installed in a PC. •... -
Page 28: Running Tcp/Ip Sample Programs
A similar situation will take place if you use a dial-up line to send a packet to the Internet. Windows may try to send it via the local Ethernet network if it is also valid for that network. RabbitCore RCM2200... - Page 29 The following IP addresses are set aside for local networks and are not allowed on the Internet: 10.0.0.0 to 10.255.255.255, 172.16.0.0 to 172.31.255.255, and 192.168.0.0 to 192.168.255.255. The RCM2200 board uses a 10Base-T type of Ethernet connection, which is the most common scheme.
-
Page 30: Ip Addresses Explained
(216.102.126.0) is used to identify the local network. The highest address (216.102.126.255) is used as a broadcast address. Usually one other address is used for the address of the gateway out of the network. This leaves 256 - 3 = 253 available IP addresses for the example given. RabbitCore RCM2200... -
Page 31: How Ip Addresses Are Used
4.4 How IP Addresses are Used The actual hardware connection via an Ethernet uses Ethernet adapter addresses (also called MAC addresses.) These are 48-bit addresses and are unique for every Ethernet adapter manufactured. In order to send a packet to another computer, given the IP address of the other computer, it is first determined if the packet needs to be sent directly to the other computer or to the gateway. -
Page 32: Dynamically Assigned Internet Addresses
IP address is usually not guaranteed. If you are not concerned about accessing the RCM2200 from the Internet, you can place the RCM2200 on the internal network using a private address assigned either statically or through DHCP. RabbitCore RCM2200... -
Page 33: Placing Your Device On The Internet
4.6 Placing Your Device on the Internet In many corporate settings, users are isolated from the Internet by a firewall and/or a proxy server. These devices attempt to secure the company from unauthorized network traffic, and usually work by disallowing traffic that did not originate from inside the net- work. -
Page 34: How To Set Ip Addresses In The Sample Programs
// #define MY_GATEWAY "216.112.116.153" In this case, the gateway is not used and is commented out. The IP address of the board is defined to be 10.1.1.2. The IP address of you PC can be defined as 10.1.1.1. RabbitCore RCM2200... -
Page 35: How To Set Up Your Computer's Ip Address For Direct Connect
4.8 How to Set Up your Computer’s IP Address for Direct Connect When your computer is connected directly to the RCM2200 board via an Ethernet connec- tion, you need to assign an IP address to your computer. To assign the PC the address 10.1.1.1 with the subnetmask 255.255.255.248 under Windows 98, do the following. -
Page 36: Run The Pingme.c Demo
Run the Telnet program on your PC ( Start > Run telnet 10.1.1.2 ). Each character you type will be printed in Dynamic C’s window, indicating that the board is receiving the characters typed via TCP/IP. STDIO RabbitCore RCM2200... -
Page 37: Where Do I Go From Here
4.11 Where Do I Go From Here? NOTE: If you purchased your RCM2200 through a distributor or through a Z-World or Rabbit Semiconductor partner, contact the distributor or Z-World partner first for tech- nical support. If there are any problems at this point: •... - Page 38 RabbitCore RCM2200...
- Page 39 NDEX Prototyping Board ....6 expansion area ....8 additional information features features ......6, 7 online documentation ..4 Prototyping Board ... 6, 7 optional header JP1 ..... 8 references ......3 RCM2200 ......1 ounting RCM2200 ....9 C language ......
- Page 40 RabbitCore RCM2200...
-
Page 41: Schematics
CHEMATICS 090-0120 RCM2200 Schematic 090-0122 RCM2200 Prototyping Board Schematic 090-0128 Programming Cable Schematic Getting Started... - Page 42 REVISION HISTORY REVISION APPROVAL PROJECT APPROVAL DOCUMENT APPROVAL DESCRIPTION OF CHANGE DATE ENGINEER DATE CONTROL APPEND THE FOLLOWING DRAWING CONTENT: DOCUMENTS WHEN CHANGING THIS DOCUMENT: 2900 SPAFFORD ST. DAVIS, CA 95616 APPROVALS: INITIAL RELEASE 530 - 757-4616 SIGNATURES DATE NONE...
- Page 43 * * * * * * * * * * * * * * * * * * * * * * * * NONE...
- Page 44 REVISION HISTORY REVISION APPROVAL PROJECT APPROVAL DOCUMENT APPROVAL DESCRIPTION ENGINEER DATE CONTROL DATE APPEND THE FOLLOWING DRAWING CONTENT: DOCUMENTS WHEN CHANGING THIS DOCUMENT: 2900 SPAFFORD ST. DAVIS, CA 95616 APPROVALS: INITIAL RELEASE 530 - 757 - 4616 SIGNATURES DATE NONE...
- Page 45 REVISION HISTORY REVISION APPROVAL PROJECT APPROVAL DOCUMENT APPROVAL DESCRIPTION ENGINEER DATE CONTROL DATE APPEND THE FOLLOWING DRAWING CONTENT: DOCUMENTS WHEN CHANGING THIS DOCUMENT: WORLD 2900 SPAFFORD ST. DAVIS, CA 95616 APPROVALS: INITIAL RELEASE 530 - 757 - 4616 SIGNATURES DATE NONE...
Need help?
Do you have a question about the RCM2000 Series and is the answer not in the manual?
Questions and answers