Table of Contents
Advertisement
Advertisement
Table of Contents

Related Manuals for Vogue 310190


Summary of Contents for Vogue 310190
- Page 1 VOGUE Freestanding Oven with Induction Cooktop 900mm 310190 / 310191...
-
Page 2: Table Of Contents
Contents For your safety Safety of children and the infirmed Cleaning and maintenance During use Installation Service and spare parts Use and care Description of the appliance Oven & Accessories Controls How to use your hob How to use your oven Positioning the oven trays &... -
Page 3: For Your Safety
For your safety We recommend that you read the instructions in this owner’s manual carefully before use for the best performance and to extend the life of your appliance .It will provide you with all the informa- tion you need to ensure its safe installation, use and maintenance. Retain this owner’s manual for future reference. -
Page 4: During Use
For your safety During use When the appliance becomes hot, do not touch the surface of the hob. Care should be taken to • avoid touching heating elements inside the oven. To avoid burns and scalds, children should be kept away. WARNING: Accessible parts will become hot when in use. -
Page 5: Installation
For your safety A steam cleaner is not to be used. • CAUTION: The cooking process has to be supervised. A short term cooking process has to • be supervised continuously. WARNING: Unattended cooking on a hob with fat or oil can be dangerous and may result in •... - Page 6 For your safety Avoid the following Touching the appliance with wet parts of the body. • Using the appliance while barefoot. • Improper or dangerous operation. • Obstructing the ventilation or heat dissipation slots. • Allowing power supply cables of other appliances to come into contact with hot parts of the oven. •...
-
Page 7: Service And Spare Parts
For your safety Service and spare parts If the appliance fails to operate correctly, never attempt to repair the appliance yourself. Repairs • by unskilled persons may cause damage and accidents. First refer to the contents of this manual. If you do not find the necessary information, contact your nearest Service Center. Servicing work on this appliance must be carried out by Authorised Personnel. -
Page 8: Description Of The Appliance
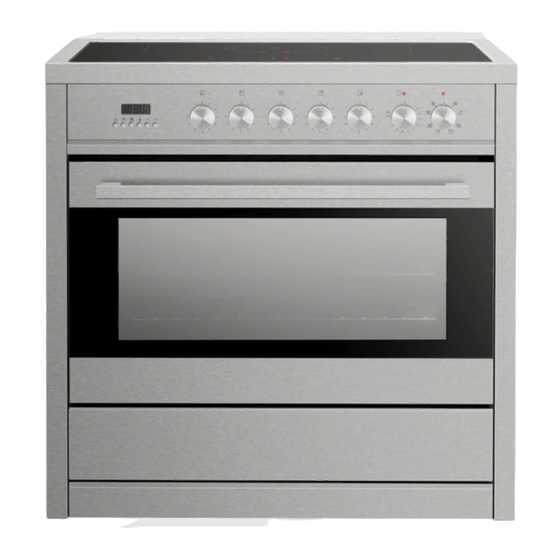
For your safety Description of the appliance 1. Hob 2. Timer 3. Control knob (cooktop burners) 4. Cooking temperature selection knob Cooking mode selection knob 5. Oven Door 6. Storage Drawer A. Induction heating element: 1800W B. Induction heating element: 2300W... -
Page 9: Oven & Accessories
Use and Care Oven & accessories The oven is supplied with chrome wire Shelf Supports and a range of shelf options as shown below. There are four shelf positions on the oven. Grill Tray with removable insert Oven Shelf Shelf Supports Oven Door... -
Page 10: Controls
Use and Care Controls Control Knob (Cooktop Burners) -
Page 11: How To Use Your Hob
Use and Care HOW TO USE YOUR HOB Before first Use Before cooking for the first time the ceramic glass has to be cleaned. Remove any removable labels and protective sheeting. Place a saucepan of water on each of the front hotplates and switch them on high for at least 30 minutes. - Page 12 Use and Care Switching On a Cooking zone After having switched on the control, a cooking zone may be switched on in two different ways: 1. With the corresponding plus key beginning with [1]. Short activation leads to an increase of the power setting code by one step. Long activation increases the value up to the limit ([9]).
- Page 13 Use and Care Automatic Heat-Up Function Each cooking zone is provided with an automatic heat‐up function, i.e. for a defined time the cooking zone will be operated with nominal power. When this heat‐up time has passed, the power will be reduced automatically to the prior selected power setting.
- Page 14 Use and Care Desscription of symbols Front left Rear left Centre Rear right Front right Sigle cooking zones Turn the control knob to the desired position (low to high). Adjustment is continuous so the cooking zone will operate at any intermediate knob setting between low & high. Once the cooking zone is hot, the LED corresponding to the zone illuminates.
- Page 15 Use and Care Note: You can turn the knob in clockwise direction to any position of the setting you select. The residual heat warning lamp remains illuminated when the temperature of the ceramic glass surface is hot and it will switch off once the surface temperature has cooled. Practical cooking advice For best results and energy saving, only use pans suitable for electric cooking: The bottom of the pan must be very thick and perfectly flat;...
-
Page 16: How To Use Your Oven
Use and Care How to use your oven This multi-function oven combines the advantages of traditional convection ovens with modern fan assisted ovens in a single appliance. It is an extremely versatile appliance that allows you to choose easily and safely between different cooking modes. The various cooking modes are selected by means of a cooking mode selection knob, located on the control panel. -
Page 17: Positioning The Oven Trays & Shelves
Use and Care Positioning the oven trays & shelves The Baking Tray, Grill Tray or Oven Shelf can be located in any of the five height positions. Refer to the ‘Cooking mode table’ for the recommended shelf position. When fitting the trays or shelves, ensure they are fitted between the two wires that are closest together as shown below. -
Page 18: Cooking Modes
Use and Care COOKING MODES Convection mode When set to convection mode, the top and bottom heating elements operate together like a ‘normal’ conventional oven that you have probably used before. Convection mode is best suited for traditional baking and roasting And you should only used one shelf at a time, otherwise the heat distribution will be uneven. - Page 19 Use and Care COOKING MODES Convection mode When set to convection mode, the top and bottom heating elements operate together like a ‘normal’ conventional oven that you have probably used before. Convection mode is best suited for traditional baking and roasting And you should only used one shelf at a time, otherwise the heat distribution will be uneven.
- Page 20 Use and Care Fan assisted grill mode Select 'Fan Assisted Grill' mode with cooking mode selection knob and turn cooking temperature selection knob to the desired temperature setting. When set to Fan Assisted Grill mode, the top inner element and the fan operate .This mode increases the circulation of air throughout the oven, which helps prevent food from burning on the surface, allowing the heat to penetrate right into the food.
-
Page 21: 6-Button Digital Clock
Use and Care 6 BUTTON DIGITAL CLOCK This model has a digital display, 24hr clock with 6 control buttons. When the power is connected, the screen displays 3 flashing numbers and 'AUTO'. Adjusting the digital clock To set the correct time , press the button first, then + or - button to advance forward or backward until the correct time is display. - Page 22 Use and Care After the above setting, the current time is displayed and 'AUTO' will flash, indicating that the automatic cooking feature is set. When the clock displays 13:15, the oven will start cooking automatically. While cooking, 'AUTO' and will flash. When the clock displays 14:00, the oven automatically stops cooking.
- Page 23 Use and Care Timer The digital countdown timer can be set up to 23 hours and 59 minutes maximum. To set the timer, press the button and the + or – button until the desired time is displayed once the button is released, the current time and is displayed.
-
Page 24: Practical Cooking Advice
Use and Care PRACTICAL COOKING ADVISE The oven offers a wide range of settings which allow you to cook any type of food in the best possible way. With time you will learn to make the best use of this versatile cooking appliance and the following directions are only a guideline which may be varied according to your own personal experience. -
Page 25: Using The Grill
Use and Care Using the grill This multi-function oven has 2 different grilling modes. Use the 'Grill' mode with the oven door closed, place the food on the centre of the grill pan, insert and fit the grill pan on either the 3rd or 4th shelf from the bottom. Note: only the central part of the top heating element operates for grilling. - Page 26 Use and Care Baking cakes When baking cakes, always place them in a preheated oven. Make sure you wait until the oven has been preheated thoroughly (the indicator light will turn off). To prevent heat loss and the cake from dropping, do not open the oven door during baking. In general…...
- Page 27 Use and Care Cooking pizza For best results when cooking pizza: Preheat the oven for at least 10 minutes. • Use a light aluminum pizza pan, placing into the shelf supplied with the oven. Don’ t use the • dripping pan since this will extend the cooking time, making it difficult to get a crispy crust. Do not open the oven door frequently while the pizza is cooking.
-
Page 28: Oven Cleaning & Maintenance
Use and Care Oven cleaning and maintenance Before cleaning your oven or performing maintenance, make sure that the cooking mode selection knob and the cooking temperature selection knob is set to 'OFF'. To extend the life of your oven, it must be cleaned frequently. - Page 29 Use and Care HOW TO REMOVE THE OVEN DOORS For a more thorough clean, you can remove and disassemble the oven door following the procedure below: 1. Open the door to the full extent. 2. Open the lever (A) completely on both hinges. 3.
- Page 30 Use and Care Replacing the oven lamps WARNING: Ensure that the appliance is switched off before replacing the lamp to avoid the possibility of the electric shock. Remove the glass cover of the lamp-holder as shown below. Remove the lamp and replace with a lamp resistant to high temperatures (300°C) with the following characteristics: Voltage: 220-240V Wattage: 25W...
-
Page 31: Disposal
Use and Care Service and parts Before leaving the factory, this appliance was tested and adjusted by specialist skilled staff to give the best operating results. Any subsequent necessary repairs or adjustments must be carried out with the greatest of care and attention by authorised personnel. For this reason, we strongly advise you contact the Authorised Service Center, specifying the nature of the problem, the model of the equipment and the serial number. -
Page 32: Installation
Installation Technical data... -
Page 33: Instructions For Installation
Installation Instructions for installation This appliance shall be installed only by authorised persons and in accordance with the manufacturer’s installation instructions, local regulations, municipal building codes, electrical wiring regulations, and any other statutory regulations. IMPORTANT: Installation, assembly and gas/electrical connections must be carried out by authorised personnel. -
Page 34: Dimensions
Installation Dimensions 750min 150min Combustible Surfaces Any adjoining wall surface must be 150mm minimum distance from the appliance. Make sure there is a minimum of 650mm between the hob and any shelf , Rangehood or exhaust fan that may be installed directly above the hob. Zero clearance is permitted on the Side and rear adjoining surfaces below the maintop. -
Page 35: Anti-Tilting Chain
Installation Anti-tilting chain The cooker is supplied with two chains which are connected to the rear left and right of the appliance. The chains should be connected to the wall directly behind the chains as low as possible to prevent the appliance from tilting forward. If the appliance is installed between two cupboards, drill a hole on each side of the cupboards, pass the Chains through the holes and anchor the chains within each cupboard. -
Page 36: Electrical Connection
Installation Electrical connection The appliance is usually supplied fitted with a power cord. The supply cable should be positioned so that it does not reach a temperature of more than 750℃ along its entire length. Connect the cable directly to the mains, connection to the electricity supply must be made by an authorised person in accordance with the Wiring Rules. -
Page 37: Single Phase Using Copper Links
Installation Single phase using copper links: Wiring: Two power cord & Two circuit break. One for induction cooktop and the other for oven separately. Warning: The coarseness of the power cord must comply with the coarseness marked in the picture. - Page 38 Installation Things to prepare: Cooper link Wiring terminal Phillips screwdriver Operation steps: Step 1: Loosen the screws corresponding to L1 and L2 with a screwdriver. Step 2: Put the copper links on and tighten the screws. Note: The torque of the screw is about 3N / M. the actual torque shall be determined according to the actual situation.
- Page 39 Installation Step 3: Repeat steps 1 and 2 to install the second copper links. Appearance after installation. Warning: Do not use 5 hot plates at the same time.
- Page 40 Installation Circuit Diagram Hob1 Hob3 Hob5 Hob2 Hob4 Power and Driver Power and Power and Terminal block Driver Driver appliance housing 7 x Lead wire Flexible Conduit Control panel Kitchen Socket 1 Kitchen Socket 2 For induction hob For oven 380-415V 3N~ 220-240V Oven...
Need help?
Do you have a question about the 310190 and is the answer not in the manual?
Questions and answers