Table of Contents
Advertisement
INSTALLATION
INSTRUCTIONS
USER GUIDE
VOGUE Freestanding Oven with Gas Cooktop 500mm
310115 / 310116
To prevent the risk of accidents or damage to the appliance, it is essential
o t
e r
a
d
h t
e
e s
n i
t s
u r
t c
o i
n
s
b
e
o f
e r
t i
s i
n i
t s
l a
e l
d
a
n
d
u
e s
d
f
r o
h t
e
r i f
t s
i t
m
e
Advertisement
Table of Contents

Subscribe to Our Youtube Channel
Related Manuals for Vogue 310115


Summary of Contents for Vogue 310115
- Page 1 INSTALLATION INSTRUCTIONS USER GUIDE VOGUE Freestanding Oven with Gas Cooktop 500mm 310115 / 310116 To prevent the risk of accidents or damage to the appliance, it is essential r i f...
- Page 2 You’ll soon be enjoying your new Freestanding Cooker It all begins here, with your instructions. Don’t worry, there’s nothing too technical coming up. Just simple, step-by-step guidance to get you up and running quickly. Sound good? Then let’s get started.
-
Page 3: Table Of Contents
Contents Safety information SAFETY INFORMATION Getting to know your Freestanding Cooker Overview Accessories Installing your Freestanding Cooker Installation requirements Electrical connection Using your Freestanding Cooker Control panel Oven functions General oven and cooking tips Practical Cooking Advice How to use your oven Care and maintenance Cleaning Replacing the oven lamps... -
Page 4: Safety Information
SAFETY INFORMATION IMPORTANT Please read these instructions fully before installing or operating. INSTALLATION WARNINGS IMPORTANT: This product MUST be installed by a qualified Gas Safe registered installer in accordance with local regulations. Particular attention should be given to the ventilation requirements. - Page 5 SAFETY INFORMATION CAUTION: Using gas cooking appliances results in the production of heat, moisture and the products of combustion. Ensure that the room where your cooker is installed is well ventilated particularly while the cooker is in use. Keep natural ventilation holes open or install a mechanical ventilation device (extractor hood) Prolonged intensive use of your cooker may call for additional ventilation (by opening a window) or by increasing the level of mechanical ventilation where present.
- Page 6 SAFETY INFORMATION GENERAL SAFETY WARNINGS IMPORTANT: This appliance has been designed for non-professional, domestic use only. Do not use this oven for commercial use or any other application e.g room heating. WARNING: Danger of fire: do not store flammable items on or near the cooking surfaces or inside the oven.
- Page 7 SAFETY INFORMATION CLEANING AND MAINTENANCE IMPORTANT: Always turn the appliance off before operations such as cleaning or maintenance. You can do this by switching the freestanding cooker off using the cooker isolation switch. IMPORTANT: Do not remove the control knobs to clean the control panel. WARNING: Do not use harsh abrasive cleaners or sharp metal scrapers to clean the oven door glass since they can scratch the surface, which may result in shattering of the glass.
-
Page 8: Getting To Know Your Freestanding Cooker
Getting to know your Freestanding Cooker Ready? Let’s begin... Please read these instructions carefully. They contain important information which will help you get the best from your freestanding cooker and ensure safe and correct installation and operation. If you require any further assistance, our technical experts are happy to help. For full details, refer to the product support section at the end of these instructions. -
Page 9: Overview
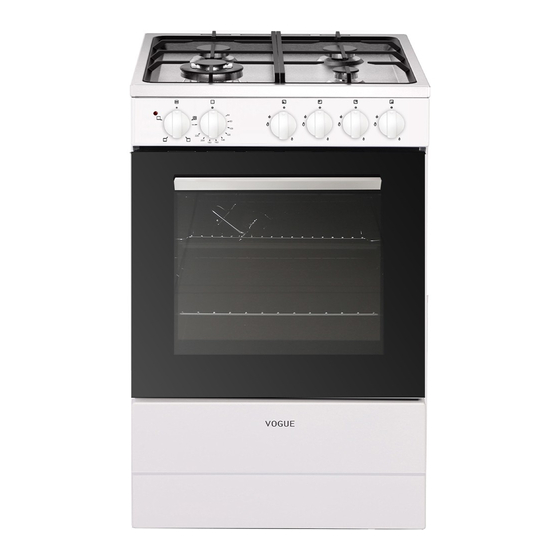
Getting to know your Freestanding Cooker Overview 900mm 600mm 1. Gas burners 2. Cast Iron Trivets 3. Control Panel 4. Oven Door... -
Page 10: Accessories
Getting to know your Freestanding Cooker Accessories 1. Baking tray x 1 2. Grill insert x 1 3. Grill pan handle x 1 4. Chrome shelves x 2... -
Page 11: Installing Your Freestanding Cooker
Installing your Freestanding Cooker Installation requirements THIS COOKER MUST BE INSTALLED ACCORDING TO BS 6172: 2010 BY A SUITABLY QUALIFIED GAS SAFE REGISTERED INSTALLER. IMPORTANT: CONTACT AN AUTHORISED SERVICE AGENT FOR INSTALLATION OF YOUR FREESTANDING COOKER! Data Label The Data Label is located on the rear of the appliance.This appliance is suitable for Natural Gas and Universal LPG;... - Page 12 Installing your Freestanding Cooker Installation of Cooker This modern cooker was manufactured with parts and materials of the highest quality and was designed to meet your cooking needs. You should read this manual so that you are able to use the cooker correctly and to avoid any potential problems with using the cooker.
- Page 13 Installing your Freestanding Cooker Environment where your appliance will be installed Your cooker must be set up and used in a place where it will always have ventilation. While operating, this appliance needs 2m³/h air per kw input. There must be enough natural ventilation to provide the gas to be used in the environment. The average air flow must directly come in through ventilation from the outside.
- Page 14 Installing your Freestanding Cooker Gas Connection IMPORTANT - All Gas installations must be carried out by a suitably qualified person. For information on choosing a gas installer contact the ‘Gas Safe Register’. www.gassaferegister.co.uk The appliance can be placed close to other furniture on condition that the furniture’s height does not exceed the height of the cooker panel.
- Page 15 Installing your Freestanding Cooker Gas Conversion (NG to U-LPG) Converting to a different gas type. CONVERSION TO A DIFFERENT GAS TYPE MUST BE CARRIED OUT BY A SUITABLY QUALIFIED GAS SAFE REGISTERED INSTALLER Changing the jets 1. Remove pan supports, burner heads and caps. 2.
- Page 16 Installing your Freestanding Cooker Levelling feet The height and level of the appliance can be adjusted by rotating the feet located underneath the appliance at each corner. Rotate the feet to decrease or increase the height. Safety chain The appliance must be secured against the possibility of tipping forward by using the supplied safety chains attached to the rear of your oven.
-
Page 17: Electrical Connection
Installing your Freestanding Cooker Electrical connection IMPORTANT: Electrical connections must be carried out by a suitably qualified person and in accordance with all relevant local building and installation regulations. Fitting on a Power Supply Cable Connecting appropriate power supply terminal board/ connector block: Using a screwdriver, prize open tabs of the Terminal board cover. - Page 18 Installing your Freestanding Cooker The supply cable should be positioned so that it does not reach a temperature of more than 50℃ with respect to the room temperature, anywhere along its length. Before switching fuse ON in meter-box check: Earth continuity. The electrical safety of this appliance can only be guaranteed if the cooker is correctly installed and earthed, in compliance with regulations on electrical installations.
-
Page 19: Control Panel
Installing your Freestanding Cooker Control panel Oven Function Control Knob Sets mode for oven. Oven Temperature Control Knob Sets temperature for oven. Gas Hob Control Knob Adjusts the flame of the hobs. -
Page 20: Oven Functions
Using your Freestanding Cooker Oven functions Grill The top central heating elements comes on .The extremely high and direct temperature of the grill makes it possible to brown the surface of meats and roasts while locking the juices in to keep them tender. - Page 21 Using your Freestanding Cooker Using your appliance for the first time The first time you use your appliance, we recommend that you set the temperature setting to the highest mark. Set the function switch control knob to a cooking mode and leave the oven on for about 40-60 minutes with nothing in it and the oven door shut.
-
Page 22: General Oven And Cooking Tips
Using your Freestanding Cooker The oven light Set cooking mode selection knob to symbol to switch on the oven light/s. The oven lights stay on when the oven is operating. General oven and cooking tips The wire shelves should always be pushed firmly to the back of the oven. Baking trays with food cooking on them should be placed level with the front edge of the oven’s wire shelves. -
Page 23: Practical Cooking Advice
Using your Freestanding Cooker Practical Cooking Advice The oven offers a wide range of alternatives which allow you to cook any type of food in the best possible way. With time you will learn to make the best use of this versatile cooking appliance and the following directions are only a guideline which may be varied according to your own personal experience. - Page 24 Using your Freestanding Cooker Use a lower temperature setting. It is not necessary to remove the food from all the racks at the same time. Cooking Fish and Meat When cooking white meat ,fowl and fish, use temperature setting from 180℃ to 200℃. For red meat that should be well done on the outside while tender and juicy in the inside, it is a good idea to start with a high temperature setting (200℃-220℃) for a short tim eth,en turn the oven down afterwards.
- Page 25 Using your Freestanding Cooker Controls Gas Burner Components Control knob (Hob top Burners) Instructions for use (hob top burners) The symbols on the control knobs mean the following: These parts can be removed for cleaning periodically. After cleaning, they must be well No gas flow or “...
-
Page 26: How To Use Your Oven
Using your Freestanding Cooker To light the hob burners To light the burner, press the control knob fully down and hold the knob down before rotating anti clockwise to the High Flame position. The ignition device is integrated into the control knob and is automatically activated by pushing down on the control knob. - Page 27 Using your Freestanding Cooker The first time you use your appliance, we recommend that you set the thermostat to the highest setting, set the cooking mode selection knob to a cooking mode and leave the oven on for about half an hour with nothing in it and the oven door shut. Then, open the oven door and allow the oven to cool.
-
Page 28: Care And Maintenance
Care and maintenance Cleaning WARNING! Isolate the power supply to the appliance and make sure that the cooker is cool. Before cleaning your cooker or performing maintenance, make sure that the cooking mode selection knob and the cooking temperature selection knob is set to ‘OFF’. To extend the life of your cooker, it must be cleaned frequently. -
Page 29: Replacing The Oven Lamps
Care and maintenance Replacing the oven lamps Disconnect the oven from the power supply at the fuse-box by means of the switch used to connect the appliance to the electrical mains ;or unplug the appliance. Remove the glass cover of the lamp-holder by rotating anti-clockwise. Remove the lamp and replace with a lamp resistant to high temperatures (300℃) with the following characteristics: Voltage: 220-240V... - Page 30 Care and maintenance Removing the Inner Pane of Glass Double oven door: Remove the seal “G” by unscrew the no.2 bolts (Fig.5) Gently pull out the inner pane of glass (Fig.6) Clean the glass with an appropriate cleaner. Dry thoroughly, and place on a soft surface. Now you can also clean the inside of the outer glass.
-
Page 31: Technical Data
Technical Data Technical specification Voltage and frequency 220-240V AC , 50-60Hz Total oven power consumption 2220-2640W oven usable capacity Natural Gas Universal LPG 2kPa 2.9kPa Burner Type Injector Nominal Gas Injector Nominal Gas (mm) (mm) Consumption Consumption Auxiliary 0.72 3.6MJ/h x 1 0.50 3.6MJ/h x 1 Semi-rapid... -
Page 32: Product Support Troubleshooting
Product support Troubleshooting If you have a problem with your appliance, check the troubleshooting table below to try and rectify your problem before calling your product support service centre. Problem Possible Cause Solution Only parts of the cooker Links may be missing in Refer to the Quick Start work it may be that the ovens the rear connector box... -
Page 33: Declaration Of Conformance To Product Standards
Product support Declaration of conformance to product standards This appliance conforms to all relavant standards applicable to domestic appliances sold in the NZ. Disposal This appliance/fitting is marked according to the European directive 2012/19/EU on Waste Electrical and Electronic Equipment (WEEE). By ensuring this product is disposed of correctly, you will help prevent potential negative consequences for the environment and human health, which could otherwise be caused by inappropriate waste handling of this product.
Need help?
Do you have a question about the 310115 and is the answer not in the manual?
Questions and answers