Table of Contents
Advertisement
Advertisement
Table of Contents

Subscribe to Our Youtube Channel
Related Manuals for Vogue 310120


Summary of Contents for Vogue 310120
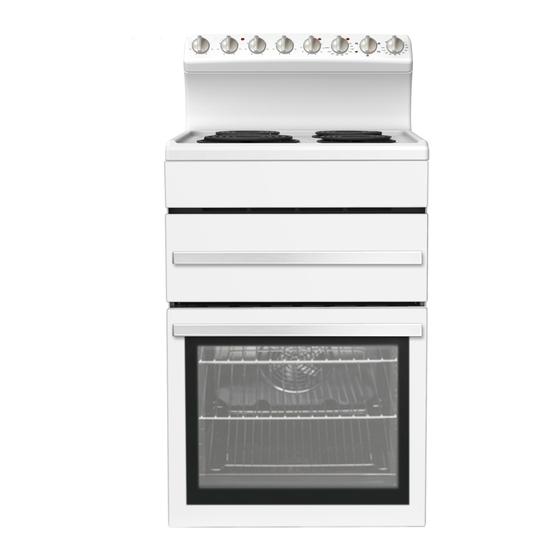
- Page 1 INSTALLATION INSTRUCTIONS USER GUIDE VOGUE Freestanding Oven / 540mm / Cooktop / Ceramic 310120 310121 To prevent the risk of accidents or damage to the appliance, it is essential to read these instructions before it is installed and used for the first time...
-
Page 2: Table Of Contents
Contents Conditions of use .........................3 Safety precautions ........................3 Other important safety information ....................3 Warnings for use of grill, oven, and appliance hob ..............4 Disposal of packaging .......................4 Installation, cleaning and servicing ...................5 Product description ........................6 First time use of the appliance ....................9 Using the oven ...........................10 Using the grill ..........................14 Using the hotplates of your cooker ..................15... -
Page 3: Conditions Of Use
We recommend that you read the instructions in this Manual carefully before use for the best performance and to extend the life of your appliance, as it will provide you with all the instructions you require to ensure its safe installation, use and maintenance. -
Page 4: Other Important Safety Information
Other important safety information According to the electrical safety regulations This appliance must not be used as a space the appliance equipment must be properly heater. earthed. Do not obstruct the ventilation slots on front Do not use corrosive cleaners e.g. oven or back of appliance. -
Page 5: Installation, Cleaning And Servicing
Installation, cleaning and servicing • An authorised person must install this appliance. • DO NOT use abravise type cleaner or caustic soda- (Certificate of Compliance to be retained). based cleaners. Using warm soapy water after the appliance has cooled somewhat, followed by a dry •... -
Page 6: Product Description
Product description (Rear Control Models) Description of cooker with separate grill and rear controls 1. Hob - (Solid, coil and ceramic) 2. Heat shield (coil element models only) 3. Grill door 4. Oven shelf (2 supplied) 5. Enamelled oven baking tray (1 supplied) 6. - Page 7 FREESTANDING OVEN 54CM HOTPLATE FREESTANDING OVEN 54CM CERAMIC...
-
Page 8: First Time Use Of The Appliance
: First time use of the appliance Preparing your appliance for the first Fitting oven shelves time • Ensure shelf orientation is correct (refer picture). • Please wipe out the oven interior prior to operation • The shelf has a safety bar fitted to reduce the risk with warm soapy water and polish dry with a soft of dishes sliding off the shelf, this is the rear of the clean cloth. -
Page 9: Using The Oven
Using the oven Oven safety warnings Fan Assisted Grill “ ” • Always follow the instructions for putting the shelves The upper heating element and the fan come on. and side racks into the oven, to avoid accidents. Suitable for grilling food without turning over and using •... - Page 10 Using the oven 3) Set Cooking Time 120 Minute Ringer Timer with “Oven ON/OFF” • Operating oven without Timer - Turn knob counterclockwise to “ ” symbol. The oven will operate with use of the timer function. • Operating oven using the Timer - To set the timer, simply turn the knob clockwise to the required number of minutes.
- Page 11 Using the oven Oven cooking guide The following cooking guide is intended as a rough guide only. You may be required to set oven 10-20 degrees above or below this guide to get the result you want. Also adjustments may be needed to the cooking time to suit personal expectations.
- Page 12 Using the oven Problem Causes What to do Incorrect shelf position Select shelf that puts food in centre of oven Oven tray too large Remove oven tray. Use smaller trays or dishes Uneven cooking Trays not in centre Put trays in centre Oven fan causing uneven browning or small Rotate food during cooking, or use Conventional cakes to lean over...
-
Page 13: Using The Grill
Using the grill • Always turn off the grill immediately after you have Using the grill finished cooking and pull drawer out or remove • Ensure grill wire rack is turned over to ‘high’ position grill tray otherwise fat left in the tray in the hot grill in the enamel grill tray for toast, food less than compartment will continue to smoke or could catch 20mm thick, or turned over to ‘low’... - Page 14 Using the hotplates of your cooker Hotplates safety warnings Using the hotplates of your electric cooker • DO NOT use pots and pans which are unsteady, as these could overbalance. Check the hotplates on your cooker against the diagrams below before you use your cooker for the first •...
-
Page 15: Using The Hotplates Of Your Cooker
Using the hotplates of your cooker Solid hotplates Ceramic hotplates • The strong solid-cast hotplates give wide contact • DO NOT use the cook top if the glass is cracked. for fast, efficient cooking. Contact the service department immediately to have this repaired. - Page 16 Fitting oven accessories and cleaning Safety warnings about cleaning Ceramic hotplates • Always make sure that the cooker is turned off before cleaning. • Always clean cooker immediately after use. • Use of steam cleaners is prohibited to clean this applaince.
- Page 17 Fitting oven accessories and cleaning Cleaning the oven door / How to remove the oven doors For a more thorough clean, you can remove and disassemble the oven door. Proceed as follows: • Open the door to the full extent (fig. 1) •...
-
Page 18: Fitting Oven Accessories And Cleaning
Fitting oven accessories and cleaning Replacing the Oven Lamp • Disconnect the oven from the power supply at the fuse-box by means of the switch used to connect the appliance to the electrical mains or unplug the appliance if a gas model. •... -
Page 19: Solving Problems
Solving Problems If you have a problem with your appliance, check the table below before calling service. You may be able to avoid a service call by and avoid unnecessary inconvenience and expense. For cooking problems, refer to Handling Baking Problems. Problem Causes What to do... -
Page 20: Installing Cooker - Power Connections
Installing cooker – power connections Fitting on a Power Supply Cable WARNING: Installtion MUST ONLY be carried out by a qualified approved installer, ie. an Electrician. Connecting appropriate power supply ` terminal boar d/ connector block: NOTE: REFER to TECHNICAL tables at the rear of this manual for correct rating for your corresponding model purchased. -
Page 21: Installing Your New Cooker
Installing your new cooker Safety warnings about installation Unpacking and installation Instructions for Installer • The cooker MUST BE installed and serviced only by an authorised person. Unpacking • A certificate of compliance must be supplied by • Please check the product and make sure that there installer and is to be kept by the customer. - Page 22 Installing your new cooker Locating the cooker Study the diagrams below to be sure of the dimensions required to locate the cooker safely. Make sure that the top of the cooker is at least 10mm higher than the level of the bench tops. Unscrew leveling legs by about 10mm to give clearance to the anti-tilt floor bracket.
- Page 23 Installing your new cooker Installation Sequence • Determine position of cooker and ant-tilt plate. • • Slide the cooker into the anti-tilt plate to double check. And then slide out the cooker. • Connect electricity supply but do not turn on until installation is completed. •...
-
Page 24: Technical Specifications
Technical specifications Model Coil element model oven capacity (L) grill capacity (L) voltage (v) 220-240 frequency (Hz) 50/60 circuit breaker (A) (10170W) 42.38 Amp oven power (W) 1990-2370 grill power (W) 1500-1800 hob power (W) Max 6000 product dimension (mm) 540*630*1140 package size (mm) 650*750*1200...
Need help?
Do you have a question about the 310120 and is the answer not in the manual?
Questions and answers