Table of Contents
Advertisement
Quick Links
JNSGyro-2T
Operator's Manual
© Copyright Javad Navigation Systems, Inc.
September, 2006
All contents in this manual are copyrighted by JNS. All rights reserved.
The information contained herein may not be used, accessed, copied,
stored, displayed, sold, modified, published, or distributed, or otherwise
reproduced without express written consent from JNS.
Advertisement
Table of Contents

Subscribe to Our Youtube Channel
Related Manuals for Javad JNSGyro-2T


Summary of Contents for Javad JNSGyro-2T
- Page 1 JNSGyro-2T Operator’s Manual © Copyright Javad Navigation Systems, Inc. September, 2006 All contents in this manual are copyrighted by JNS. All rights reserved. The information contained herein may not be used, accessed, copied, stored, displayed, sold, modified, published, or distributed, or otherwise...
-
Page 3: Table Of Contents
Conclusion ........18 JNSGyro-2T Overview ....... . .19 JNSGyro-2T Accessory Kit . - Page 4 Chapter 2. Configuration ......25 Powering the JNSGyro-2T ......26 Power supply requirements .
- Page 5 Things to Check First ........65 JNSGyro-2T Problems ....... . .66 Obtaining Technical Support .
- Page 6 Warranty Terms ........77 6 JNSGyro-2T Operator’s Manual...
- Page 7 IST OF IGURES JNSGyro-2T ..............15 Front Panel ..............22 Back Panel ..............22 Powering JNSGyro-2T ..........27 PCView Main Window ..........28 RS-232 Connection Parameters ........29 PCView Connection Established ........29 Configuration->Receiver ..........30 Receiver Configuration ..........31 Receiver Configuration –...
- Page 8 L I S T O F F I G U R E S Floader Main Screen ............ 62 Set Device Type ............62 Program Tab Settings ........... 63 Power Connector ............73 RS-232C Connector ............. 74 8 JNSGyro-2T Operator’s Manual www.javad.com...
-
Page 9: Preface
(the “Manual”) have been prepared by Javad Navigation Systems, Inc. (“JNS”) for owners of JNS products. It is designed to assist owners with the use of the JNSGyro-2T and its use is subject to these terms and conditions (the “Terms and Conditions”). - Page 10 Terms or Conditions. You agree to destroy the Software and manual upon termination of your use of the JNSGyro-2T. All ownership, copyright and other intellectual property rights in and to the Software belong to JNS. If these license terms are not acceptable, return any unused software and manual.
-
Page 11: Regulatory Information
Conditions (including the Software license, warranty and limitation of lia- bility). SAFETY – Improper use of the JNSGyro-2T can lead to injury to persons or property and/or malfunction of the product. The JNSGyro-2T should only be repaired by authorized JNS warranty service centers. Users should review and heed the safety warnings in “Safety Warnings”... -
Page 12: Canadian Emissions Labeling Requirements
This Class B digital apparatus meets all requirements of the Canadian Interfer- ence-Causing Equipment Regulations. Cet appareil numérique de la classe B respecte toutes les exigences du Régle- ment sur le matériel brouilleur du Canada. 12 JNSGyro-2T Operator’s Manual www.javad.com... -
Page 13: Weee Directive
Supplementary information that can have an affect on system operation, system performance, measurements, or personal safety. CAUTION: Notification that an action has the potential to adversely affect system operation, system perfor- mance, data integrity, or personal health. www.javad.com JNSGyro-2T Operator’s Manual 13... -
Page 14: Screen Captures
This manual includes sample screen captures. Your actual screen can look slightly different from the sample screen due to the receiver you have connected, operating system used and settings you have specified. This is normal and not a cause for concern. 14 JNSGyro-2T Operator’s Manual www.javad.com... -
Page 15: Chapter 1. Introduction
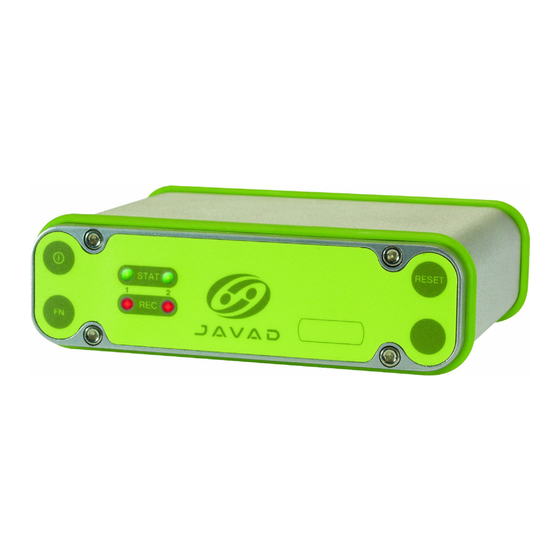
Figure 1-1. JNSGyro-2T The JNSGyro-2T can receive and process L1 and L2 signal. The GNSS component of JNSGyro-2T means you can access both the GPS (Global Positioning System) satellites of the United States, and the GLONASS (Global... -
Page 16: Principles Of Operation
(satellite positions as a function of time), to ensure the satellites transmit data properly. • User – The community and military that use GPS/GLONASS receivers and the corresponding satellites to calculate positions. 16 JNSGyro-2T Operator’s Manual www.javad.com... -
Page 17: Calculating Positions
–The more satellites in view, the stronger the signal, the lower the DOP number, providing more accurate positioning. • Availability – The availability of satellites affects the calculation of valid positions. The more visible satellites available, the more valid and www.javad.com JNSGyro-2T Operator’s Manual 17... -
Page 18: Conclusion
GNSS users can use JNS GNSS receivers to collect data from a network of satellites and control stations to triangulate precise points anywhere on Earth. This overview simply outlines the basics of GPS and GLONASS position- ing. For detailed information, visit the JNS website (http://www.javad.com). 18 JNSGyro-2T Operator’s Manual www.javad.com... -
Page 19: Jnsgyro-2T Overview
(carrier and code phases) are measured. In addition, broadcast navigation data are retrieved from the navigation frame. After the JNSGyro-2T boards lock on to four or more satellites, it is possible to solve the so-called “absolute positioning problem” and compute the JNSGyro- 2T boards’... -
Page 20: Software
Software and software manuals are also available on the JNS website (http:/ /www.javad.com). The following software will also be useful for operating, caring for and using your JNSGyro-2T system, and may be required for some applications. • FLoader – JNS's firmware loader; available on the JNS website. Literature JNSGyro-2T literature, including manuals and other product information are available on the JNS website (http://www.javad.com):... -
Page 21: Getting To Know Your Jnsgyro-2T
Getting to Know Your JNSGyro-2T Getting to Know Your JNSGyro-2T JNSGyro-2T is 49 mm high, 159 mm wide, and 169 mm deep, and weighs ~ 0.950 kg. The casing allocates space for two Euro cards. These cards are the GPS receivers. The JNSGyro-2T has two end panels for user interface. For JNSGyro-2T specifications, see Appendix A on page 69. -
Page 22: Front Panel
Figure 1-2 shows the JNSGyro-2T’s front panel components: MinPad Figure 1-2. Front Panel • MinPad – The simple user interface for the JNSGyro-2T. The MinPad consists of three keys and up to four three-color LEDs. See “Using Min- Pad” on page 45 for detailed description. -
Page 23: Option Authorization File (Oaf)
JNSGyro-2T’s boards according to particular needs, thus only purchasing those options needed. Typically, all JNSGyro-2T boards ship with a temporary OAF that allows the system to be used for a predetermined period. When the JNSGyro-2T is purchased, new OAFs activate desired, purchased options permanently. - Page 24 Notes: 24 JNSGyro-2T Operator’s Manual www.javad.com...
-
Page 25: Chapter 2. Configuration
ONFIGURATION This chapter discusses how to configure the JNSGyro-2T. Chapter Tip: Before you can use your JNSGyro-2T, you need to: Power your JNSGyro-2T. See “Powering the JNSGyro-2T” on page 26. Configure the various parts of your JNSGyro-2T. See: • “Connecting the JNSGyro-2T and a Computer” on page 27, •... -
Page 26: Powering The Jnsgyro-2T
Do not operate the supply if it has received a sharp blow, been dropped, or otherwise damaged. Do not disassemble the supply. 26 JNSGyro-2T Operator’s Manual www.javad.com... -
Page 27: Turning On/Off The Jnsgyro-2T
C O N F I G U R A T I O N Connecting the JNSGyro-2T and a Computer On the back panel of the JNSGyro-2T, there is the power connector, marked PWR. Connect an appropriate cable to this connector to power your unit. -
Page 28: Establishing An Rs232 Cable Connection
(usually COM1) to the unit’s serial port 1A (for the first board), or 1C (for the second board). 2. Press the power buttons on the JNSGyro-2T and computer to turn them 3. Continue with steps, described in “Establishing a PCView Connection”... - Page 29 C O N F I G U R A T I O N Connecting the JNSGyro-2T and a Computer On the Connection Parameters dialog box, select the following parame- ters and click Connect (Figure 2-3): –Set the Connection mode (Direct).
-
Page 30: Jnsgyro-2T Configuration
JNSGyro-2T Configuration PCView is JNS's receiver and board configuration software, used to configure the boards of the JNSGyro-2T unit. Any settings made using PCView will be saved in the unit's memory, and will be reflected when you use the MinPad. The full range of PCView configuration and function is outside the scope of this manual. -
Page 31: Receiver Configuration
Click the MinPad tab, configure the following settings, and click Apply (Figure 2-7 on page 32). • Set the Recording interval in seconds. • Set the Elevation mask for Log file in degrees. • Enter the File name prefix. www.javad.com JNSGyro-2T Operator’s Manual 31... -
Page 32: Receiver Configuration - Minpad Tab
Click the Advanced tab on the Receiver Configuration screen and then click the Multipath Reduction subtab. Enable the following boxes, and click Apply (Figure 2-8 on page 33): • Code multipath reduction • Carrier multipath reduction 32 JNSGyro-2T Operator’s Manual www.javad.com... -
Page 33: Advanced Configuration - Multipath Reduction
Click the Loop Management tab, enable the following boxes, and click Apply (Figure 2-9): • Enable Common Tracking • Static Mode (used for static receivers only, disable if using the receiver as a Rover) Figure 2-9. Advanced Configuration – Loop Management www.javad.com JNSGyro-2T Operator’s Manual 33... -
Page 34: Minpad Configuration
Repeat these steps with other boards. Once the JNSGyro-2T’s boards are configured, the configuration will remain until you change it either using PCView or clearing the boards NVRAM. MinPad Configuration... -
Page 35: Connection Parameters - Rts/Cts Handshaking
Use PCView to configure MinPad settings. Refer to the PCView Software Man- ual for all possible MinPad configurations. Connect selected board of your JNSGyro-2T and computer. See “Connecting the JNSGyro-2T and a Computer” on page 27 for this procedure. Start PCView. -
Page 36: Receiver Configuration - Minpad Tab
This parameter specifies what prefix will be added to the names of the board files created when pressing FN. The prefix can be up to 20 characters long. The default value is log. Log file names have the following structure: 36 JNSGyro-2T Operator’s Manual www.javad.com... - Page 37 • Files (total) - a counter that specifies how many multiple log files must be created in AFRM until this mode automatically turns off. This counter decrements on every file rotation until it value becomes zero, then file rotation automatically stops. The counter initializes with AFRM. www.javad.com JNSGyro-2T Operator’s Manual 37...
- Page 38 The default value is off (disabled). FN Key Mode parameter You use these two radio buttons to program how the JNSGyro-2T will react when pressing the FN key. • LED blink mode switch - pressing FN will toggle between the MinPad's normal/extended information modes and start/stop data recording of Static measuring.
- Page 39 (to a newly created or an existing file) in the following three cases: • After pressing the Power key to turn on the unit. • After resetting the unit (with PCView or the Reset key). www.javad.com JNSGyro-2T Operator’s Manual 39...
-
Page 40: Collecting Almanacs
Non-Volatile Random Access Memory (NVRAM). Set up the JNSGyro-2T (connect the external antennas if needed) in a location with a clear view of the sky. Turn on the JNSGyro-2T. Wait for about 15 minutes while the unit collects almanac data from satellites. Notice: If 15 minutes have passed and the JNSGyro-2T does not lock on to satellites, you may need to clear the NVRAM. -
Page 41: Chapter 3. Setup And Measuring
ETUP AND EASURING Chapter Tip: To set up your JNSGyro-2T system, configure the JNSGyro-2T boards as described in Chapter 2 “Configuration”. How to Work with JNSGyro-2T Real-Time Heading The heading mode is a part of the standard firmware and is activated by commands. - Page 42 S E T U P A N D M E A S U R I N G How to Work with JNSGyro-2T set,pos/elm,10 set,raw/corr/ca/code,normal set,raw/corr/ca/carrier,normal set,raw/clp/loops,off set,raw/msint,200 set,pos/msint,200 set,cmr/base/motion,kinematic set,dev/ser/b/rate,115200 set,dev/ser/b/rtscts,off dm,dev/ser/b em,/dev/ser/b,cmr{/10:0.2,/0:0.2,/1:0.2}2) 2. For Rover: set,rover/mode/,off set,base/mode/,off set,pos/elm,10 set,raw/corr/ca/code,normal...
- Page 43 S E T U P A N D M E A S U R I N G How to Work with JNSGyro-2T The command %HD_USELEN%set,hd/uselen,on says the rover to use the known distance between antennas. If this set to off:...
- Page 44 S E T U P A N D M E A S U R I N G How to Work with JNSGyro-2T set,pos/elm,10 set,raw/corr/ca/code,normal set,raw/corr/ca/carrier,normal set,raw/clp/loops,off set,raw/msint,200 set,pos/msint,200 set,dev/ser/c/rate,9600 set,dev/ser/c/rtscts,off set,dev/ser/c/imode,cmr set,pos/pd/dyn,1 set,pos/pd/aflevel,medium set,pos/pd/mode,delay set,pos/mode/cur,pd set,pos/pd/period,0.2 set,cmr/base/motion,kinematic set,dev/ser/b/rate,115200 set,dev/ser/b/rtscts,off dm,dev/ser/b em,/dev/ser/b,cmr{/10:0.2,/0:0.2,/1:0.2}...
-
Page 45: Chapter 4. Operation
Pressing the power button turns the JNSGyro-2T on and off. Status LEDs • When the JNSGyro-2T is on and no satellites are tracked, the STAT LED of each board will blink red. • When satellites are tracked, the STAT LED will produce one blink for each tracked satellite (green for GPS, orange for GLONASS). -
Page 46: Reset Key
REC LED is red (during the next three seconds). Pressing the FN key for more than eight seconds has no impact. • After loading new firmware or clearing the board’s NVRAM, the board checks its internal file system. 46 JNSGyro-2T Operator’s Manual www.javad.com... - Page 47 Release to start recording (Kinematic or Static post- Green processing occupation mode). Pressed for 5–8 seconds Release to turn serial port A baud rate to 9600 bps. Pressed for > 8 seconds No light No function. www.javad.com JNSGyro-2T Operator’s Manual 47...
- Page 48 No light Release to stop data recording. Pressed for 5–8 seconds Release to turn serial port A baud rate to 9600 bps. Pressed for > 8 seconds No light No function (data recording still on). 48 JNSGyro-2T Operator’s Manual www.javad.com...
-
Page 49: Information Modes
O P E R A T I O N Using MinPad Information Modes The JNSGyro-2T system has two information modes: Normal and Extended Information Mode (EIM). Normal In normal mode, the STAT LED of each board indicates the number of tracked satellites and the position's computation status. -
Page 50: Downloading Files To A Computer
1. To switch to EIM, press and quickly release (within one second) the FN key on the MinPad. 2. Watch for the delimiter double-blink. With good JNSGyro-2T, antenna, and observation conditions, all blinks should be green within 15 minutes of powering on. -
Page 51: Connection Parameters - Rts/Cts Handshaking
Figure 4-2. Connection Parameters – RTS/CTS Handshaking Click File->File Manager (Figure 4-3). Figure 4-3. File->File Manager Click the Download path tab on the File Manager dialog box (Figure 4-4) Figure 4-4. Find Files to Download www.javad.com JNSGyro-2T Operator’s Manual 51... -
Page 52: Download Files
Figure 4-5. Download Files Click the Download button. During the download, status indicators display next to each file (Figure 4-6). • Blue indicator – file in queue for downloading. • Red indicator – file currently downloading. 52 JNSGyro-2T Operator’s Manual www.javad.com... -
Page 53: Deleting Files
Continue with other operations. Or, click File->Disconnect, then File->Exit to quit PCView. Deleting Files Use the following steps to delete files from your JNSGyro-2T’s boards. Connect your JNSGyro-2T and computer. See “Connecting the JNSGyro-2T and a Computer” on page 27 for this procedure. -
Page 54: Managing Jnsgyro-2T Memory
PCView. Managing JNSGyro-2T Memory When using the JNSGyro-2T in static or dynamic applications, you may need to know the amount of memory the boards’ log file occupies. The specific memory size depends on the type of data being recorded. Use the formulas below to compute the approximate size of the boards’... -
Page 55: Checking An Oaf
Tip: For a complete list of options and their details, visit the JNS website. You can check the status of your JNSGyro-2T boards’ options, and load new OAFs, using the RS232 cable, a computer, and PCView. Refer to the PCView Software Manual for a more complete description of the PCView software. -
Page 56: Option Manager
• yes or no – the option is either enabled or disabled. Figure 4-9. Option Manager When finished, click Exit on the Option Manager screen, and then click File->Disconnect to prevent conflicts with serial port management. 56 JNSGyro-2T Operator’s Manual www.javad.com... -
Page 57: Loading Oafs
O P E R A T I O N Loading OAFs Loading OAFs Javad Navigation Systems dealers provide customers with OAF files. For any OAF related questions, E-mail JNS at options@javad.com. Please have your board ID number available (see “Checking Firmware Version” on page 59). -
Page 58: Clearing The Nvram
NVRAM using PCView. Using PCView to Clear NVRAM Notice: Because the JNSGyro-2T system consists of more than one receiver boards, NVRAM clearing procedure using PCView should be perform with every board. 1. Connect your JNSGyro-2T and computer. See “Connecting the JNSGyro-2T and a Computer”... -
Page 59: Using Gril To Clear Nvram
NVRAM clearing procedure using GRIL command should be perform with every board. 1. Connect the selected serial port of JNSGyro-2T and a computer as described in “Connecting the JNSGyro-2T and a Computer” on page 2. Press the power key to turn on the JNSGyro-2T. -
Page 60: About Pcview
JNS or your dealer: • Receiver model • Receiver IDs • Firmware version When finished, click OK, and then click File->Disconnect to prevent conflicts with serial port management. Repeat these steps with other board. 60 JNSGyro-2T Operator’s Manual www.javad.com... -
Page 61: Loading New Firmware
Loading New Firmware Loading New Firmware All JNSGyro-2T boards (one by one) must be loaded with the same firmware version. Use the latest firmware version, available for download from the JNS website (http://www.javad.com), to ensure your boards have the most recent updates. - Page 62 (usually 115200). Select the Device tab and set the Device Type as Receiver (Figure 4-15). Figure 4-15. Set Device Type Click Get from Device for device information (Figure 4-15). 62 JNSGyro-2T Operator’s Manual www.javad.com...
- Page 63 Reselect the correct file. Click File->Exit. Clear the board’s NVRAM (see “Clearing the NVRAM” on page 58) and update the almanac after loading new firmware. Repeat all these steps with other JNSGyro-2T board. www.javad.com JNSGyro-2T Operator’s Manual 63...
- Page 64 Notes: 64 JNSGyro-2T Operator’s Manual www.javad.com...
-
Page 65: Chapter 5. Troubleshooting
ROUBLESHOOTING In general, as long as you follow the maintenance and safety instructions pro- vided in this manual, you should have few problems with your JNSGyro-2T system. This chapter will help you diagnose and solve some common, minor problems you may encounter with your JNSGyro-2T system. -
Page 66: Jnsgyro-2T Problems
PCView. Click Configuration->Receiver->Ports. Change the Input for the serial port used for connection to Command. Problem The JNSGyro-2T boards do not lock on to satellites for a long period of time. Causes Solutions The boards store an old almanac. Update the almanac. - Page 67 Rover receivers. Connect your receiver and a computer and start PCView. See “Connecting the JNSGyro-2T and a Computer” on page 27. Click Configuration->Receiver->Ports and set the same input/ output format for both receivers. The specified link rate is not compatible Change the link rate to that which your modem supports.
-
Page 68: Obtaining Technical Support
If in doubt which e-mail address to use for your particular question, please send it to support@javad.com. Website The Javad Navigation Systems website provides current information about JNS's line of products. The support area of the website provides access to fre- quently asked questions, configuration procedures, manuals, etc. -
Page 69: Specifications
The dual frequency code and carrier data from two antennas are processed to determine the three orientation angles and three- dimensional position up to 20 times per second. The JNSGyro-2T can also be operated in RTK or DGPS mode from an external base station to provide highly accurate position and velocity. -
Page 70: General Details
A P P E N D I X Specifications General Details Table A-1 table lists the receiver’s general specifications. Table A-1. JNSGyro-2T General Specifications Physical Enclosure Aluminum extrusion, rainproof Color JNS Green and Black Dimensions 49 x159 x169 mm Weight 0.95 kg... - Page 71 A P P E N D I X Specifications Table A-1. JNSGyro-2T General Specifications (Continued) Data Features Up to 20 Hz update rate for real time position and raw data (code and carrier) 10cm code phase and 0.1mm carrier phase precision RTCM SC104 version 2.1, 2.2, 2.3, and 3.0...
-
Page 72: Gps Board Details
Code and carrier from L1 and L2 of GPS PPS Output Number of PPS ports Edge Rise, Fall Period 10 to 1000000000 ms Offset -500000000 to 500000000 msec Reference time GPS, GLONASS, UTC (USNO), UTC (SU) Event Marker Number of event Marker ports 72 JNSGyro-2T Operator’s Manual www.javad.com... -
Page 73: Connector Specifications
Tuesday at GPS midnight. Refer to JNS's web- site for more information and specific Cinderella day dates. Connector Specifications This sections list JNSGyro-2T connector details. Power Connector The power connector (Figure A-1) is a sealed receptacle, 5 pin, ODU p/n G80F1C-T05QF00-0000. -
Page 74: Serial Rs-232C Connector
Signal Name Details RF input from LNA, 100 mA ANT_IN at 5.0 volts DC output EVENT and 1PPS Connectors The EVENT and 1PPS connectors are coaxial female receptacles of BNC series, Kings Electronics part number KC-79-108. 74 JNSGyro-2T Operator’s Manual www.javad.com... - Page 75 PPENDIX Safety Warnings General Warnings WARNING: The JNSGyro-2T is designed for measuring and measuring related uses (i.e., measuring coordinates, distances, angles and depths). This product should never be used: – Without the user thoroughly understanding this manual. – After disabling safety systems or altering the product.
- Page 76 The owner should periodically test this product to ensure it provides accurate measurements. CAUTION: Inform JNS immediately if this product does not func- tion properly. CAUTION: Only allow authorized JNS warranty service centers to service or repair this product. 76 JNSGyro-2T Operator’s Manual www.javad.com...
- Page 77 1. The warranty against defects in JNS battery, charger, or cable is 90 days. www.javad.com JNSGyro-2T Operator’s Manual 77...
- Page 78 1731 Technology Drive, San Jose, CA 95110 USA Phone: +1(408)573-8100 Fax: +1(408)573-9100 www.javad.com JNSGyro-2T Operator’s Manual Rev 1.1 09/06 ©2006 Javad Navigation Systems All rights reserved. No unauthorized duplication...
Need help?
Do you have a question about the JNSGyro-2T and is the answer not in the manual?
Questions and answers