
Related Manuals for Abus eyseo TV7220


Summary of Contents for Abus eyseo TV7220
- Page 1 Progressive Scan CCD network camera Installation instructions Version 1.2 TV7220 - TV7223...
-
Page 2: Preface
Preface Dear Customer, Thank you for purchasing this network camera of the Eyseo series from ABUS Security-Center. You made the right decision in choosing this state-of-the-art technology, which complies with the current standards of domestic and European regulations. The CE has been proven and all related certifications are available from the manufacturer upon request. -
Page 3: Before Using This Product
Before using this product The use of surveillance equipment may be forbidden by law in some countries. This network camera is not only high-quality web camera but can also be used as part of a flexible surveillance system. Before using this equipment, make sure that all your surveillance activities are completely legal. Before installation, check the product for completeness (page 5: Scope of delivery). -
Page 4: Table Of Contents
Contents Preface ..............................2 Precautions ...............................2 Before using this product ..........................3 Contents ..............................4 Scope of delivery ............................5 Hardware installation ..........................6 Consult your dealer for the correct installation of peripheral devices............6 External connections ........................7 Connections at the rear side .................... 7 I/O-connector ........................ -
Page 5: Scope Of Delivery
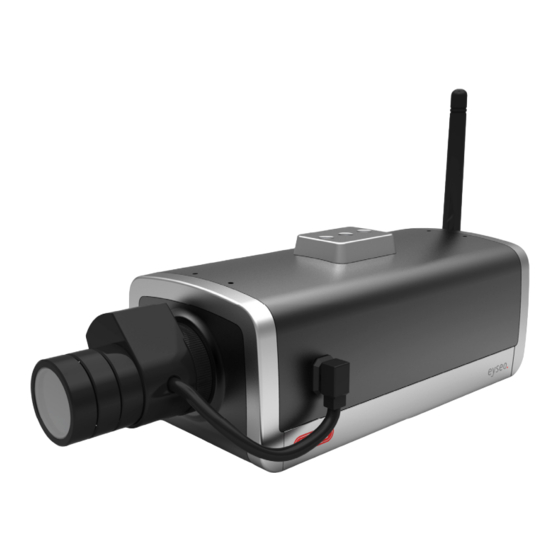
Scope of delivery Network camera TV7220/TV7221/TV7222/TV7223 Lens Antenna (only TV7221/23) Transformer Camera stand Software CD Installation instructions (on CD) -
Page 6: Hardware Installation
Hardware installation Make sure that all accessories and articles listed above are present in the scope of delivery. Depending on application, an Ethernet cable may be required. This Ethernet cable must meet the specifications of UTP Category 5 (CAT 5) and must not be longer than 100 meters. -
Page 7: External Connections
External connections Connections at the rear side Audio output Switch: internal / Antenna external Microphone 12VDC Audio input Ethernet connector I/O-Port Reset button I/O-connector 1 : not used 2 : not used 3 : not used 4 : not used 5 : Ground 6 : Digital input 7 : Digital output... -
Page 8: First Access To Network Camera
First access to network camera The first access to the network camera should be done by using the Installation Wizard 2. After the startup of this tool the wizard will search for any connected Eyseo network camera or videoserver. The Standard IP address of the videoserver is 169.254.0.99. If there is a DHCP server running on the network then the IP address assignment will be done automatically, regarding your network stucture. -
Page 9: Access To The Network Camera Via The Internet Explorer
Access to the network camera via the Internet Explorer Defining a password to prevent unauthorised access When delivered, no administrator password is defined for the network camera. The network camera asks for this number at the start of operation. For security reasons, the administrator should define a new password immediately. -
Page 10: Changing The Administrator Password
Changing the administrator password Click “Configuration” and then “Security”. Under “Root password”, enter the administrator password and confirm it under Confirm password. Click The new administrator password is saved. Click “HOME” in the column on the left to exit configuration. -
Page 11: Installing The Plug-In
Installing the plug-in When you first access the network camera under Windows, the web browser may ask for the installation of a new plug-in for the network camera. This query depends on the Internet security settings of your PC. If the highest security level is set, the PC will refuse any installation and any attempt at execution. -
Page 12: Basic User Functions
Basic user functions Main window and camera view The view of the main page consists of two parts: Configuration: You can configure the camera with these steps. Camera view: Camera video stream Click the configuration link on the left of the picture to open the configuration page. Language: Selection for the GUI language of the camera. -
Page 13: Digital Zoom And Snapshot
Digital Zoom and Snapshot Click the magnifying glass under camera view. The control field for digital zooming appears. Disable the Disable Digital Zoom box and change the zoom factor with the slider. Click “Snapshot”. The web browser displays a new window containing the snapshot. To save the snapshot, either left-click it and then click the diskette icon or right-click it and select Save from the context menu. -
Page 14: Client Settings
Client Settings When you first access the Connection Type page under Windows, the web browser asks for the installation of a new plug-in. This plug-in was registered at certification and can be used to change parameters on the Client settings page. To install the plug-in, click . - Page 15 The selection of the client is normally recommended in the following order: UDP – TCP – HTTP. When the network camera has been successfully connected, the “Protocol Options” box shows the selected protocol. The selected protocol is registered in your PC and used for the next connection. After changing the network environment or if you want to search again for the network camera using the web browser, select the UDP protocol manually, save it and then return to “HOME”...
-
Page 16: Administrator Settings
Administrator settings Configuration / video and audio Best performance is produced by the maximum frame rate with best video quality and minimum network bandwidth. The three factors “Max frame rate”, “Constant bit rate” and “Fixed quality” on the video configuration page are interrelated. Mobile access to the network camera Many modern mobile telephones support access to MPEG4 videostream and GSM-AMR audio data. -
Page 17: Protecting The Network Camera With A Password
For higher-quality pictures For best video quality, set “Fixed quality” to “Detailled” or “Excellent” and the “Max frame rate” so that it corresponds to the bandwidth of your network. If your network is slow and you get “broken” images, go to the TCP protocol under Connection Type and select a more suitable transmission mode. Pictures can also be affected by a time delay due to a slower connection. -
Page 18: Setting Up A Surveillance Application
For detailed information, see “System configuration”. Updating the software version You can download the latest software from the website www.abus-sc.com. A user-friendly update wizard is provided for updating the network camera software (Installation Wizard / Upgrade). Only the administrator can start the update function. To update the system: 1. -
Page 19: System Configuration
System configuration Only the administrator has access to system configuration. The following sections explain each element in the left column. Specific tasks on the Options page are printed bold. The administrator can enter the URL under the picture to jump direct to the pictures page of the configuration. <URL>http://”Network Camera”/setup/config.html <Network Camera>... -
Page 20: System
System „Host name“ The text represents the title of the homepage. „Turn off the LED indicator“ Select this option to switch off the LED on the front of the camera. This prevents other persons knowing that the camera is in use. „Keep current date and time“...
Need help?
Do you have a question about the eyseo TV7220 and is the answer not in the manual?
Questions and answers