Table of Contents
Advertisement
Available languages
Available languages
Quick Links
Advertisement
Table of Contents

Related Manuals for Ibiza sound DJM103USB


Summary of Contents for Ibiza sound DJM103USB
- Page 1 USER GUIDE DJM103USB INSTRUCTIONS ©Copyright Lotronic 2009...
- Page 2 - GB - ©Copyright Lotronic 2009...
-
Page 3: For Your Attention
For Your Attention Importance: 1) Read manual ---Please read through safety and operating instruction carefully before using this unit. 2) Keep manual ---Please keep this manual for future reference. 3) Attach importance to warning and note ---Please operate it according warning and bote of manual. 4) Do it according what the manual indicates ---Do it according to instruction of manual. -
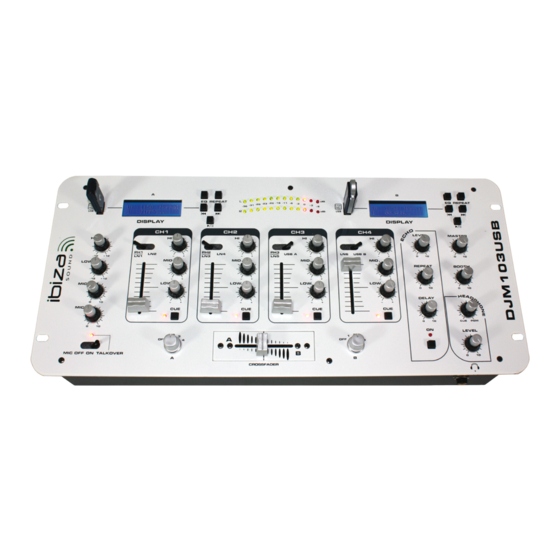
Page 4: Front Panel
Not On Use: Allow for sufficient heat dispersion when installed on a rack. 1) Handle the power cord carefully. Hold the plug when unplugging the cord. 2) Keep the set free from moisture,water and dust. 3) Unplug the power cord when not using the set for long periods of time. 4) Do not obstruct the ventilation holes.(For sets with ventilation holes.) 5) Do not let foreign objects in the set. - Page 5 Used to increase or lower the MIDS of the input channel. 10) BASS CONTROL Used to increase or lower the LOWS of the input channel. 11) CHANNEL CUE Use it to monitor the selected audio input source. 12) CHANNEL ASSIGN SELECTOR Let you select the input source to be mixed by the crossfader control.
- Page 6 Rear Panel: 31)MIC 1 INPUT JACK Microphones with a 1/4” connector can be connected to these input terminals. 32)MIC 2 INPUT JACK Microphones with a 1/4” connector can be connected to these input terminals. 33) INPUT SELECTOR Set these swithches based on what is plugged into Phono/ Line input jacks. 34) LINE INPUTS Let you connect most high-level audio source, such as CD players, tape deck, tuner or VCR.
-
Page 7: Specifications
Specifications: Input Sensitivity/ Impedance MIC 1-2---------------------------------------------------------------------------------------------------1.5mV/ 2.2K Ohms, bal/unbal Phono 1-3---------------------------------------------------------------------------------------------------------------3.0mV/ 47K Ohms Line 1-6------------------------------------------------------------------------------------------------------------------150 mV/27K Ohms Output Level Amp---------------------------------------------------------------------------------------------------------------------------1.0V/600 Ohms Booth-------------------------------------------------------------------------------------------------------------------------1.0V/600 Ohms Record---------------------------------------------------------------------------------------------------------------------300Mv/600 Ohms Frequency Response-----------------------------------------------------------------------------------------------20Hz-20kHz +/-1 dB S/N Ratio ( at 1 kHz) MIC -------------------------------------------------------------------------------------------------------------------->65 dB/ 1.5mV input Phono ----------------------------------------------------------------------------------------------------------------->60 dB/ 3.0mV input Line ------------------------------------------------------------------------------------------------------------------->70 dB/ 150mV input Distortion... -
Page 8: Notes Importantes
- F - Consignes de Sécurité Lire le mode d’emploi avant la première mise en service du produit. Conserver le mode d’emploi pour référence ultérieure. Suivez toutes les instructions imprimées sur l’appareil afin de garantir une utilisation correcte. NE PAS OUVRIR LE BOITIER. IL NE CONTIENT AUCUNE PIECE REMPLACABLE PAR L’UTILISATEUR. - Page 9 7) Ne pas placer l’appareil sur un chariot, un support, un tabouret ou une table instable. L’appareil peut tomber et provoquer des blessures et des dommages. Utilisez l’appareil uniquement avec un chariot, support, tabouret ou table recommandé par le fabricant et vendu avec l’appareil. 8) Lorsque l’appareil est installé...
- Page 10 Règle les basses fréquences du son du microphone. 3) MIC 1 LEVEL CONTROL Contrôle de niveau du microphone 1. 4) MIC 2 LEVEL CONTROL Contrôle de niveau du microphone 2. 5) MIC OFF ON TALK OVER En position ON, le niveau de toutes les autres sources baisse, lorsque le microphone est utilisé 6) SELECTEUR DU CANAL D’ENTREE Sélectionnez la source d’entrée pour chaque canal.
- Page 11 A chaque pression sur cette touche, le fonctionnement bascule entre lecture et pause. 32)|<< PREVIOUS Appuyez pour redémarrer le titre ou sélectionner le titre précédent 33)>>| NEXT Appuyez pour sélectionner le titre suivant 34) EQ Vous pouvez choisir entre NORM, POP, CLASSIC ou ROCK. 30) REPEAT Appuyer pour répéter un titre ou tous les titres.
- Page 12 Ligne 1-6 ..........................150 mV/27K Ohms Niveau de sortie Amplificateur ..........................1.0V/600 Ohms Booth............................1.0V/600 Ohms Record .............................300Mv/600 Ohms Bande passante ........................20Hz-20kHz +/-1 dB Rapport S/B (à 1 kHz) MICRO ..........................>65 dB/ entrée 1.5mV Phono ..........................>60 dB/ entrée 3.0mV Line ..........................
-
Page 13: Wichtige Hinweise
Hinweise: Die Netzsteckdosen müssen der benötigten Versorgungsspannung entsprechen. Die Netzspannung muss der auf der Rückseite des Geräts angegebenen Spannung entsprechen. Das Gerät nicht benutzen, wenn das Netzkabel beschädigt ist. Das Gerät vor Spritzwasser schützen. Keine mit Wasser gefüllten Gegenstände wie Vasen, Flaschen usw. aufs Gerät stellen. - Page 14 11) Nicht das Netzkabel betreten oder quetschen. 12) Vor dem Reinigen den Netzstecker abziehen. 13) Das Gerät nur mit einem feuchten Tuch abwischen. Kein Wasser ins Gehäuse dringen lassen. 14) Bei längerem Nichtgebrauch den Netzstecker abziehen. 15) Das Gerät muss von einem Techniker überprüft werden, wenn: das Netzkabel oder die –schnur beschädigt sind;...
- Page 15 10) BASS REGLER Verstärkt oder mindert die TIEFEN Töne des Eingangskanals 11) KANALVORHÖREN (CHANNEL CUE) Hören Sie die gewählte Audioeingangsquelle 12) ASSIGN SCHALTER Weist dem Crossfader eine Eingangsquelle zu, die gemixt wird. 13) CROSSFADER Blendet zwischen den Eingangsquellen um, die Kanal A und B zugewiesen wurden 14) ECHO ON/OFF Ein- und Ausschalten der Echo Funktion 15) ECHO DELAY REGLER...
- Page 16 Rückseite : 31) MIC 1 EINGANGSBUCHSE Für ein Mikrofon mit 6,35mm Klinkenstecker 32) MIC 2 EINGANGSBUCHSE Für ein Mikrofon mit 6,35mm Klinkenstecker 33) EINGANGSWAHLSCHALTER Stellen Sie diesen Schalter auf das Gerät ein, das an die Phono/Line Eingangsbuchsen angeschlossen ist. 34) LINE EINGÄNGE Zum Anschluss einer hochpegeligen Audioquelle wie CD Spieler, Recorder, Tuner of Videorecorder 35) RECORD AUSGANGSBUCHSEN Zum Anschluss des Mischpults an ein Aufnahmegerät...
- Page 17 Line ........................... >70 dB/ 150mV Eingang Distorsion MIKRO ...............................0.3% Phono................................0.5% Line ................................0.1% MIKROFON-Klangregler Treble ............................10kHz; +12/-12dB Mitten ............................1kHz; +12/-12dB Bässe ............................100Hz; +12/-12dB KANAL-Klangregler Treble ............................10kHz; +12/-12dB Mitten ............................1kHz; +12/-12dB Bässe ............................100Hz; +12/-12dB Talkover (Übersprechdämpfung) ......................... 15dB Echo Delay............................
- Page 18 Waarschuwingen : Elke installatie, manipulatie of wijziging anders dan deze vermeld in de gebruiksaanwijzing kunnen gevaarlijke stralingen teweegbrengen. Iedere reparatie moet door een gekwalificeerde technieker uitgevoerd worden. Gebruik enkel vervangstukken die op alle vlakken overeenstemmen met de originele stukken. Nota : Kies aan de hand van de schakelaar achteraan het toestel, de spanning die overeenstemt met uw sectorspanning.
- Page 19 Voorkant 1) MIC TREBLE Regelt de hoge frequenties van het microfoongeluid. 2) MIC BASS Regelt de lage frequenties van het microfoongeluid. 3) MIC 1 LEVEL CONTROL Niveaucontrole van de Microfoon 1. 4) MIC 2 LEVEL CONTROL Niveaucontrole van de Microfoon 2. 5) MIC OFF ON TALK OVER Op de ON positie, daalt het niveau van alle andere bronnen, indien een microfoon gebruikt wordt.
- Page 20 15) CONTROLE VAN DE VERTRAGING VAN DE ECHO Regelt de duur van de temporisering van de echo 16) HERHALING VAN DE ECHO Regelt de duur waarin de echo herhaald wordt 17) NIVEAU VAN DE ECHO Controleert de diepte van het echo-effect 18) CONTROLE VAN HET MASTERNIVEAU Regelt het algemene niveau (MASTER) van het mengpaneel 19) CONTROLE VAN HET BOOTH NIVEAU...
- Page 21 33) INGANGSSELECTOR Regel deze selectoren in functie van de uitrusting dat aangesloten is op de ingangsfiches Phone/Lijn 34) LIJNINGANGEN Sluit een hoge niveau bron, zoals een CD speler, cassettespeler, tuner of videorecorder aan 35) UITGANGSFICHE VAN DE OPNAME Sluit een mengpaneel op de recorder aan 36) BOOTH OUTPUT JACKS Sluit een mengpaneel aan op een tweede recorder of een versterker die de luidsprekers in de cabine van de DJ of een ander lokaal op afstand voedt...
- Page 22 Lage tonen ..........................100Hz; +12/-12dB Atenuatie Talk over............................15dB Temporisatie van de echo ....................... 50ms-120ms Uitgangspanning van de koptelefoon ..................30mW @32 Ohms Voeding ............................AC230V, 50Hz Verbruikte spanning ............................. 20W Electric products must not be put into household waste. Please bring them to a recycling centre. Ask your local authorities or your dealer about the way to proceed.
Need help?
Do you have a question about the DJM103USB and is the answer not in the manual?
Questions and answers