
Related Manuals for TECPEL DTM-322


Summary of Contents for TECPEL DTM-322
- Page 1 DTM-322 K-TYPE HOLD TEMP: 20 C 60 C 140 F 1370 2498 HUMIDITY: POWER-UP OPTIONS...
- Page 2 311-01 JUL.2000...
-
Page 3: Table Of Contents
CONTENTS TITLE PAGE I. Safety Information ………………………………………………………………….….. 1 II. Introduction …...……………………………………………………………………….….. 1 III. Specifications ………………………………………………………………………….. 1 IV. Symbol Definition and Button Location ……………………………….. 2 V. Operation Instructions …………………………………………….…………..…… 3 4.1 Power-Up…………………………………………………………………………………..3 4.2 Humidity and Temperature Measurement…………………………………………..3 4.3 Connection the Thermocouples ( T2 channel )……………….……………………... 3 4.4 Selecting the Temperature Scale……………………………………………………….. -
Page 4: Safety Information
HUMIDITY TEMPERATURE METER I. Safety Information Read the following safety information carefully before attempting to operate or service the meter. Use the meter only as specified in this manual; otherwise, the protection provided by the meter may be impaired. Environment conditions Altitude up to 2000 meters Relatively humidity 90% max. -
Page 5: Symbol Definition And Button Location
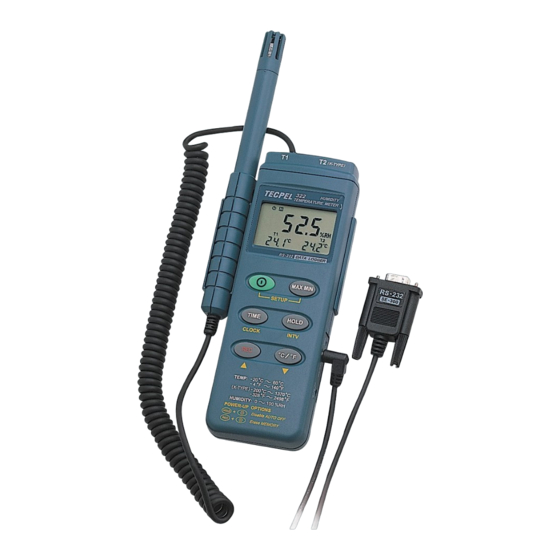
HUMIDITY TEMPERATURE METER Response Time : Humidity: 75 sec. In slowly moving air Temperature: 40 sec. in slowly moving air (T1) Signal Output : RS-232 Data Output Operating Environment : 0℃~50℃, 32℉~122℉ 0 to 90%RH non-condensing Storage Environment : -10℃~60℃, 14℉~140℉ 0 to 80%RH non-condensing Power Requirements : Battery: One 9V battery 006p or IEC 6F22 or NEDA1604 AC adapter: 9V... -
Page 6: Operation Instructions
HUMIDITY TEMPERATURE METER Button Location: Dust mask ○ Sensor probe ○ T2 channel, “K” type thermocouple ○ K-TYPE probe input LCD display ○ ON/OFF button ○ REL button ○ °C control button ○ MAX MIN function control button ○ HOLD button ○... -
Page 7: Max/Min Operation
HUMIDITY TEMPERATURE METER Press "MAX MIN" again, MAX, and MIN will blink together. This means that all these data is updated in the memory and the reading is the present temperature. One may press "MAX MIN" to circulate the display mode among these options. When the meter is under "MAX MIN"... -
Page 8: Calibration Procedure
HUMIDITY TEMPERATURE METER VI .Calibration Procedure Humidity Calibration: 1. Turn the unit off. Press and hold MAX/MIN, HOLD and °C keys. While these three keys are pressed, turn the power on. Release these keys and all the segments on the LCD will blink. 2. - Page 9 HUMIDITY TEMPERATURE METER 4. Insert the probe into standard chamber of 0°C(32°F) and wait the system to stabilize for 20 minutes. Press MAX/MIN button to create the calibration data. If the tester recognizes the data is within the tolerance, it will go to “CAL2” mode or it will sound 2 beeps and remain at “CAL1” mode.
- Page 10 TEL: 886-2-2218-3111 FAX: 886-2-2218-3222 Email: sales@tecpel.com , tecpelco@gmail.com...
Need help?
Do you have a question about the DTM-322 and is the answer not in the manual?
Questions and answers