
Related Manuals for Parkside WWS-GLK9-Y02


Summary of Contents for Parkside WWS-GLK9-Y02
- Page 1 3-IN-1 GAS SOLDERING IRON SET WWS-GLK9-Y02 3-IN-1 GAS SOLDERING IRON SET Operation and Safety Notes IAN 373546_2104...
- Page 2 1 / 2 1 / 2...
-
Page 4: Table Of Contents
Table of contents Symbols used ......................................Introduction ..............................Safety instructions ........................... Intended use ........................................ Technical specifications ........................Pack contents ....................................... Description of the parts ..................................Technical data ......................................Before using the tool .......................... Check the gas soldering iron and scope of delivery ................... -
Page 5: Symbols Used
Symbols used Follow the warnings and safety instructions! Read the operating manual Wear eye protection Danger: Highly inflammable aerosol Dispose of product and packaging in an environmentally friendly manner Perform the filling in just one short burst. The packaging is made of paper and can be disposed of in the wastepaper bin. -
Page 6: Safety Instructions
Safety instructions - WARNING! Please keep the gas soldering iron out of reach of children. - Wear eye protection to avoid the risk of eye injuries. - Contains flammable pressurised gas. Take care not to heat the refillable gas tank. Do not expose gas soldering iron to temperatures exceeding 50°C/120°F or to prolonged sunlight. - Page 7 - Use the burner only at a clean workplace, well away from inflammable materials, walls or ceilings or oily materials. The soldering iron may not be used in an environment where flammable fumes, flammable liquids or explosive materials are present. Otherwise there is risk of fire or explosion.
-
Page 8: Intended Use
Intended use This gas soldering iron set is designed for soft soldering electrical wires and circuit boards, removing or drying paint and forming plastic. It is also suitable for shrink-fitting and softening and removing adhesives. The soldering iron set may be used for only in accordance with its intended purpose. Any other use is forbidden. -
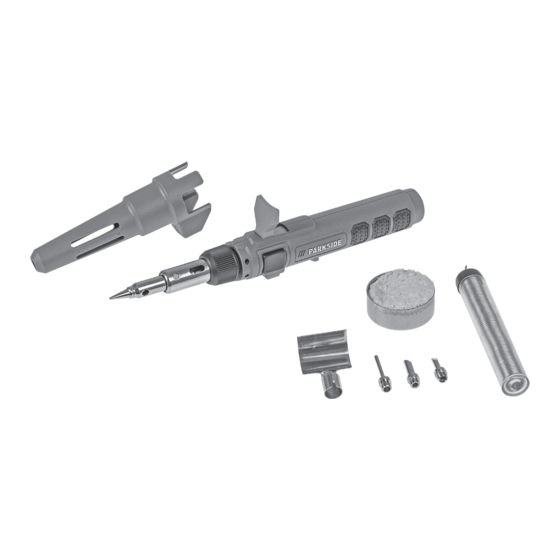
Page 9: Description Of The Parts
Refill adapter (supplied with canister) Technical data Distributor: Walter Werkzeuge Salzburg GmbH, Gewerbeparkstr. 9, 5081 Anif, Austria Name of the product: Gas soldering iron mod. No. WWS-GLK9-Y02 The gas soldering iron is not filled. Appliance category / type of gas: Direct pressure butane;... -
Page 10: Before Using The Tool
Before using the tool Check the gas soldering iron and scope of delivery • Take the gas soldering iron and accessories out of the packaging. • Check if the delivery is complete (see section “SCOPE OF DELIVERY / DESCRIPTION OF PARTS”). -
Page 11: Operation/Use
1. If necessary, empty the gas tank by igniting the gas soldering iron and burning off any remaining gas. 2. Allow the gas soldering iron to cool down completely. 3. Insert the adapter supplied with the gas canister with side slots (17) onto the canister nozzle. -
Page 12: Use As Hot Air Gun (Figure F)
• 4 soldering tips are included in the contents. • Choose the most suitable tip for your application and screw this firmly into the threaded hole in the hot air/soldering attachment. The pre-assembled soldering tip should be removed beforehand as required. Use as hot air gun (Figure F) The hot air gun function is ideal for removing or drying paint and forming plastic. -
Page 13: Igniting And Extinguishing The Flame
Igniting and extinguishing the flame Igniting the flame Trigger lock Regulating the flame 1. Outlet opening • Applies only for use as a heat gun or gas soldering iron: Before starting work, check that the side outlet of the hot air attachment (16) points upwards (= away from the stand). Adjust the position of the hot air attachment if necessary. -
Page 14: Shutting Down The Product Safely (Figure I)
Shutting down the product safely (Figure I) A stand is integrated in the ignition switch to rest the device safely. Always use the tool rest when putting the item down. Protective cap (Figure J) The contents include a protective cap (15). Use the protective cap to safely rest the hot device and to prevent mechanical hazards. -
Page 15: Troubleshooting
Troubleshooting Problem Possible cause Rectification The soldering iron The tank is empty. Fill the tank as per the gas tank doesn't switch on. filling instructions. The flame size is not Slide the flame controller to sufficient. increase the flame size. The solder does not The tank is empty. -
Page 16: Disposal
Disposal The gas soldering iron may only be disposed of when empty. Worn out tools must be recycled at a suitable recycling facility. Do not dispose of with the household waste. For further information contact your local authority. Dispose of the packaging material according to the type of material and according to any local regulations. - Page 17 Scope of the warranty The device has been manufactured according to strict quality guidelines and tested diligently before delivery. The warranty applies to material or fabrication defects. This warranty does not cover product parts that are subject to normal wear and tear and therefore can be considered as parts subject to wear and tear or for the damage to fragile parts, e.g switch, batteries or those made of glass.
- Page 18 Walter Werkzeuge Salzburg GmbH Gewerbeparkstr. 9 5081 Anif, AUSTRIA V. 1.0 Last Information Update: 02/2022 IAN 373546_2104...