Advertisement
Quick Links
Advertisement

Related Manuals for Boya BY-WM6S


Summary of Contents for Boya BY-WM6S
- Page 1 BY-WM6S Sistem Mikrofon Nirkabel UHF Buku Panduan...
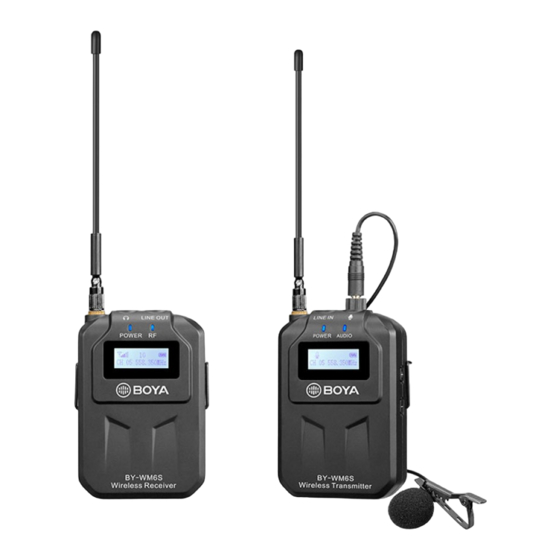
- Page 2 BOYA BY-WM6S merupakan sistem mikrofon nirkabel UHF yang cocok dipakai dengan smartphone, tablet, DSLR, camcorder, perekam suara, dan lainnya. BY-WM6S menggunakan baterai yang ada didalam yang dapat diisi ulang dnegan menggunakan USB Type-C 5V.BY-WM6S berbahan kokoh dengan antena yang dapat dilepas, sangat mudah digunakan didalam maupun luar ruangan.
- Page 3 The BY-WM6S consists of one body-pack transmitter (TX6S), a portable receiver (RX6S), and their accessories as following: Body-pack transmitters(TX6S) (1) Portable receiver(RX6S) (1) Omni-directional lavalier 3.5mm TRS to TRS audio output cable microphone 3.5mm TRS to XLR Male Type-C to USB-A connect cable (x2) Output Cable 3.5mm TRS to TRRS audio output cable...
- Page 4 Transmitter Bottom Front Back 1. Antenna 2. LINE IN 3. Microphone input Connect the supplied lavalier microphone here. Fully insert the microphone’s 3.5mm TRS plug and make sure it clicks into place, then lock the plug. To remove, release the locking mechanism, then pull the plug out.
-
Page 5: Power/Mute Button
For more details about LED indicator, please refer to as following: “POWER” “AUDIO” “RF” Status The transmitter and the Transmitter √ √ receiver is connected √ Receiver √ The transmitter and the Transmitter √ √ receiver is disconnected Receiver √ ×... - Page 6 Receiver Front Back 1. Antenna 2. Headphone output 3. LINE OUT (3.5mm diameter stereo mini jack) Connect one end of the supplied stereo 3.5mm TRS to TRS or XLR to XLR Male output cable here, and the other end to the microphone input on a DSLR camera, camcorder, mixer, 4.
- Page 7 5. RF indicator 6. LCD display For details, please refer to "LCD display Operation Guide"on page 8 7. Power button Long press the power of the transmitter ON or OFF. 8. SET button Channel / Volume / Light setting 9. + (+ selection)/ – (- selection) buttons Press these buttons to set the transmission channel, volume and light setting.
- Page 8 For cameras, camcorders, audio recorders and other audio/video ② recording devices. 3-pole plug USB Type-C to USB-A charging cable ③ - Using this cable, the devices with USB-A output can deliver power to BY-WM6S. The end of XLR is connected to audio devices with a standard ④...
- Page 9 Cara Membaca Layar LCD Receiver CH 23 556.710MHz 1. Signal level 2. Volume setting (1-16) - Press the SET button to volume setting - Press the +/- (+/- selection) button to adjust volume. 3. Battery indication 4. Channel number (1-48) 5.
- Page 10 Mute function Mute On - Transmitter is mute on. Lock function Press + & - to unlock - LCD will be locked automatically in 30 seconds. - Long press bottoms “+” and “-“ to unlock. Backlight Light OFF Light ON Light Delay 10s Light Delay 30s Light Delay 60s...
-
Page 11: Charging Status
Charging status - This indication shows the battery is charging. Memasang Adapter Shoe Mount 1. Please attach the belt clip in the direction of the shown picture before attaching the shoe mount adapter. and the receiver. 3. Make sure the adapter insert into vertical slot in parallel until it properly... - Page 12 Memasang Transmitter dan Receiver To connect the transmitters and the receiver, follow these steps: 1. Make sure the supplied lavalier microphones are connected to the transmitter microphones input or plug a line-level source into the transmitter line input. 2. Turn on the transmitters and the receiver. 3.
- Page 13 Menghubungkan Transmitter dan Receiver Menggunakan Mikrofon dengan smartphone, tablet, Mac, atau Laptop dengan lubang audio 3.5mm Receiver 1. Mount receiver to smartphone, tablet, Mac or laptop. 2. Using TRRS cable, plug the 3.5 mm connector (straight plug) into the audio jack of your smartphone. 3.
- Page 14 Menggunakan Mikrofon dengan kamera, camcorders, perekam suara dan alat rekam video/ audio lainnya Receiver 1. Mount receiver to cameras, camcorders, audio recorders and other audio/video recording devices. 2. Using TRS cable, plug the 3.5 mm connector into the audio jack of your camera.
- Page 15 Menggunakan Mikrofon dengan camcorder dan alat rekam lain berbasis XLR Receiver 1. Mount receiver to camcorders and other XLR audio/video recording devices. 2. Using the supplied XLR cable, plug the terminal of XLR connector into the audio jack of your camcorder. 3.
-
Page 16: Troubleshooting
Troubleshooting If you have any problem using the BY-WM6S components, use the following checklist. If any problem persist, please consult our local dealer, or contact us directly. Status Cause Measure The units does The batteries of BY-WM6S TX Use the supplied USB Type-C not turn on. - Page 17 Status Cause Measure There can be a lot of RF interferenceoutdoors. Try moving indoors, where there is less RF interference. Overhead telephone lines, RF interference fences can all cause interference. mobile phones." The audio is noisy Make sure there is an or distorted.
- Page 18 Spesi kasi Channel number Oscillator type PLL synthesizer Carrier frequencies 556.710-575.980MHz Reference deviation +/-5KHZ(-60dBV, 1KHz input) Signal to noise ratio 82dB or more RF output power 10mW Distortion 0.1% or less Antenna 1/4λ wire antenna Headphone output level 30mW(16 ohm) Receive sensitivity -98dBm Frequency respose...
Need help?
Do you have a question about the BY-WM6S and is the answer not in the manual?
Questions and answers