Table of Contents
Advertisement
Quick Links
Advertisement
Table of Contents

Related Manuals for HIT FITNESS HIT00235


Summary of Contents for HIT FITNESS HIT00235
-
Page 2: Important Safety Notice
Dear Customer, Please read this instruction very carefully before using this item. You will find important information regarding safety of your spinning bike. IMPORTANT SAFETY NOTICE: http://www.ustylesports.com/ Note the following precaution before assembling or operating the machine. 1、 Keep children and pets away from the Spinning Bike at all times. DO NOT leave unattended children in the same room with the machine. - Page 3 7、 Assemble the machine exactly as the descriptions in the instruction manual. 8、 Check all bolts and other connections before using the machine for the first time and ensure that the trainer is in the safe condition. 9、 Hold a routine inspection of the equipment. Pay special attention to components which are the most susceptible to wear off, i.e.
-
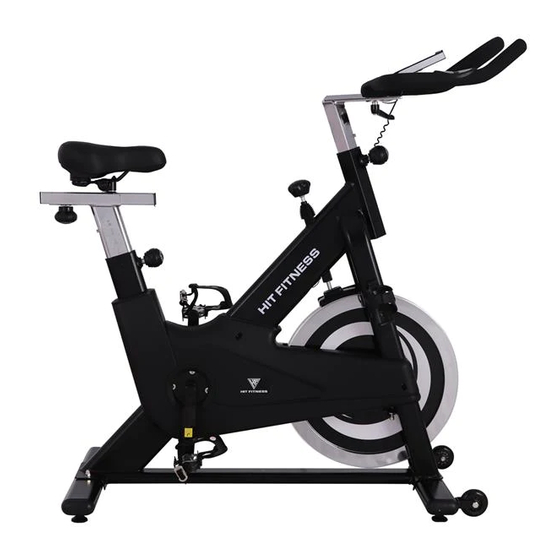
Page 4: Exploded View And Parts List
BEFORE USING SPINNING BIKE. THANE ASSUMES RESPONSIBILITY FOR PERSONAL INJURY OR PROPERTY DAMAGE SUSTA I N E D BY OR THROUGH THE USE OF THIS PRODUCT EXPLODED-VIEW & PARTS LIST:... -
Page 6: Parts List
PARTS LIST Description Qty. Description Qty. Main Frame Belt Wheel φ200*24 Rear Stabilizer Elastic Washer GB/T 859-1987 8 Carriage Bolt GB/T 12-1988 M8*52 Casing Pipe φ25*φ20.05*11.5 End Cap Material:PP Crank Bearing 6004ZZ Flat Washer GB/T 95-2002 8 Left Decorative Cover 164*35.5*32,重:20g Domed Nut GB/T 802-1988 M8 Screw GB/T 15856.1-2002 ST4.2X16 (H=16mm) - Page 7 Computer X-3574 Washer φ16*φ10.2*1.5 Sensor Wire =1400 Magnet Holder Transport Wheel φ69X26 Magnet 30*15*10 Bearing 608ZZ Magnet holder Supporter Bolt GB/T 5780-2000 M8*40 Brake Pole Lock Nut GB/T 889.1-2000 Screw GB/T 70.1-2000 M6*10 Crank Plug φ23*7.5 Washer GB/T 95-2002 Flange Nut M10*1.25 Lock nut GB/T 889.1-2000 1 SET...
-
Page 8: Hardware Package
Pulse Sensor Match Φ25 tube Crosshead Spanner Pulse Sensing Line L=700 Hex nut C class Bolt GB/T 70.1-2000 M8*45 FLAT WASHER 4 Crosshead Spanner Inner hexagon spanner (6#) Spanner HARDWARE PACKAGE NO.3 NO.5 NO.6 NO.14 NO.13 NO.86 NO.85 NO.10 NO.10... -
Page 9: Assembly Instruction
ASSEMBLY INSTRUCTION: 1.PREPARATION: A. Before assembling make sure that you will have enough space around the item. B. Use the present tooling for assembling. C. Before assembling please check whether all needed parts are available (at the above of this instruction sheet you will find an explosion drawing with all single parts (marked with numbers) which this item consists of. - Page 10 FIG.2...
- Page 11 FIG.3 FIG.3: Insert the Handlebar Post (pt.17) into the handlebar post housing on the main frame. You will have to slacken the Knob (pt.10) and pull the knob. Then select the desired height. Release the knob and tighten the knob back. Fix the Handlebar (pt.18) on the Handlebar Post (pt.17) with the 2 Bolts (pt.85) Fix the Computer (pt.19) on the computer bracket on Handlebar .
- Page 12 FIG.4: The Pedals (pt.27L & pt.27R) are marked "L" and "R" - Left and Right. Connect them to their appropriate crank arms. The right crank arm is on the right- hand side of the cycle as you sit on it. Please refer assembly...
- Page 13 A.) Adjust the Tension: Increasing or decreasing the tension allows you to add variety to your workout sessions by adjusting the resistance level of the bike. To increase tension and increase resistance (requiring more strength to pedal), turn the Emergency Brake & Tension Control Knob (pt.49) to the right.
-
Page 14: Exercise Instructions
ADJUSTMENT *To adjust the seat height, slacken the spring knob on the vertical post stem on the main frame and pull back the knob. Position the vertical seat post for the desired height so that holes are aligned, then release the knob and tighten it. - Page 15 This stage helps get the blood flowing around the body and the muscles working properly. It will also reduce the risk of cramp and muscle injury. It is advisable to do a few stretching exercises as shown below. Each stretch should be held for approximately 30 seconds, do not force or jerk your muscles into a stretch - if it hurts, STOP.
-
Page 16: Muscle Toning
This stage should last for a minimum of 12 minutes for most people start at about 15-20 minutes This stage is to let your Cardio-vascular System and muscles wind down. This is a repeat of the warm up exercise e.g. reduce your tempo, continue for approximately 5 minutes. The stretching exercises should now be repeated, again remembering not to force or jerk your muscles into the stretch.
Need help?
Do you have a question about the HIT00235 and is the answer not in the manual?
Questions and answers