Advertisement
Quick Links
Advertisement

Related Manuals for HIT FITNESS Multi-Gym


Summary of Contents for HIT FITNESS Multi-Gym
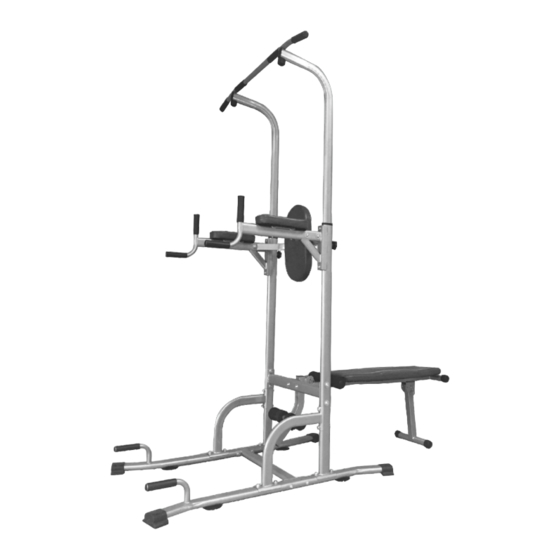
- Page 1 Multi - Gym...
-
Page 2: Safety Instructions
1. If you feel dizzy while using, please stop and consult your doctor to ensure this item is suitable for you 2. This multi-gym is intended for adult use and should not be used by children as small parts may lead to suffocation or injury 3. -
Page 3: Part List
Multi-Gym Part List 7 Grab Bar 1 Base Frame 11 Back Rest 9 Pull Up Bar Screw & Tool List Allen Key (big) Allen Key (small) - Page 4 Multi-Gym Assembly Instructions Step 1: Connecting the base frame, support frame, and vertical support What you will need: Screws and Tools: • Vertical support x 2 • Open-end wrench • Support frame x 2 • Allen Key (large) • Base frame x 2 •...
- Page 5 Multi-Gym Assembly Instructions Step 2: Connecting lower transverse tube What you will need: Screws and Tools: • Lower transverse tube x 1 • Open-end wrench • Allen key (large) • M10*75 screw x 4 • Arc (curve) washer x4 •...
- Page 6 Multi-Gym Assembly Instructions Step 3: Connect upper transverse tube What you will need: Screws and Tools: • Upper transverse tube x 1 • Open-end wrench • Allen key (large) • M10*45 screw x 4 • Flat washer x4 • M10 nut x 4...
- Page 7 Multi-Gym Assembly Instructions Step 4: Connect grab bar What you will need: Screws and Tools: • Grab bar x 2 • Open-end wrench • M10*20 screw x 4 • Flat washer x4 Directions Take the left grab bar and align with the vertical support Loosely screw in the M10*20 screw and flat washer with your hand.
- Page 8 Multi-Gym Assembly Instructions Step 5: Connect upper bracket What you will need: • Upper bracket x 2 Directions Note: The upper bracket should be facing towards the dip bar handles. Insert the upper bracket into the vertical support until it clicks...
- Page 9 Multi-Gym Assembly Instructions Step 6: Connect pull up bar What you will need: Screws and Tools: • Pull up bar • M10*85 screw x 2 • M10 fixed nob x2 Directions Feed M10*85 screws through the pull-up bar and, using the M10 fixed nob, tighten to the...
- Page 10 Multi-Gym Assembly Instructions Step 7: Adjusting the height of the upper bracket What you will need: • Plum blossom Directions Shift the vertical support to the desired height and insert a plum blossom screw on either side to hold the alignment...
- Page 11 Multi-Gym Assembly Instructions Step 8: Connect dip bar What you will need: Screws and Tools: • Elbow pads x2 • Allen key (small) • M6*70 screw x4 Directions Take two M6*70 screws and lightly fasten them using your hand to the dip bar. Then take...
- Page 12 Multi-Gym Assembly Instructions Step 9: Install back lever What you will need: Screws and Tools: • Back lever • Open-end wrench • M10*40 screws x 4 • Flat washer x 6 • M10 nut x 2 Directions On the back, feed an M10*40 screw and flat washer through and tighten with an open-end...
- Page 13 Multi-Gym Assembly Instructions Step 10: Connect backrest What you will need: Screws and Tools: • Backrest • Allen key (large) • M6*14 screw x 2 • M8*55 screw x 1 • Flat washer ɸ8 x1 • M8 nut x 1 Directions Fix the backrest against the back lever, using the M8*55 screw, flat washer ɸ8, and...
- Page 14 Multi-Gym Assembly Instructions Step 11: Connect flat bench frame What you will need: Screws and Tools: • Flat bench frame • M10*45 screw x 1 • Flat washer x 1 • M10 nut x 1 Directions Tip: make sure the curved part of the frame is facing the handles of the base frame Align the flat bench frame to the lower transverse tube.
- Page 15 Multi-Gym Assembly Instructions Step 12: Connect kickstand What you will need: • Kickstand • Plum blossom nut Directions Feed kickstand screw through the curved section of the flat bench frame. Using a plum blossom nut, tighten the screw to the frame...
- Page 16 Multi-Gym Assembly Instructions Step 13: Connect flat bench What you will need: Screws and Tools: • Flat bench • Open-end wrench • M10*60 screw x 1 • M10 nut x 1 Directions Align the flat bench with the flat bench frame. Feed the M10*60 screw through the second...
Need help?
Do you have a question about the Multi-Gym and is the answer not in the manual?
Questions and answers