Table of Contents
Advertisement
Quick Links
Advertisement
Table of Contents

Related Manuals for Crown C6CT


Summary of Contents for Crown C6CT
- Page 1 XXXX BULLETIN No. XXXX SUPERSEDES XXXX DATE XXXX CONCRETE MIXER MODELS: C6CT, C9CT, C9PCT & C12CT OPERATOR’S MANUAL PHONE (204) 831-8468 P.O.BOX 73, STATION L TOLL FREE: (877) 403-1220 WINNIPEG, MANITOBA FAX: (204) 831-5890 CANADA R3H 0Z4 WORLD WIDE WEB...
- Page 2 (1) SALES POLICY: Nothing herein shall be construed as abridging furnished under contract shall in no case exceed the price paid the right of Crown to sell directly or indirectly to: (a) Federal, by the purchaser for de equipment. Crown also disclaims all...
- Page 3 CROWN CONSTRUCTION EQUIPMENT CONCRETE MIXER WARRANTY REGISTRATION FORM & INSPECTION REPORT WARRANTY REGISTRATION (please print) This form must be filled out by the dealer and signed by both the dealer and the customer at the time of delivery. Customer´s Name...
-
Page 4: Table Of Contents
Table of contents REPORTING SAFETY DEFECTS ..........................6 1 INTRODUCTION ..............................7 2 SAFETY ...................................7 GENERAL SAFETY .............................8 OPERATING SAFETY ..........................9 MAINTENANCE SAFETY ..........................9 TRANSPORT SAFETY ..........................10 TIRE SAFETY ............................10 STORAGE SAFETY ..........................10 REFUELING SAFETY ..........................10 ELECTRICAL SAFETY..........................10 SAFETY SIGNS ............................ - Page 5 5.1.4 SERVICE RECORD ..........................33 5.2 MAINTENANCE ............................34 5.2.1 ENGINE OIL CHANGING ........................34 5.2.2 ENGINE SPEDD SET TING ........................35 5.2.3 AIR CLEANER MAINTENANCE ....................... 35 5.2.4 BELT TENSION AND ALIGNMENT ......................36 5.2.5 BELT TENSION AND ALIGNMENT ......................36 6 TROUBLE SHOOTING ............................
-
Page 6: Reporting Safety Defects
REPORTING SAFETY DEFECTS If you believe that your vehicle has a defect which could cause a crash or could cause injury or death, you should immediately inform the National Highway Traffic Safety Administration (NHTSA) in addition to notifying Crown Construction Equipment. -
Page 7: Introduction
Operator´s Manual. This manual is applicable to all the Model C-3C, C-6C, C-6P and C-9C Concrete Mixers built by Crown Construction Equipment. Use the Table of Contents or Index as a guide when searching for specific information. Keep this manual handy for frequent reference and to pass on to new operators or owners. -
Page 8: General Safety
DANGER Indicates an imminently hazardous situation that, if not avoided, will result in death or serious injury. This signal word is to be limited to the most extreme situations, typically for machine components that, for functional SIGNAL WORDS: purposes, cannot be guarded. WARNING Indicates a potentially hazardous situation Note the use of the signal... -
Page 9: Operating Safety
6. Wear appropriate protective gear. This list 6. Keep hands, feet, hair and clothing away from moving includes, but is no limited to: parts. - A hard hat 7. Keep working area clean and dry to prevent slipping Protective boots and tripping. -
Page 10: Transport Safety
Keep hands, feet, clothing and hair away from TIRE SAFETY all. 1. Failure to follow proper procedures when mounting a Keep service area clean and tire on a wheel or rim can produce an explosion which dry. may result in serious injury or death. ... -
Page 11: Sign-0Ff Form
Engineers (SAE) and the Occupational Safety and Health How to install Safety Signs: Administration (OSHA). Anyone who will be operating and/or maintaining the Crown Concrete Mixers must Be sure that the installation area is clean and read and clearly understand ALL Safety, Operating and dry. -
Page 12: Safety Sign Locations
3 SAFETY SIGN LOCATIONS READ AND STUDY THE FOLLOWING SAFETY INFORMATION BEFORE ATTEMPTING TO OPERATE THIS EQUIPMENT. IN ADDITION, ENSURE THAT EVERY INDIVIDUAL WHO OPERATES OR WORKS WITH THIS EQUIPMENT IS FAMILIAR WITH THESE SAFETY PRECAUTIONS. IT IS THE OPERATOR'S RESPONSIBILITY TO OPERATE OUR MACHINES ONLY WHEN WEARING THE PROPER PROTECTION RECOMMENDED BY THE OCCUPATIONAL SAFETY AND HEALTH ADMINISTRATION. - Page 13 The types of safety signs and locations on the equipment are show in the illustration below. Good safety requires that you familiarize yourself with the various safety signs, the type of warning and area, or particular function related to that area, that requires your SAFETY AWARENESS.
-
Page 14: Safety Sign Locations
3.1 SAFETY SIGN LOCATIONS The types of safety signs and locations on the equipment are show in the illustration below. Good safety requires that you familiarize yourself with the various safety signs, the type of warning and the area, or particular function related to that area, that requires your SAFETY AWARENESS. -
Page 15: Safety Sign Locations Electric Motor Power Unit
REMEMBER –if safety sings have been damaged, removed, become illegible or parts replaced without safety signs, new signs must be applied. New safety sigs are available from your authorized dealer. 3.2 SAFETY SIGN LOCATIONS ELECTRIC MOTOR POWER UNIT The types of safety signs and locations on the equipment are show in the illustration below. Good safety requires the you familiarize yourself with the various Safety Signs, the types of warning and the area, or particular function related to the area, that requires your SAFETY AWARENESS. -
Page 16: Safety Sign Locations Gas Engine Power Unit
REMEMBER –if safety sings have been damaged, removed, become illegible or parts replaced without safety signs, new signs must be applied. New safety sigs are available from your authorized dealer. 3.3 SAFETY SIGN LOCATIONS GAS ENGINE POWER UNIT The types of safety signs and locations on the equipment are show in the illustration below. Good safety requires the you familiarize yourself with the various Safety Signs, the types of warning and the area, or particular function related to the area, that requires your SAFETY AWARENESS. -
Page 17: Operation
4.1 TO THE NEW OPERATOR OR OWNER The Crown Construction Equipment Concrete Mixer is 5. Clear the area of all bystanders before starting. designed to efficiently combine water, aggregate and 6. -
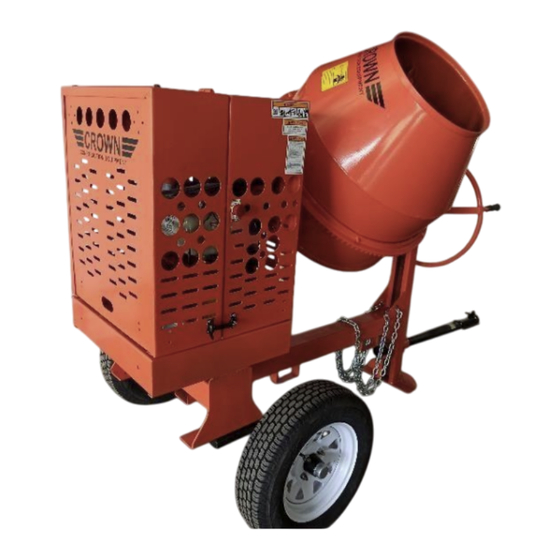
Page 18: How The Machine Works
drum to the required position for mixing and 4.2 HOW THE MACHINE WORKS emptying. An extendable hitch on the front of the The Concrete Mixer consists of a large rotating drum frame allows the hitch to extend for towing and with internal paddles for combining cement, retracts during operation. -
Page 19: Pre-Operation Checklist
IMPORTANT 4.3 PRE-OPERATION CHECKLIST Engine warranty is void if the engine is run Efficient and safe operation of the Mixer requires that without oil. each operator reads and understands the operating Refer to engine manual for oil specifications if procedures and all related safety precautions outlined in operating in unusual temperature conditions. -
Page 20: Controls
5. Lubricate the points defined in the d. Choke: Maintenance section. The choke controls the fuel/air mixture to the engine. 6. Then go to the service schedule as defined Close the choke when starting if the engine is cold. in the Maintenance section. Open the choke as the engine warms. - Page 21 Electric Motor (Typical): Drum Position: Master ON/OFF: This lever and lock assembly sets the position of the mixing drum. This switch controls the power to the electric motor The C-3C model is equipped with a spring-loaded that turns the mixing drum. Move the switch pin that seats into holes in the lock disc.
-
Page 22: Operating
4.7 OPERATING 11. Slow down for corners and when going over 1. Read and understand the Operator’s Manual rough terrain. and all safety signs before operating, servicing, 12. Review safety instructions with all operators adjusting, or cleaning the mixer. annually. 2. - Page 23 Gas engine powered units: e) Close and secure the engine compartment hood. A. Check that everyone is clear of the machine. B. Pull the emergency stop switch out. C. Unlatch and open the engine compartment hood. D. Move the throttle into its midrange position. Close the choke if starting when the engine is cold.
- Page 24 Filling: Mixing time: When mixing concrete, follow this procedure: After all the ingredients have been added to the drum, allow time for the material to reach a uniform color and a) Clear the working area of unauthorized consistency. Watch the color and consistency of mixture personnel.
- Page 25 Mixers for ordinary jobs: advanced. For the first time, vigorous 12 inch strikes NOTE cross-wise of the slab are used. Advance slowly along the slab as the surface is made smooth and even. repeat 500 cu. Ft. divided by 27 cu. Ft. = 18.5 cu. Yds. Volumes and weights of materials: 1 bag of cement 40kg...
- Page 26 surface evaporates, leaving a thin honeycombed layer of permitted to dry during the curing period. Floors, weak material just where toughness and extra strength sidewalks, pavements, and other flat surface require are required. Excessive cracking, spalling and dusting careful attention as moisture is lost very rapidly by may result.
-
Page 27: Transporting
6. Use a mechanical retainer through the ball hitch or clevis pin before transporting. Pole in extended position, only transport in middle position. Crown Construction Mixers are designed to be easily and conveniently moved from place to place. When moving the machine, follow this procedure: WARNING 1. - Page 28 10. Check that the wheel bolts are tightened to their specified torque. 11. Check that the tires are inflated to their required pressure. 12. Use special care when transporting during times of limited visibility. Be sure that you can be seen by oncoming and overtaking traffic. Always use the lighting bar.
-
Page 29: Storage
4.9 STORAGE 5 SERVICE AND MAINTENANCE MAINTENANCE SAFETY 1. Review the operator´s Manual and all safety items before working with, maintaining or operating the mixer. 2. Stop engine or motor, disconnect spark plug wire or unplug power cord, and wait for all At the end of the season or when the machine will not be moving parts to stop before servicing, adjusting, repairing, or cleaning. -
Page 30: Service
5.1 SERVICE 5.1.3 SERVICING INTERVALS. Daily or 8 hours. 5.1.1 FLUIDS AND LUBRICANTS Grease 1. Check engine fluid levels. Top as required. Use an SAE multi-purpose high temperature grease Check engine oil level. Top up as required. or a multi-purpose lithium base grease. b. - Page 31 FIG. 17 DRIVE BELT TENSION Fig. 19 ENGINE OIL On C9-C Models only, grease the lower bowl bearing. (where shown) Fig. 20 DRIVE COMPARTMENT Weekly or 50 hours Fig. 18 drum assembly bearings 1. Change the engine oil. Use an air hose to blow out and clean the engine, Drain plug.
- Page 32 Fig. 21 engine air intake filter (typical) Fig. 23 WHEELS Fig. 22 ring gear / sprocket Annually or 400 hours 1. Grease the electric motor bearings with ½ shot of grease (2 location) 2. Repack wheel bearings on the mixer (2 locations).
-
Page 33: Service Record
5.1.4 SERVICE RECORD See lubrication and maintenance sections for details of service. Copy this page to continue record. ACTION CODE: Ŝ CHECK C CAHNGE CL CLEAN L LUBRICATE RE REMOVE R REPACK HOURS SERVICED BY MAINTENANCE DAILY OR 8 HOURS Ŝ... -
Page 34: Maintenance
5.2 MAINTENANCE By following a careful service and maintenance program for your machine, you will enjoy many years of trouble- free service. 5.2.1 ENGINE OIL CHANGING 1. Review the Operator’s Manual for the engine. 2. Allow the engine to cool before changing oil. Hot oil can cause burns if it contacts exposed skin. -
Page 35: Engine Spedd Set Ting
5.2.2 ENGINE SPEED SETTING Every engine is shipped from the engine factory without gas or oil because of fire hazards during shipping. They are all set with a high idle of 3500 RPM. Since no fluids are added at the Mixer factory, the RPM is not reset. When the Mixer is delivered, the fluids must be added and RPM reset. -
Page 36: Belt Tension And Alignment
5.2.4 BELT TENSION AND ALIGNMENT 5.2.5 BELT TENSION AND ALIGNMENT A drive belt and pulley system transmits power Each machine is equipped with 3 equally spaced from the motor or engine to the pinion gear for paddles on the inside of the drum. After extended rotating the drum. -
Page 37: Trouble Shooting
6 TROUBLE SHOOTING The Crown Construction Concrete Mixer uses a large heavy-duty rotating drum with paddles drum with paddles for combining water, cement and aggregate in a mixture for forming concrete. It is a well-engineered machine that requires minimum maintenance. -
Page 38: Specifications
7 SPECIFICATIONS 7.1 MECHANICAL Batch Capacity Bag 1/2 to 1 bags 1/2 to 1 bags 1 to 1 -1/2 1 - 1/2 to 2bags bags Batch capacity cu. ft (lts.) 7cu. ft (220) 9 cu.ft (260) 9 cu.ft 12 cu. ft (340) (260) Power Honda 5.5 to 8HP... -
Page 39: Bolttorque
7.2 BOLTTORQUE CHRECKING BOLTTORQUE The tables show below give correct torque values for various bolts and capscrews. Tighten all bolts to torques specified in chart unless otherwise noted. Check tightness of bolts periodically, using bolt torque chart as a guide. Replace hardware with the same strength bolt. Bolt Bolt torque* Bolt...
Need help?
Do you have a question about the C6CT and is the answer not in the manual?
Questions and answers