
Related Manuals for Clarion Ungo S100


Summary of Contents for Clarion Ungo S100
- Page 1 M M o o d d e e l l S S 1 1 0 0 0 0 O O w w n n e e r r ’ ’ s s G G u u i i d d e e...
-
Page 2: Limited Lifetime Consumer Warranty
Warranty shall be limited to the repair or replacement of the product, at the sole discretion of Clarion. If it becomes necessary to send the product or any defective part to Clarion, the product must be shipped in its original carton or equivalent carton, fully insured, with shipping charges prepaid. - Page 3 ALSO HAVE THE OTHER RIGHTS, WHICH VARY FROM STATE TO STATE. Should you have any difficulties with the performance of this product during warranty, please call: 1-800-GO-CLARION or visit your local Ungo Pro Security dealer. You may also contact the National Service Manager at the following address below for additional service help you may need.
-
Page 4: Table Of Contents
table of contents limited lifetime consumer warranty .......i standard remote configuration ........2 what is included . -
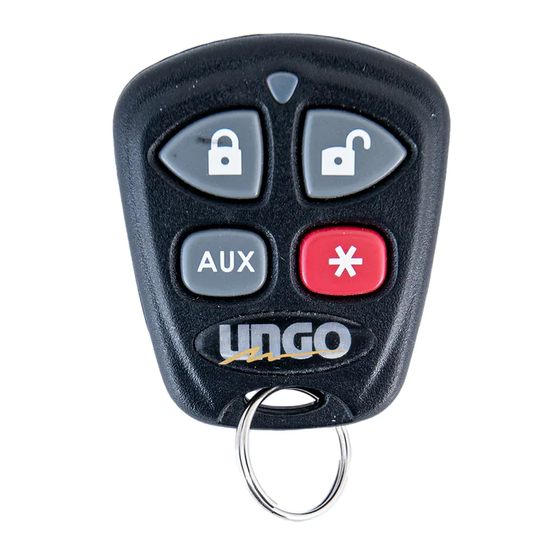
Page 5: Standard Remote Configuration
standard remote configuration controls the Arm function. controls the Disarm function. controls Silent Arm/Disarm and an Auxiliary output. controls the Panic function. pressed together control an Auxiliary output. -
Page 6: What Is Included
what is included One control module A pair of four-button remotes A dual-stage shock sensor A six-tone programmable siren The blue status LED indicator light A push-button override switch Starter kill ready circuitry (may require additional labor) External receiver/antenna important information Congratulations on the purchase of your state-of-the-art vehicle securi- ty system. -
Page 7: System Maintenance
system maintenance The system requires no specific maintenance. Your remote control is powered by a small, lightweight 3 volt lithium battery that will last approximately one year under normal use. When the battery weakens, operating range will be reduced and the LED on the remote will dim. fcc/id notice This device complies with Part 15 of FCC rules. - Page 8 standard configuration Button The arming function is controlled by pressing this button for one second. Button The disarming function is controlled by pressing this button for one second. Button Silent Arm/Disarm and an optional auxiliary function are controlled by pressing this button. (Silent Arm/Disarm works by pressing this button for less than one second before arming or disarming.
-
Page 9: Using Your System
using your system The buttons used in the instructions in this manual correspond to the standard configuration. Remember, this is not the only way your remote may be set up. It can be custom configured to meet your needs. active arming You can activate, or arm, the system by pressing on your remote for one second. - Page 10 vides you with a 10-second warning prior to arming. n n o o t t e e : : If any protected entry point (such as a door or a switch- protected trunk or hood) is open, the system will not passive- ly arm (unless forced passive arming is programmed on).
-
Page 11: Remote Sensor Bypass
remote sensor bypass Remote Sensor Bypass allows you to select which of the security sys- tem's inputs or sensors will be active and which will be bypassed at the time that the system is armed. (See the Table of Zones section of this guide.) Pressing again within five seconds of arming the security system will activate the Remote Sensor Bypass feature. -
Page 12: Arming While Driving
arming while driving Your system can be armed while driving the vehicle. Simply press your remote for two seconds while the vehicle is running or while the igni- tion is on. The siren will chirp once and then once more to indicate that the ignition is on. -
Page 13: Disarming Without A Remote
diately. The six second timer is provided for your convenience, in case the system is accidentally triggered. disarming without a remote This feature allows you to disarm the security system without the remote should it be lost, damaged, or disabled. In order to disarm the system without a remote, you must have the vehicle’s ignition key and know where the override switch is located. -
Page 14: Silent Mode
silent mode To temporarily turn off the arm or disarm chirps, use Silent Arm/Disarm. Simply press for less than one second before arming or disarming, and the confirmation chirp(s) will be eliminated for that one operation only. If you want the arm/disarm chirps turned off permanently, your dealer can do this for you. -
Page 15: Override Mode
override mode You can prevent your security system from automatically arming and triggering by using Override Mode. This is very useful when washing the vehicle or having it serviced. In Override Mode, the security system will not arm, even with the remote remote, but all convenience functions (door locks, trunk release, etc.) will continue to work normally. -
Page 16: False Alarm Prevention Circuitry
false alarm prevention circuitry Your system has false alarm prevention circuity. It prevents annoying repetitive trigger sequences due to faulty door pin switches or environ- mental conditions such as thunder, jackhammers, airport noise, etc. Example If the alarm triggers three times within a 60-minute period and each time the same sensor or switch triggers the alarm, The system will inter- pret those triggers as false alarms. -
Page 17: Diagnostics
diagnostics The microprocessor at the heart of your security system is constantly monitoring all of the switches and sensors that are connected to it. It detects any faulty switches and sensors and prevents them from dis- abling the entire system. The microprocessor will also record and report any triggers that occurred during your absence. -
Page 18: System Status Chirps
of Zones section of this guide.) The system will retain this information in its memory, and continue to chirp four or five times each time it is disarmed, until the next time the ignition key is turned on. system status chirps The siren will chirp when arming/disarming the system. -
Page 19: Table Of Zones
table of zones The zone number is the number of LED flashes used by the system to identify that input. The standard input assignments are listed below, along with spaces to write in any optional sensors or switches you have had installed. -
Page 20: Anti-Code Grabbing
n n o o t t e e : : Your system stores the last two triggered zones in memo- ry. If your system has been triggered but the LED has been reset by turning on the ignition, your dealer can still recall the last two zones that were triggered. -
Page 21: Individual Remote Recognition
individual remote recognition Individual remote recognition is a feature available. Using the Pro Security Programmer, a hand-held programming tool, your dealer can program many of the system settings. The programmer makes it possi- ble to program different settings for each remote that is used with the system. -
Page 22: Power Saving Mode
power saving mode Your system will automatically enter a power saving mode while armed or in valet mode, after a period of time in which no operation has been performed. This lowers the current draw to the vehicle’s battery. Power Saver mode takes over under the following conditions: Power saving when the system is armed: After the system has been armed for 24 hours, the LED will flash at half its normal... -
Page 23: Programming Options
programming options Programming options control what your system does during normal operation, and require few or no additional parts. However, some may require additional installation labor. The following is a list of the program settings, with the factory settings in Bold: Active arming (only with the remote) or passive arming (auto- matic arming 30-seconds after the last door has been closed). - Page 24 Panic mode enabled/disabled with the ignition on: Some states have laws against siren capability in a moving vehicle. Forced passive arming on or off: If your system is programmed for passive arming and the forced passive arming feature has been programmed on, the system will passively arm after one hour, even if a protected entry has been left open.
- Page 25 n n o o t t e e : : This feature will only function if the Starter Kill relay has been installed. Full trigger response 30 or 60 seconds: This determines how long the full triggered sequence lasts. Some states have laws regulating how long a security system can sound before it is considered a nuisance.
-
Page 26: Installation Options
of six different tones in sequence. Any of these tones can be eliminated by your dealer, resulting in a unique, easily identi- fiable siren sound. The siren chirps can be either full volume or six decibels quieter than the full alarm blast. installation options The system has many options that may require extra parts and labor. -
Page 27: Anti-Carjacking System
anti-carjacking system The optional anti-carjacking system feature is designed to ensure that any unauthorized user of your vehicle (even if using your keys and remote control) will not be able to permanently separate you from your vehicle. This system cannot prevent a carjacking attempt; however, it does en- sure that if your vehicle is taken by an unauthorized user, it will be dis- abled (after several progressive warnings) as safely as possible. -
Page 28: Anti-Carjacking Triggered Sequence
it will initiate its triggered sequence (see below) if any door is opened and closed. If you are forced from the vehicle, the system will trigger as the door is opened and closed. This is how the system works to com- bat intersection carjacking. -
Page 29: Disarming The Anti-Carjacking System
until the system is disarmed. If the door is opened or the ignition is turned off and on in an attempt to restart the car, the siren and light flashing will begin again. disarming the anti-carjacking system Take the time to familiarize yourself with the anti-carjacking triggering sequence and the disarm procedure. -
Page 30: Glossary Of Terms
n n o o t t e e : : If the Anti-Carjacking system has begun its chirping sequence, the ignition must be turned off, then on to disarm. If you are driving the vehicle at the time, pull to a safe place away from traffic and follow the triggered sequence disarm procedure. - Page 31 ment of the vehicle. It is responsible for generating the "chirps" you hear, as well as the six tones you hear while the alarm is triggered. Remote: Hand-held, remote control which operates the various func- tions of your system. Trigger or Triggered Sequence: This is what happens when the alarm "goes off"...
-
Page 32: Security & Convenience Expansions
security & convenience expansions Here we have listed only some of the many expansion options avail- able. Please contact your dealer for a complete explanation of all the options available to you. Audio Sensor: Metal on glass, glass cracking, and breaking glass each produce distinctive acoustic signatures. - Page 33 dows down by using the remote. The second system will roll two win- dows both up and down. This second system also provides one touch switch operation. Override Start System: For the ultimate in convenience, the Override start system can start your vehicle, monitor engine functions, and power your climate control system with a push of a button.
-
Page 34: Quick Reference Guide
QUICK REFERENCE GUIDE To arm using your remote You can activate, or arm, the system by pressing second. When the system arms, you will hear a short siren sound, or chirp, and the parking lights will flash once. If the vehicle’s power door locks have been connected to the system, the doors will lock. - Page 36 Get Started Get Protected Ungo Pro Security 661 W. Redondo Beach Blvd. Gardena, Ca. 90247 800-GO-CLARION © 2003 Directed Electronics, Inc. - All rights reserved GS100 11-03...
Need help?
Do you have a question about the Ungo S100 and is the answer not in the manual?
Questions and answers