Advertisement
Quick Links
FontanaShowers
FontanaShowers
©
©
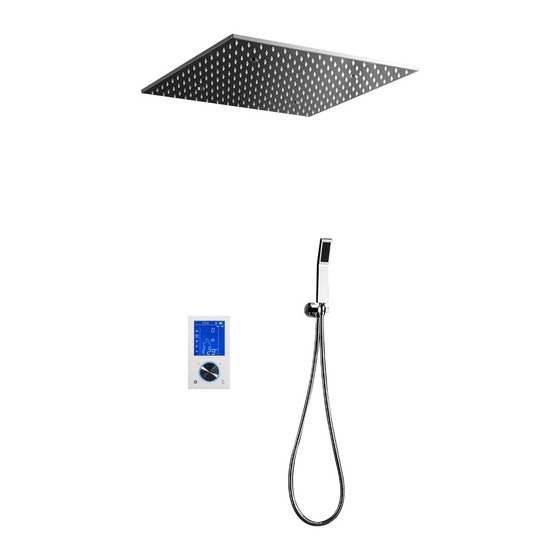
Product code: FS9645
FONTANA DENVER CHROME DIGITAL TOUCH PANEL
THERMOSTATIC SHOWER SET INSTALLATION
INSTRUCTIONS
PRIOR TO INSTALLATION
Please read installation instructions below. All plumbing should be
installed in accordance with applicable building codes and regulations.
Unpack and inspect the items for any shipping damages. If you find
damages, do not install.
All products must be installed by a professional and certified plumber
otherwise warranty may be voided.
POSSIBLE TOOLS REQUIRED*
Level
Plumbers Tape
Tape Measure
Adjustable Wrench
Hex Wrench
Thread Sealant
Pencil or Marker
Screwdriver
Drill
*not included
fontanashowers.com
FontanaShowers
FontanaShowers
1
Customer Service: 800-684-4489
Advertisement

Related Manuals for Fontana Showers FS9645


Summary of Contents for Fontana Showers FS9645
- Page 1 FontanaShowers FontanaShowers © © Product code: FS9645 FONTANA DENVER CHROME DIGITAL TOUCH PANEL THERMOSTATIC SHOWER SET INSTALLATION INSTRUCTIONS PRIOR TO INSTALLATION Please read installation instructions below. All plumbing should be installed in accordance with applicable building codes and regulations. Unpack and inspect the items for any shipping damages. If you find damages, do not install.
- Page 2 FontanaShowers FontanaShowers © © Shower Head Installations Instruction Parts: Step 1: Mark the 4 drilling positions then use the Ø6mm drill to drill holes on the wall according to the marked hole position. Step 3: Inset the plug(D) into the hole, hold the fix base (C) use the tapping screw (D) through fix base(C) holes, tighten the tapping screw (D) tighten the top shower fixed bar(E) and the inlet hose (F) with the fix base (C) fontanashowers.com...
- Page 3 FontanaShowers FontanaShowers © © Step 5: Fixed the top shower with the top shower fixed bar (E) , then connect with the inlet hose (F) . 2 Inlets for Rainshower are provided in big shower heads so the water disperses equally throughout the showerhead.
- Page 4 FontanaShowers FontanaShowers © © Hand-Held Shower Installations Instructions Step 1 Step 2 Step 3 Step 4 Hand Shower Outlet Installation • Complete the outlet pipework ensuring it ends in an appropriate 15mm x 1/2" BSP female thread elbow. Note: This fitting is not supplied as variations in installations require the selection of a suitable solder or compression fitting.
- Page 5 FontanaShowers FontanaShowers © © Digital Mixer 2 Way Installation Instructions Step 1 Step 2 Step 3 Step 4 Step 5 Step 6 fontanashowers.com FontanaShowers FontanaShowers Customer Service: 800-684-4489...
- Page 6 FontanaShowers FontanaShowers © © Step 7 Step 8 Step 9 Step 10 Notice 1. The control panel is sensitive, when installing it, please avoid to lel it ace directly to the water from the hand shower and the head shower, because water will gel it misoperation or lock the control panel.
- Page 7 FontanaShowers FontanaShowers © © fontanashowers.com FontanaShowers FontanaShowers Customer Service: 800-684-4489...
- Page 8 FontanaShowers FontanaShowers © © fontanashowers.com FontanaShowers FontanaShowers Customer Service: 800-684-4489...
- Page 9 FontanaShowers FontanaShowers © © fontanashowers.com FontanaShowers FontanaShowers Customer Service: 800-684-4489...
- Page 10 FontanaShowers FontanaShowers © © Installation Of The Control Panel 1. Build the control panel into the shower panel Step 1: Open a hole (6.7" X 3.7") on the shower panel, putting some glass cement around the back of the control panel and fit it in the hole of the shower panel as picture shown. Step 2: Fasten the mounting bracket onto the back of the control panel by screws.
- Page 11 FontanaShowers FontanaShowers © © Recess Mounted Into Wall According to the wall thickness, you can choose installation method A or B. Method A: If the wall is thin, the host box and the shower control panel can be installed in a different position.
- Page 12 FontanaShowers FontanaShowers © © fontanashowers.com FontanaShowers FontanaShowers Customer Service: 800-684-4489...
- Page 13 FontanaShowers FontanaShowers © © fontanashowers.com FontanaShowers FontanaShowers Customer Service: 800-684-4489...
- Page 14 FontanaShowers FontanaShowers © © Operation 1. Power on/off Power on A. After electrify (The battery without electricity or not install battery), press the fly-shuttle switch, power on and switch on the head shower automatically, adjust the ther- mostatic Temp function. When you hear buzzer sound, the fly-shuttle switch and LCD display would be lighting.
- Page 15 FontanaShowers FontanaShowers © © When the TEMP is lowest, rotating the fly-shuttle switch one round counter-clockwise to enter into cold water mode, cursor and frame will move to the cold water icon. You can hear buzzer sound when system enter into cold water mode. If you rotate the fly-shuttle switch one round clockwise, system will enter into the water TEMP adjusting again.
-
Page 16: General Information
FontanaShowers FontanaShowers © © General Information All products manufactured and supplied by Fontana are safe and comply to legislative requirements. Providing they are installed correctly and receive regular maintenance in accordance with these instructions your user experience will not be affected Care &...
Need help?
Do you have a question about the FS9645 and is the answer not in the manual?
Questions and answers