Table of Contents
Advertisement
Advertisement
Table of Contents

Summary of Contents for CareWise C-Trak Apollo
- Page 1 C-Trak Apollo Wireless/Wired Gamma Probe for radio guided surgery User Manual...
-
Page 2: Table Of Contents
7.9 Environmental Limits 7.10 Label Legibility 8.0 Use of Optional Accessories 8.1 Apollo Handset 8.2 Apollo Charging Dock and Plug-In Charger 8.3 C-Trak Apollo System Cart ® 8.4 Foot Pedal 8.5 Printer 8.6 Lechner Collimator 8.7 Indium Shield Assembly www.carewise.com... -
Page 3: Introduction
IMPORTANT INFORMATION WARNING: No modification of this equipment is allowed. 1.0 Introduction 1.1 C-Trak Analyzer and Probe Introduction 1.2 C-Trak Getting Started Guide ® ® The C-Trak Apollo system has been designed to detect and (1) Attach the Monitor to the Stand. Place the stand on a flat, ®... - Page 4 C-Trak Apollo (4) Connecting the OmniProbe to the Apollo Wireless Handset Carefully insert the OmniProbe through the clamp so if not using the wired option. that the base of the probe comes into contact with the LEMO connector mounted on the handset.
-
Page 5: C-Trak ® Quick Reference For Surgical Use
1.3 C-Trak Quick Reference for Surgical Use 2. Ensure that: ® a. The probe connected to the analyzer is the probe listed on the Count Screen Before use the system should be calibrated using [Image bottom left on this page]. the supplied test source. -
Page 6: Getting Acquainted With The C-Trak ® System
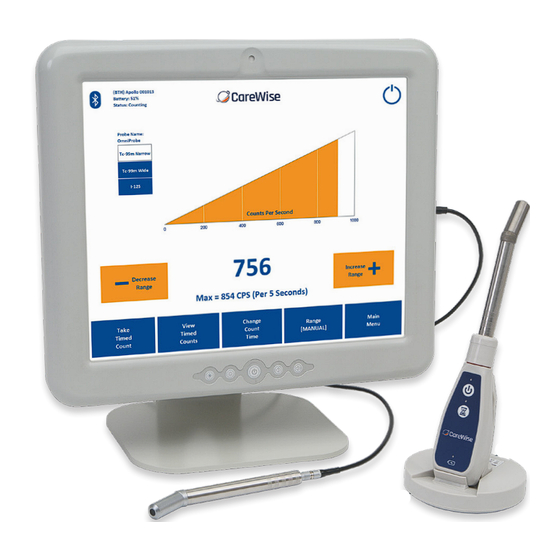
C-Trak Apollo 2.0 Getting acquainted with the C-Trak System ® 2.1 Front Panel [Figure 1] (1) Display Screens – Depending on the specific screen selected, displays the data on radiation detected by the system, the specific configuration of the system when in use, or the information needed to calibrate or reconfigure the system as desired. -
Page 7: Bottom Panel
2.2 Bottom Panel [Figure 2] (1) Power – DC In Connection • External, Universal AC input (100-240 vac 47-63 Hz), 100 watts, DC-out: 12 V, 8.33 A. • For U.S. applications, the AC mains plug is Hospital Grade, NEMA 5-15P-HG. •... -
Page 8: Accessing The Display Screens (Sections 1 - 14)
C-Trak Apollo 2.4 Accessing the screens The C-Trak Apollo is a touchscreen system. To change screens or ® input data, select the desired field by touching the corresponding ‘button’ with your finger. The screen will respond to bare or gloved fingers or other stylus and solid instruments. - Page 9 (7) Toggle between manual and auto-range – When the [AUTO] ranging option is selected, the software will automatically change the measurement range and associated sound pitch to the optimal setting for the quantity of radioactivity being detected at that point in time. The optimisation process typically takes no more than five seconds.
- Page 10 C-Trak Apollo 2.4-2 Take Timed Counts Screen On the Take Timed Counts Screen [Figure 7], a user can collect information about how much radiation is detected over time. In the lower corner is a countdown timer, which starts with the duration of the timed count selected in 2.4-4;...
- Page 11 2.4-3 View Timed Counts Screen (Continued) Locking Timed Count Fields: The user can lock the changeable fields by pressing the lock icon in the upper, right-hand side. When the image of the padlock is “open” [as in Figure 8], the fields can be rearranged. When the image of the padlock is “closed”, the fields are locked in place.
- Page 12 C-Trak Apollo 2.4-4 Change Count Time Screen On the Change Count Time Screen [Figure 9], a user can set the duration of timed counts. The default is 10 seconds. The default can be restored quickly by pressing the “Default” button.
- Page 13 2.4-7 System Test Screen On the System Test Screen [Figure 12], reached from the Main Menu [Figure 11], a user can calibrate and test all functionality of the Apollo system. When a user presses SYSTEM TEST, the Apollo system will both calibrate and test the system. IT IS ESSENTIAL THAT THE CORRECT PROBE BE SELECTED FOR THIS PROCESS.
- Page 14 C-Trak Apollo 2.4-9 Select Probe Screen The Select Probe Screen [Figure 14], can be reached from the SYSTEM TEST Screen or the SETUP Screen. Select Probe allows users with multiple probes to select which C-Trak gamma probe ® to use. Users can create new probe entries by selecting NEW or choose a different probe with SELECT.
- Page 15 2.4-10 Select Isotope Screen The Select Isotope Screen [Refer to Figure 16] allows the user to quickly choose from a list of commonly used isotopes, based on the type of probe currently selected. (1) Clinical Isotope – Pressing this button brings up the Count Screen preset to detect the most commonly used clinical isotope associated with the type of probe selected.
- Page 16 C-Trak Apollo 2.4-10.2 Edit/Create Isotope Screen To create or edit an isotope entry from the Isotope Library Screen (Section 2.4-10.1), selecting NEW will bring up the Edit/Create Isotope Screen [Figure 18]. The user can enter the isotope’s full name, as well as a shortcut name, threshold setting, window setting, and primary photopeak using the on screen keyboard.
- Page 17 2.4-13 Shutdown Screen The Shutdown Screen [Figure 20] appears if the ‘power button’ icon in the top right-hand corner is pressed and allows the user to turn off the Apollo System. Pressing ‘No’ will return the User to whichever screen was live before the power button icon was pressed.
- Page 18 C-Trak Apollo Figure 21c – Main Counts Screen showing the Cable icon for the active wired OmniProbe mode of operation In order to pair a new Apollo handset with the system, press the Pair button in the Available Devices screen.
- Page 19 Figure 22b – Enter the password obtained from Care Wise Support using the on-screen keyboard Figure 22c – Enter the password obtained from Care Wise Support using the on-screen keyboard Figure 22d – Add Device window showing available devices that can be selected...
- Page 20 C-Trak Apollo Pressing the Icon will bring up the available connections screen which will list all of the available Apollo devices that have been previously linked to the Apollo system. Each connection type is displayed in terms of six parameters:...
- Page 21 Click ‘Select’ to connect the software to the selected Apollo Handset device. Figure 26 –Information shown on screen when the highlighted available device has been selected after pressing the Select button Once connected, the software will return to the main Counts screen and the top LED on the Apollo Handset keypad will be illuminated in steady blue (not flashing).
-
Page 22: Calibration Guidelines
C-Trak Apollo Low battery indication and charging: For Low Battery indications, see Appendix C. Figure 29 – Main Counts Screen showing Apollo handset has become active again after a Sleep period Figure 30 – Main Counts screen showing indication for... -
Page 23: Check Source Holder Use
4.0 Pre-surgery Set Up Check Source for C-Trak OmniProbe ® ® A Sodium 22 (Na-22) check source should be used to calibrate the system if an OmniProbe PET is in use. ® Before use the system should be calibrated using The characteristics of Sodium 22 are: the supplied test source. -
Page 24: Sterile Practices, Cleaning And Disinfecting
C-Trak Apollo 5.0 Sterile Practices, Cleaning and Disinfecting Processing Instructions in accordance with ISO 17664:2017, Annex B Manufacturer: Southern Scientific Limited Device: Care Wise C-Trak OmniProbes (Standard, EL and PET; standard and Lechner collimators) ® WARNINGS OmniProbes sold with the C-Trak system are sold as non-sterile devices and must always be used within a sterile drape. - Page 25 Reconnect the cable and probe and turn on the C-Trak Apollo System. If the system is still indicating a high background, turn the system off and repeat the steps above. If the system still indicates a high background, contact nuclear medicine or biomedical engineering for evaluation.
- Page 26 C-Trak Apollo Disinfection (continued) a) Take one Rinse Wipe sachet. b) Remove the Wipe from its sachet and lay it out in the palm of your hand. c) Wipe the surface of the device that has been decontaminated to remove excess foam.
- Page 27 E-mail: info@southernscientific.co.uk Telephone: +44 1273 497600 LabLogic Systems, Inc. (USA) E-mail: sales@carewise.com Telephone: +1 813 626 6848 The instructions provided above have been validated by the manufacturer of the medical device as being capable of preparing a medical device for reuse. It remains the responsibility of the processor to ensure that the processing, as actually performed using equipment, materials and personnel in the processing facility, achieves the desired result.
-
Page 28: Safety Considerations
C-Trak Apollo 6.0 Safety Considerations 6.1 Error Messages Maintenance Routinely check the handset battery’s charge status via the Apollo Appendix C describes the various error messages that may software – this will be displayed as a percentage value. appear if the C-Trak Apollo System detects any malfunction. -
Page 29: Radioactive Concerns
6.5 Radioactive Concerns All radioactive isotopes and/or material, drapes, liquids, cleaning materials, etc., that come in contact with a radioisotope, or item that is contaminated with a radioisotope, must be handsetd as per your institution’s radiation rules and regulations. Consult with your Radiation Safety Officer for guidance concerning the use and disposal of radioactive material. -
Page 30: Technical Specifications
C-Trak Apollo 7.0 Technical Specifications 7.1 Power / Probe Overload Cutoff 7.2 LCD Display The Apollo CW4000 system is classified by the U.S. Code of The 17" LCD Resistive Touch display is integral to the C-Trak ® Federal Regulations as a Class I device. In Europe the Apollo Apollo CW4000 System. -
Page 31: Use Of Optional Accessories
8.0 Use of Optional Accessories 8.1 Apollo Handset 8.3 C-Trak Apollo System Cart ® The Apollo Wireless Handset has been designed to permit To ensure that all system components are neatly and securely operation of the Apollo system without the need to have a stored, Care Wise offers a sturdy wheeled C-Trak Apollo ®... -
Page 32: Foot Pedal
C-Trak Apollo 8.4 Foot Pedal 8.7 Indium Shield Assembly An optional USB Foot Pedal can be supplied with the analyzer The Indium shield assembly is an extra layer of shielding that which allows the timed counts operation [Section 2.4-2] to be... -
Page 33: International Symbols
9.0 International Symbols Temperature Limits (°C) Information, Consult Accompanying Documents (User’s Guide) Humidity Limits Equipment not suitable for use in the presence of a flammable mixture with air or with oxygen or nitrous oxide Atmospheric Pressure (hPa) Medical – General Medical Equipment as to electrical shock, fire and mechanical hazards only in accordance with ANSI/AAMI ES60601-1: A1:2012, “Man Reading Book”... -
Page 34: Warranty, Receiving Examination, Returns And Repairs
C-Trak Apollo Appendix A Warranty Equipment being returned, for any reason, MUST be clean and Care Wise warrants all new analyzers, probes, and related disinfected. A completed copy of the Care Wise Proof of Cleaning products addressed in this User Guide to be free of defects due... - Page 35 Appendix B Troubleshooting The meter moves but there is no sound 1. The volume may be turned down. To adjust the volume on the system press the volume buttons located on the front panel. 2. The range selected does not detect the radioisotope present. Lower the Range using the Range Selections.
-
Page 36: Error Messages
C-Trak Apollo Appendix C Error Messages Probe or Apollo Device Disconnected – [Figure 32] Information: USB/Bluetooth communications have been disconnected; reconnect the Apollo Handset (Bluetooth or USB) and press ‘OK’. Figure 32 – Connection Error Message Probe Disconnected – [Figure 33] Warning: The OmniProbe has become disconnected from the Apollo Handset or probe cable. - Page 37 Figure 35 – High Voltage Error Low Battery Indications – [Figure 36] If the system is being operated using an Apollo Handset in Bluetooth wireless mode, ® the software will indicate if the battery level drops below a critical value. In the ‘Battery Critical’ phase, a coloured box will appear around the Bluetooth symbol in the top, left-hand corner of the ®...
- Page 38 C-Trak Apollo Figure 38 – Shutdown State Over-Range Error – [Figure 39] If If the measured count rate exceeds the measurement capacity of the probe (e.g. by moving the probe in the vicinity of a very high level of radioactivity), the system will enter an ‘...
-
Page 39: Emc Precautions
Appendix D EMC Precautions Electromagnetic environment guidance: • The C-Trak CW4000 uses RF (Radio Frequency) energy Special precautions regarding EMC (Electromagnetic ® only for its internal function. Therefore, its RF emissions Compatibility) and the Care Wise C-Trak Apollo System. ® are very low and are not likely to cause any interference The C-Trak Apollo System conforms to IEC 60601-1-2 standards... -
Page 40: Proof Of Cleaning Statement
C-Trak Apollo Appendix E Proof of Cleaning Statement (Must be included with any C-Trak Device/System return) ® RMA Number: Date: Purchase Order Number: Serial Number(s) and Reason(s) for return: S/N-1 REASON-1 S/N-2 REASON-2 S/N-3 REASON-3 S/N-4 REASON-4 S/N-5 REASON-5 This “Proof of Cleaning Statement” is a safety requirement. Its purpose is to ensure that the item(s) being returned for evaluation/repair/maintenance pose no biological threat to any personnel that may be exposed to said product. - Page 41 Appendix F Care Wise Product List C-Trak Apollo Systems and Components Product Code ® 1. C-Trak Apollo standard systems ® a. With OmniProbe standard device and standard Technetium collimator CW5-APO1-01 ® b. With OmniProbe EL device CW5-APO1-02 ® c. With OmniProbe PET device CW5-APO1-03 ®...
- Page 42 C-Trak Apollo Appendix F (continued) 4. Service Contracts Care Wise understand the need for outstanding services to minimise instrument downtime and maximise reliability. The most cost effective way to do this is through our service contracts, which include: Annual Preventative Maintenance (return to base) − Annual preventative maintenance checks on your instrument to ensure system reliability.
-
Page 43: Appendix H Intended Use
Appendix H Intended Use The C-Trak Apollo system (CW4000) is the new iteration of the existing Galaxy CW4000 device; an active, invasive medical device comprised ® of a pre-compliant Panel PC incorporating an analyser MCA, power supply, Wireless accessory, gamma probe (Omniprobe), and probe cable (either USB where specified or coaxial signal cable, depending on the chosen use mode). -
Page 44: Appendix I Disposal Information
C-Trak Apollo Appendix I Disposal Information Upon the system’s end of life, the following disposal routes must be adhered to: Monitor, Power supply and Cable Disposal route following WEEE (EU) or applicable E-Waste (US) regulations after necessary cleaning/disinfection. Monitor Stand Disposal route following local recycling guidance for metals after necessary cleaning/disinfection. - Page 45 Important Information Probe Handling Treat the probe as you would any expensive, delicate instrument. Inside the probe are crystals and a glass photomultiplier tube. If the probe is dropped or hit against something hard, it can break. PLEASE HANDLE CAREFULLY Figure 41 –...
- Page 46 C/o LabLogic Systems, Inc. Scientific House, The Henfield Business Park 1911 N US HWY 301, Suite 140 Shoreham Road, Henfield, BN5 9SL, UK Tampa, FL 33619, USA E-mail: info@southernscientific.co.uk E-mail: sales@carewise.com Tel: +44 (0)1273 497600 Tel: +1-813-626-6848 www.southernscientific.co.uk www.carewise.com A LabLogic Group Company...
Need help?
Do you have a question about the C-Trak Apollo and is the answer not in the manual?
Questions and answers