Advertisement
Quick Links
Hanover Outdoor Furniture
IMPORTANT
If you have any problems with this product (missing or damaged parts, assembly issues, etc.),
PLEASE DO NOT RETURN TO THE RETAILER/STORE
from where you purchased the product.
1-877-397-5144
Please call our Toll‐Free Customer Service Hotline at:
Between 9:00 AM and 5:00 PM Eastern Time, Monday through Friday
www.hanover‐products.com
Or visit our website at:
To expedite any future warranty claims, please retain the Instruction Sheet, Warranty
Card and receipt for future use.
Care and Maintenance
Store furniture in an upright position. Be careful to never allow water to build up in frames as this will
cause corrosion and freeze damage in cold climates. Wash all frames with a solution of mild soap and
water. Rinse with clean water and dry with a soft absorbent cloth towel. Frames can be treated with a
liquid wax for maximum protection against UV rays and/or salty, damp air. If your set includes
cushions, slings, and/or an umbrella they may be cleaned by hand with a solution of soap and water
with a clean water rinse. (Never machine wash cushions, slings or umbrella covers as this will result in
shrinkage or damage). After cleaning cushions tip on end and allow to drip dry. (Never use a
commercial or home dryer to tumble dry fabric goods). Do not use bleach or solvents to clean any
product! This will void the warranty.
For additional on‐line support on assembly, troubleshooting and care & maintenance of your outdoor
furniture, please visit our website at: www.hanover‐products.com.
6/1/2015 (b)
Advertisement

Subscribe to Our Youtube Channel
Related Manuals for Hanover GFM00692A


Summary of Contents for Hanover GFM00692A
- Page 1 Do not use bleach or solvents to clean any product! This will void the warranty. For additional on‐line support on assembly, troubleshooting and care & maintenance of your outdoor furniture, please visit our website at: www.hanover‐products.com. 6/1/2015 (b)
- Page 2 IN CONNECTION WITH THE REPAIR OR REPLACEMENT OF ANY PRODUCT OR COMPONENT DEEMED TO BE DEFECTIVE UNDER THE TERMS AND CONDITIONS AS STATED IN THIS WARRANTY. NEITHER HANOVER, THE PRODUCT MANUFACTURER NOR ITS AGENTS SHALL BE LIABLE IN ANY CASE FOR INCIDENTAL, INDIRECT, SPECIAL OR CONSEQUENTIAL DAMAGES RESULTING FROM THE USE OF THIS PRODUCT OR ARISING OUT OF ANY BREACH OF THIS WARRANTY OR NEGLIGENCE EVEN IF IT HAS BEEN ADVISED OF THE POSSIBILITY OF SUCH DAMAGES.
- Page 3 Page 4 of 7...
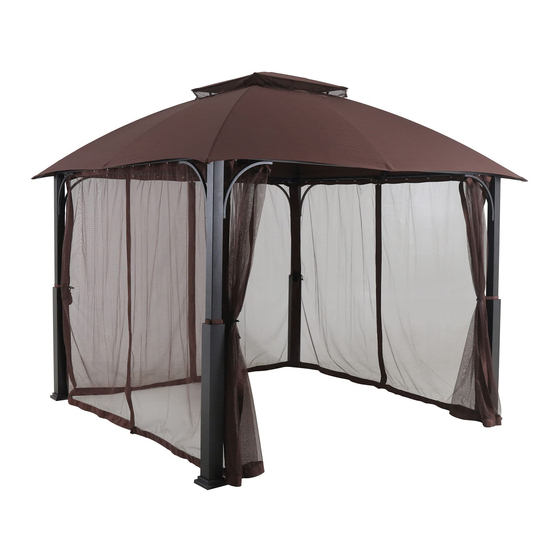
- Page 4 Assembly Instructions GFM00692A Aluminum and Steel Gazebo with Netting Questions, problems, or missing parts? Before returning to the store, call Customer Service. 1-877-397-5144 8 a.m. -5 p.m., PST Monday - Friday Retain this manual for future use.
-
Page 5: Parts And Tools
GFM00692A Parts & Tools PART PICTURE & DESCRIPTION PART PICTURE & DESCRIPTION Inclined tube 1 Inclined tube 2 40+2 M6*15 mm screw 24+2 Inclined tube 3 M6*35 mm screw Left beam 16+2 M6*45 mm screw Right beam Inner allen wrench... - Page 6 GFM00692A Q-shape split ring Post base Beam connected part 2 WARNING: To avoid damage of this production, please use either the carton or another soft surface such as carpet as a working surface to Small canopy prevent product damage during assembly.
- Page 7 GFM00692A Gazebo Assembly Step 1: • Attach the post leg (D1) to the post leg cover (D2). • Attach the U-shape kit to the post leg (D1) with M6*15mm screw (Q) using inner allen wrench (T). • Attach the post base (J) to the post leg (D1) with M6*15mm screw (Q) using inner allen wrench (T).
- Page 8 GFM00692A Step 4: • Attach the support tube (G) to post leg (D1) and the beams with M6*35mm screw (R) using the inner allen wrench (T). Step 5: • Attach the inclined tube 1 (A1) and inclined tube 2 (A2) to the top kit (E) alternately as shown.
- Page 9 GFM00692A Step 7: • Attach the rail beam clip (O) to the beams with M6*45mm screw (S) as shown. • Attach the rail beam (C) to the rail beam clip (O). Step 8: • Put the large canopy (M) on the inclined tubes as shown.
- Page 10 GFM00692A Step 10: • Tighten the large canopy (M) as shown. Step 11: • Attach the net (N) to the rail beam, using Q-shape split ring. • Mount the gazebo on the ground with Ground spike (U). • Assembly is completed.
Need help?
Do you have a question about the GFM00692A and is the answer not in the manual?
Questions and answers