
Subscribe to Our Youtube Channel
Related Manuals for North-Vision Tech Elegant-1100


Summary of Contents for North-Vision Tech Elegant-1100
- Page 1 Multi-parameter Patient Monitor Elegant-1100 User Manual Version: 3.0 Issued by: Sara Lo Date: 7/20/2020 Reviewed by: Albert Huang Date: 7/20/2020 Document No: UM-PM1-201405-01 North-Vision Tech. Inc. 2460...
- Page 2 Part1: General requirements for safety),and MDD 93/42/EEC. It complies with both international and enterprise standards and is also approved by the Food and Drug Administration, Ministry of Health and Welfare. The Manual is written for the current Elegant-1100 Multi-parameter Patient Monitor.
- Page 3 User Manual for Multi-parameter Patient Monitor North-vision Tech. Inc. Instructions to User Dear Users, thank you very much for purchasing our product. Please read the following pages very carefully before using this equipment. Read these instructions carefully before using this monitor. These instructions describe the operating procedures to be followed strictly.
- Page 4 User Manual for Multi-parameter Patient Monitor North-vision Tech. Inc. technical indexes have been carefully tested and positive testing results obtained. Before maintenance, please switch off power. This monitor is a professional medical device, can only be operated by trained personnel with qualification.
-
Page 5: Table Of Contents
User Manual for Multi-parameter Patient Monitor North-vision Tech. Inc. TABLE OF CONTENT CHAPTER 1 OVERVIEW 1.1 FEATURES 1.2 PRODUCT NAME AND MODEL 1.3 DESCRIPTION AND INDICATION FOR USE 1.4 REQUIREMENT OF OPERATING ENVIRONMENT AND INSTALLATION 1.5 NORMAL WORKING ENVIRONMENT 1.6 IMPACT ON ENVIRONMENT AND RESOURCES 1.7 SAFETY... - Page 6 User Manual for Multi-parameter Patient Monitor North-vision Tech. Inc. 4.5.1 Screen Description 4.6 TREND SCREEN 4.6.1 Screen Description 4.6.2 Operating Instructions 4.7 RECALL SCREEN 4.8 THE MENU SETUP SCREEN OF THE SYSTEM 4.8.1 Screen Description 4.8.2 System Parameter Settings 4.8.3 ECG Parameter Settings 4.8.4 NIBP Parameter Settings...
- Page 7 User Manual for Multi-parameter Patient Monitor North-vision Tech. Inc. 8.1 PROTECTIVE MAINTENANCES 8.2 BATTERY MAINTENANCE 8.3 CLEANING, STERILIZATION AND DISINFECTION OF THE MONITOR 8.4 CLEANING, STERILIZATION AND DISINFECTION OF ACCESSORIES 8.5 STORAGE 8.6 TRANSPORTATION CHAPTER 9 TROUBLESHOOTING 9.1 NO DISPLAY ON THE SCREEN 9.2 EXCESSIVE ECG SIGNAL INTERFERENCE OR THICK BASELINE...
-
Page 8: Chapter 1 Overview
User Manual for Patient Monitor Chapter 1 Overview 1.1 Features This monitoring system may be used to monitor patient’s ECG, non-invasive blood pressure (NIBP), pulse oxygen saturation (SpO2), pulse rate and other physiological parameters. 10.4” high-resolution color LCD to display patient’s ECG waveform and SpO2 cubage waveform; Abundant and friendly display interface, multifold ECG display screen: Main monitoring screen: displays the information of all the waveforms and parameters visually. -
Page 9: Product Name And Model
1.3 Description and Indication for use 1.3.1 Device Description Elegant-1100 is intended to monitor, display and record physiological data to provide cardiac and vital signs monitoring within a medical facility. It is modular designed patient Monitor, which can monitor the patient’s Electrocardiograph (ECG) by measuring physical parameters with variety modules. -
Page 10: Impact On Environment And Resources
1.6 Impact on Environment and Resources 1.7 Safety a) Conform to IEC 60601-1, certified as Class II, with Type BF and CF applied parts. b) Elegant-1100 Multi-parameter Patient Monitor can resist against defibrillator and electrosurgical detect and filter the pacemaker-generated signals equipment interferences, and can... -
Page 11: Chapter 2 The Operation And The Patient Monitor
2.1 Overall Structure and Working Theories The overall structure of this monitor is shown as Fig.2.1. Elegant-1100 patient monitor is a product of modular design. It performs its measurement of the physiological parameter through different modules. There are four functional modules for the monitor: ECG module, NIBP module, SpO module and Central Processing Unit (CPU) module. -
Page 12: Chapter 3 Installation And Connection
3.1.1 Front Panel North-vision 3 4 5 6 7 Figure 3.1 Elegant-1100 Front Panel The patient monitor front panel is shown above: 1 Power switch Press it to turn on the monitor, press it again to turn off the monitor. - Page 13 User Manual for Patient Monitor system starts count-down after the alarm silent time is set and will activate the alarm when the count-down ends. The alarm silence time has 4 settings: 2 min, 5 min, 10 min and 20 min, or in alarm. FREEZE Press this key to freeze ECG wave, or ECG, SpO based on the freezing settings in the system.
-
Page 14: Left And Right Side Panel
User Manual for Patient Monitor 3.1.2 Left and Right Side Panel Figure 3.2 Left panel Figure 3.3 Right panel The built-in printer is on the left panel as shown in Figure 3.2. The right panel of the monitor hosts the patient cable and probe jacks, as shown in Figure 3.3. 1. -
Page 15: Back Panel
User Manual for Patient Monitor 3.1.3 Back Panel Figure 3.4 Back panel The back panel of the monitor includes the following 1. MONITOR: External monitor port 2. NET: Communication port which is used to network with central monitoring system : Equipotential grounding port 4. -
Page 16: Installation
User Manual for Patient Monitor 3.2 Installation 3.2.1 Opening the Box and Check 1. Open the packaging, take out the monitor accessories from the box carefully and place it in a safe stable and easy to watch position. 2. Open the users’ manual to sort the accessories according to the packing list. Inspect the accessories for any mechanical damages Check all the exposed leads and inserted accessories Please contact the local dealer or our company in case of any problems. -
Page 17: Connection
User Manual for Patient Monitor 3.3 Connection 3.3.1 ECG Connection ECG measurement is to collect the ECG signal via the ECG electrodes. Electrode connects the patient and the lead. The lead connects the monitor. The locations of the electrodes are very important for obtaining accurate ECG signals. -
Page 18: Blood Pressure Cuff Connection
User Manual for Patient Monitor Elegant-1100 Multi-parameter Patient Monitor can only be equipped with ECG leads provided by our company; using ECG leads supplied by other companies may cause improper performance or poor protection while using defibrillator. Electric parts of electrodes, leads and cable are forbidden to contact any other conductive parts (including ground). -
Page 19: To Connect The Spo2
User Manual for Patient Monitor Figure 3.6 Cuff Position When unplugging the cuff, hold the head of the connector and pull it out. Safety Instructions for NIBP Monitoring When taking the measure of an pediatric’s (less than 10 years old) blood pressure, do NOT operate in the adult mode. -
Page 20: Battery Installation
User Manual for Patient Monitor The scenario above will cause inaccurate reading or no readings during SpO measurement. Safety Introductions for SpO Monitoring Continuous use of fingertip SpO sensor may result in discomfort or pain, especially for those patients with microcirculatory problem. It is recommended that the sensor should NOT be applied to the same finger for over two hours. - Page 21 User Manual for Patient Monitor Withdrawal of paper Load the paper Figure 3.8 Loading Printing Paper...
-
Page 22: Chapter 4 Monitoring Screen
User Manual for Patient Monitor Chapter 4 Monitoring Screen 4.1 Main Screen 4.1.1 Date and Time Setup Instead of entering into monitoring screen, it shows the date and time setting screen immediately after the monitor is started, shown as Figure 4.1: Figure 4.1 Date and Time Setup The system will stay on this screen for 10 seconds. -
Page 23: Screen Description
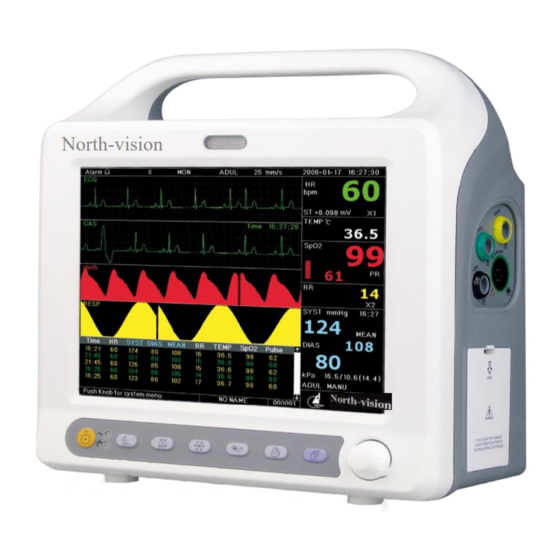
User Manual for Patient Monitor 4.1.2 Screen Description Figure 4.2 Main Screen Border area: “Alarm”: Alarm status, shows the alarm ON, shows the alarm silence status. “16:27”: alarm silence count down time, the alarm activates automatically after the system finishes counting down. “II”: Lead indicator, I, II, III, aVR, aVL, aVF, V (V1-V6) and GND adjustable. - Page 24 User Manual for Patient Monitor “Push knob for system menu”: System prompt or description for the current status. “NO NAME”: Patient name. The patient name can be entered or changed in the archive management window. “000001”: The patient ID. The patient ID can be entered or changed in the archive management window.
- Page 25 User Manual for Patient Monitor Figure 4.4 NIBP data area NIBP Data: “SYS”, “DIA”, “MAP”: The blood pressure type labels and the measured value. “09:36”: The time of NIBP measuring “mmHg”: The measurement values when the unit is mmHg. “Manu”: The NIBP measurement mode: Manual mode.
- Page 26 User Manual for Patient Monitor Mark and Value of PI & PR Figure 4.6 SpO and Pulse Rate Data Area “SpO ”: SpO label,the “99” on the right side is the current SpO value being measured. “PI & PR”: Pulse rate label. The value “5.5 & 60” n the lower left shows the Perfusion index and pulse rate value.
-
Page 27: Display2 Screen
User Manual for Patient Monitor 4.2 Display2 Screen 4.2.1 Viewing Screen Choose Obsev of Disp2 on system setup screen, press the DISP key to enter the monitoring screen, as shown in Figure 4.9. Figure 4.9 Viewing Screen In this screen, press the DISP key to switch the ECG lead, or press the Print key to print the ECG waveform and the second waveform. -
Page 28: Freeze And St Analysis Screen
User Manual for Patient Monitor 4.3 Freeze and ST Analysis Screen In the main screen, press the Freeze key to freeze three channel ECG waveforms or all the waveforms on the screen, as shown in Figure 4.10. Figure 4.10 Frozen Screen 4.3.1 Screen Description Freezing, ST segment analysis screen is similar with the main screen, except the waveforms are frozen. -
Page 29: Operation Instruction
User Manual for Patient Monitor 4.3.2 Operation Instruction between the ST segment value and the referenced value. The value is displayed after the measure on “ST + 0.000 mV”. The operation is carried out in 4 steps. First, rotate the Navigation Knob to move the base point (the red cross) horizontally to base line point (the base line is between the Q wave and the P wave). -
Page 30: Spo2 Data List Screen
User Manual for Patient Monitor 4.5 SpO2 Data List Screen Move the gray cursor to SpO List in the mode selection screen, and press Navigation Knob to enter into data list screen, displays in the same position shown as Figure 4.13. Figure 4.13 SpO List 4.5.1 Screen Description... - Page 31 User Manual for Patient Monitor Figure 4.15 HR Trend Graph Figure 4.15 is the ECG trend graph. There are 3 options on the right of the graph, as described below. The “12” on the top shows the trend graph time. Move the cursor to the trend time, press the knob and rotate the knob.
-
Page 32: Operating Instructions
User Manual for Patient Monitor Figure 4.18 SpO2 Trend Graph Figure 4.19 PR Trend Graph Figure 4.20 NIBP Trend Graph 4.6.2 Operating Instructions Rotate the knob, choose the parameter and press the knob. Review the trend graph and move the cursor to the Exit button to exit the trend graph. -
Page 33: Recall Screen
User Manual for Patient Monitor 4.7 Recall Screen Move the cursor to “RCALL” in the mode selection screen and press the navigation knob, the system enters in the waveform recall screen. Figure 4.22 Waveform Recall Screen The waveform recall screen is shown in Figure 4.22. It is different from the main screen in its 2 waveform area and the operation area. - Page 34 User Manual for Patient Monitor HIST: press this button to switch the button between the history button and current button. Press the History button the recall listing on the left side displays the history listing. Press the Current button, the recall list on the left side displays the current listings. When entering the recall screen, the system defaults to the current listing.
-
Page 35: The Menu Setup Screen Of The System
User Manual for Patient Monitor 4.8 The Menu Setup Screen of the System 4.8.1 Screen Description During the Mode Selection screen, move the cursor to the “SETUP” and press the knob. The screen shows the system setting screen as shown in Figure 4.26. Figure 4.26 System Settings To set up the system parameter, rotate the knob and move the cursor to the corresponding button, press the knob to perform the corresponding system settings. - Page 36 User Manual for Patient Monitor default is 5. HL7: Monitoring to hl7 format output measurement signal. Nuser Call: Nurse call signal output can be provided in the monitoring process. Password: The need for the administrator password for a specific project input.
-
Page 37: System Parameter Settings
User Manual for Patient Monitor 4.8.2 Print Parameter Settings Figure 4.28 Print Parameter Settings Print: Choose to open the printer function, The default is “ON”. Timer: Regular printing time, The options are “OFF、1、2、3…240 Minute”, Chose a time “XX” minutes, when the exit the setting screen after the time the countdown to the end of the countdown is triggered to print the current screen, and will be printed once after every XX minutes, the factory default setting is “OFF”... -
Page 38: Nibp Parameter Settings
User Manual for Patient Monitor during normal operation. Factory default is “OFF”. Notch: ECG waveform filter, “50 Hz” To do 50hz filtering said ECG waveform, “60 Hz” To do 60hz filtering said ECG waveform,”OFF” Do not do filtering, Factory default is “50Hz”. Grid: The grids will be displayed on the background if this setting is “ON”. -
Page 39: Spo2 Parameter Settings
User Manual for Patient Monitor Test gas leakage: This option provides the cuff with test leak with turning the rotary knob will highlight the cursor position in the test leak position rotary knob will leak testing, test results and blood pressure zone. WARNING: STAT can only be used for Adult. -
Page 40: File/Patient Management Screen
User Manual for Patient Monitor 4.10 File/Patient Management Screen Figure 4.37 File Management settings The document/patient management screen can be used to manage information about the patient. In the screen, the operator can enter the patient ID, name, bed number, sex, and age. The operator can also choose to save the patient data in the permanent storage. -
Page 41: Chapter 5 Technical Specifications
User Manual for Patient Monitor Chapter 5 Technical Specifications 5.1 ECG Monitoring 1. Input signals range in amplitude: ± 0.5 mV ~ ± 3mV 2. Heart rate display range: 15bpm ~ 300 bpm 3. Heart rate display accuracy: ± 1% or ± 2 bpm, whichever is greater. 4. -
Page 42: Spo2 Monitoring
User Manual for Patient Monitor MAP: ±5 mmHg Measurement mode: Manual, Auto Measurement Method: Adult, Pediatric 5.3 SpO Monitoring Transducer: Dual-wavelength LED measuring range: 0%~100% measuring accuracy: Arms is not greater than 2% for SpO range from 70% to 100% measurement accuracy:... -
Page 43: Default Alarming Values Of All Parameters
User Manual for Patient Monitor 5.8 Default Alarming Values of All Parameters Mode Adult Pediatric Parameter High 180bpm 200bpm Heart Rate 40bpm 50bpm High 180mmHg 130mmHg Systolic 60mmHg 50mmHg High 120mmHg 90mmHg Diastolic 50mmHg 40mmHg High 160mmHg 110mmHg 50mmHg 40mmHg High 100% 100%... -
Page 44: Chapter 6 Packaging And Accessories
User Manual for Patient Monitor Chapter 6 Packaging and Accessories 6.1 Packaging The product is packed in high quality corrugated cartons with foam inside to protect the equipment against damage in the shipping and handling process. Gross Weight: see the packaging Dimensions: 500mm x 320mm x 460mm 6.2 Accessories (1) ECG lead cable One set... -
Page 45: Chapter 7 Monitoring Parameters
User Manual for Patient Monitor Chapter 7 Monitoring Parameters 7.1 Measuring ECG The electrocardiogram (ECG or EKG) is primarily a tool for evaluating the electrical events within the heart. The action potentials of cardiac-muscle cells can be viewed as batteries that cause charge to move throughout the body fluids. -
Page 46: The Principle For Measurement Of The Blood Pressure
User Manual for Patient Monitor 7.2 The Principle for Measurement of the Blood Pressure Blood pressure may be measured in an invasive manner (whereby the sensor will be inserted into blood vessel directly) or a non-invasive manner. The non-invasive methods include several methodologies, the Korotkoff-souna method and oscillating method. - Page 47 User Manual for Patient Monitor 1. The measures by the Korotkoff-souna method are liable to effect of human factors. For example, different people may have different sound judging ability, or different reactivity when listening to heart sound and reading mercury meter. The air release speed and subjectivity may also affect the judgment. By the oscillating method, the computation is accomplished by the computer, thus relieving the possibility of effect due to human factor.
-
Page 48: Measuring The Blood Pressures
User Manual for Patient Monitor 7.3 Measuring the Blood Pressures 7.3.1 Operational Tips Like common non-invasive blood pressure measurement, improper operation may cause inaccurate or no result, or misunderstanding of the measuring information when the oscillating method is used to take the measure of blood pressure. - Page 49 User Manual for Patient Monitor 6. Subject with hyperadiposis. In addition, statistics show that 37% people report blood pressure difference of no less than 0.80kPa (6mmHg) between the left and right arms, and 13% people report difference of no less than 1.47kPa (11mmHg).
-
Page 50: Measuring The Pulse Oxygen Saturation And Pulse Rate
User Manual for Patient Monitor 7.4 Measuring the Pulse Oxygen Saturation and Pulse Rate This monitor measures the pulse oxygen saturation and the pulse by means of the radiograph of infrared light and the red light emitted by LED through body’s peripheral areas (fingers), whereby the photoelectric detecting circuits will analyze the absorption of the oxy-hemoglobin and reduced hemoglobin respectively, and give the photo-absorption rates before and after pulsation. -
Page 51: Chapter 8 Maintenance
User Manual for Patient Monitor Chapter 8 Maintenance The multi-parameter patient monitor should be properly maintained to ensure its maximum performance and long service life. In addition to the warranty period of one year, the company also offers long-term service for each customer. -
Page 52: Cleaning, Sterilization And Disinfection Of The Monitor
User Manual for Patient Monitor explosion risk. Do not hit or strike it with force; Do not use this battery on other devices; Do not use this battery below -10℃ or above 40℃; In order to maintain battery supply time and prolong battery lifetime, please use the battery once a month and do not charge it until it is used up each time. -
Page 53: Storage
User Manual for Patient Monitor Do not use damaged accessories. Accessories can not be entirely immerged into water, liquor or cleanser. Do not use radial, steam or epoxyethane to disinfect accessories. 8.5 Storage If the apparatus will not be used for long period of time, wipe it clean and keep it in the package, which shall be kept in a dry place free from dust. -
Page 54: Chapter 9 Troubleshooting
User Manual for Patient Monitor Chapter 9 Troubleshooting Note: To troubleshoot this machine in the service, follow the instructions below to eliminate the problem first. If the attempt fails, refer to the dealer in your local area or the manufacturer. The service should be performed by a professional electrician. -
Page 55: Chapter 10 Appendix
User Manual for Patient Monitor 10.1 Other Terms and Messages “Cuff error” - cuff is not wrapped correctly, or is not connected “Air leak” - Pneumatic component, tubing or cuff leaks “Pressure error” - Unstable cuff pressure or tangled cuff tubing “Signal weak”... - Page 56 User Manual for Patient Monitor Manufacturer North-vision Tech. Inc. Address: 1st Fl., No.15, Gongye E. 2nd Rd., East Dist., HsinChu City 30075, Taiwan R.O.C. International Sales North-vision Tech. Inc. Address: 1st Fl., No.15, Gongye E. 2nd Rd., East Dist., HsinChu City 30075, Taiwan R.O.C.
Need help?
Do you have a question about the Elegant-1100 and is the answer not in the manual?
Questions and answers