Table of Contents

Related Manuals for North-Vision Tech Wrist-100


Summary of Contents for North-Vision Tech Wrist-100
- Page 1 User Manual for Wrist Oximeter North-vision Wrist Pulse Oximeter Wrist-100 User Manual Version: 2 Issued by: Sara Lo Date: 5/11/2020 Reviewed by: Albert Huang Date: 5/11/2020 Document No: UM-WO1-201212-01 North-Vision Tech. Inc. 2460...
- Page 2 Manual. No part of this manual may be photocopied, reproduced or translated into another language without the prior written consent. North-vision Tech. Inc. reserves the right to improve and amend it at any time without prior notice.
- Page 3 User Manual for Wrist Oximeter Notes ⚫ The contents contained in this manual are subject to change without prior notice. ⚫ Information furnished by our company is believed to be accurate and reliable. However, no responsibility is assumed by us for its use, or any infringements of patents or other rights of third parties that may result from its use.
- Page 4 User Manual for Wrist Oximeter Warnings For individual patients, there should be a more prudent inspecting in the placing process. The device cannot be clipped on the edema and tender tissue. The light (the infrared light is invisible) emitted from the sensor is harmful to the eyes, so the user or even the service engineer should not stare at the light emitting components.
- Page 5 User Manual for Wrist Oximeter High temperature or high pressure steam disinfection to the oximeter is not permitted. Refer to related chapter for instructions of cleaning and disinfection. Declaration of Conformity: The manufacturer hereby declares that this device complies with the following standards: IEC 60601-1 ISO 80601-2-61...
-
Page 6: Table Of Contents
User Manual for Wrist Oximeter Contents 1 OVERVIEW............... 1 1.1 Appearance............. 1 1.2 Name and Model............ 3 1.3 Conformation............4 1.4 Features..............4 1.5 Intended Use............5 1.6 Key of Symbols ............6 2 BATTERY INSTALLATION........7 3 OPERATION. - Page 7 User Manual for Wrist Oximeter 4 ADDITIONAL ADVICE FOR OPERATION..26 5 TECHNICAL SPECIFICATIONS......27 6 ACCESSORIES............30 7 REPAIR AND MAINTENANCE......31 7.1 Maintenance............31 7.2 Cleaning and Disinfecting Instruction……………33 8 TROUBLESHOOTING........... 34 9 APPENDIX ...............
-
Page 8: Overview
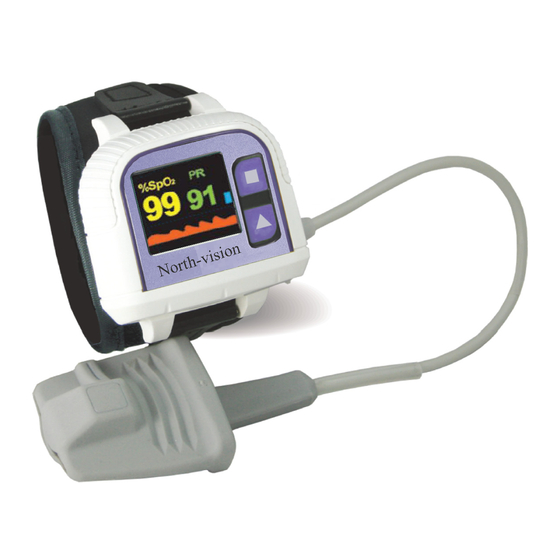
User Manual for Wrist Oximeter 1 Overview 1.1 Appearance Figure 1 Front View 1. LCD screen 2. Set Key “ ■ ” : shift display modes, confirm the operation etc. 3. Scroll Key“ ”: Short Press to move display cursor, ▲... - Page 9 User Manual for Wrist Oximeter Figure 2 Frontal Side View 4. Buzzer 5. Data interface 6. Wristband Underlay Figure 3 Right Side View 7. SpO probe receptacle...
-
Page 10: Name And Model
User Manual for Wrist Oximeter 1.2 Name and Model Name: “North-vision” Wrist Pulse Oximeter Model: Wrist-100... -
Page 11: Conformation
User Manual for Wrist Oximeter 1.3 Conformation It comprises the main unit and SpO probe. 1.4 Features Wrist Oximeter can be used to measure and record the functional oxygen saturation (SpO ) and pulse rate accurately. Simply put your finger into sensor, SpO value and pulse rate value will be displayed on screen and stored in the device. -
Page 12: Intended Use
User Manual for Wrist Oximeter ● Recording interval can be selected, up to 480 hours data memory; ● Applicable for longtime continuous measurement; ● PR trend curve and SpO trend curve view; ● Data storage and transmission to PC for view and analysis (Optional);... -
Page 13: Key Of Symbols
User Manual for Wrist Oximeter 1.7 Key of Symbols Symbol Description Pulse Oxygen Saturation %SpO Perfusion Index Pulse Rate USB interface Pulse rate icon Low battery voltage icon for display always on Full memory icon Serial number Date of manufacture Authorized representative in the European community Manufacturer (including address) -
Page 14: Battery Installation
User Manual for Wrist Oximeter 2 Battery Installation Figure 4 Battery Installation 1. Lift up the cloth covered on the battery cover. Then, use your index finger and middle finger to press against the battery cover. Meanwhile, slide it towards the side with probe (as shown in Figure 4). -
Page 15: Operation
User Manual for Wrist Oximeter 3 Operation NOTE for key button operation: Long pressing: press a key down more than 1 second. Short pressing: press a key down then let it go immediately (less than 1 second). The following methods can activate the device while it is in standby status: 1. - Page 16 User Manual for Wrist Oximeter Figure 5 SpO Probe Connection 2. Fix the oximeter on your left wrist (Figure 6); 3. Then, hold the probe with its opening towards your index finger. The probe should be oriented in such a way that the sensor side with a finger tip icon is positioned on the top (Figure 6).
- Page 17 User Manual for Wrist Oximeter (Figure 7). Adjust the finger to be placed evenly on the middle base of the sensor (make sure the finger is in the right position). If the index finger cannot be positioned correctly, or is not available, other finger can be used. Figure 7 Wrong Placement of the Probe: Not deep enough...
- Page 18 User Manual for Wrist Oximeter Figure 9A Default Screen Display “%SpO ”: SpO label; “99”: SpO value; “PR”: Pulse rate label; “65”: Pulse rate value; “ ”: Pulse beat icon; “ ”: Battery indicator; “ ”: Pulsation bar-graph; ...
- Page 19 User Manual for Wrist Oximeter you choose display always on, the icon (“ ”) for “display always on” will appear on the screen as shown in Figure 9B. ● Short press “ ” key during measurement, the screen ▲ display direction can flip 180°. Figure 9B “Display Always On”...
- Page 20 User Manual for Wrist Oximeter Figure 9C -13-...
- Page 21 User Manual for Wrist Oximeter “PI%”: Perfusion index label; Figure 9D Real Time Clock “20:30”: the current time; Key Operations: ● Long press “ ” key, menu screen will be displayed, ■ refer to section 3.2 for details; 6.
- Page 22 User Manual for Wrist Oximeter Figure 10 “No Signal” Indication ● During measurement, if the memory is full or the total number of the records reaches to 1024 pieces, the earliest record will be overwritten and the icon “ ” will appear on the screen for prompt, as shown in Figure 11.
- Page 23 User Manual for Wrist Oximeter Working Mode Note: It is suggested that the data shall be uploaded to computer when memory is full, or the earliest record will be overwritten. ● The measurement will start automatically when the finger is inserted into the SpO probe, so the data recording (SpO and PR value) starts simultaneously...
- Page 24 User Manual for Wrist Oximeter any key will activate the screen to default display screen, or once the finger is inserted in the SpO probe, the measurement will start and screen display will be activated as well. Note: During measurement, there is a green-dot flashing on the screen for indicating the measurement and data recording are undergoing when the display screen is blank, and if SpO...
-
Page 25: Menu Operation
User Manual for Wrist Oximeter 3.2 Menu Operation On display screen, long press “ ” key menu screen will be ■ displayed on the screen, as shown in Figure 12. Figure 12 Menu Screen Review: view SpO and pulse rate trend graph; ... -
Page 26: Trend Review
User Manual for Wrist Oximeter Operation Instructions: ● Short press “ ” key: shift cursor circularly; ▲ ● Short press “ ” key: confirm the selection and ■ enter into the corresponding screen; ● long press “ ” key: go back to the default screen ■... -
Page 27: Delete Data
User Manual for Wrist Oximeter Operation Instructions: ● Short press “ ” key: Page scroll forward; ▲ ● Short press “ ” key: Page scroll backward; ■ ● Long press “ ” key: go back to the menu screen; ■ Note: when the display screen is menu screen or its submenu screen, the measurement will be interrupted. - Page 28 User Manual for Wrist Oximeter Figure 15 Over-limit indication Settings SpO Lo: set SpO low limit; Setting range:85%~95%, default setting: 90%; PR Lo: set pulse rate low limit; Setting range:25bpm~99bpm, default setting: 50bpm; PR Hi: set pulse rate high limit; Setting range:100bpm~250bpm, default setting: 120bpm;...
-
Page 29: Time Settings
User Manual for Wrist Oximeter ● Short press “ ” key: increase numerical value one ▲ time; ● long press “ ” key: increase numerical values ▲ continuously; ● Short press “ ” key: confirm the selection; ■ ● long press “ ”... -
Page 30: Record Interval Settings
User Manual for Wrist Oximeter time; ● long press “ ” key: increase numerical value ▲ continuously; ● Short press “ ” key: confirm the modification; ■ ● long press “ ” key: go back to the menu screen; ■ 3.2.5 Record Interval Settings On menu screen, select “Rec Interval”... - Page 31 User Manual for Wrist Oximeter ● long press “ ” key: go back to the menu screen; ■ Note: The length of data record is constrained to at least 30 seconds, and the maximal length for one record is also limited to 60 hours (for 1 second interval) , 240 hours (for 4 second interval) or 480 hours (for 8 second interval) respectively.
-
Page 32: Upload Data
User Manual for Wrist Oximeter 3.3 Upload Data Before uploading the data to PC, please quit from the menu screen if you are doing the setup or trend view operation. Before uploading, connect the USB data cable between the oximeter and PC. ●... -
Page 33: Additional Advice For Operation
User Manual for Wrist Oximeter 4 Additional Advice for Operation ● The finger should be put properly and correctly. ● Avoid shaking finger as possible as you can during measurement; ● Do not put wet finger directly into sensor. ● Avoid placing the device on the same limb which is wrapped with a cuff for blood pressure measurement or during venous infusion. -
Page 34: Technical Specifications
User Manual for Wrist Oximeter 5 Technical Specifications A. Display mode: Color OLED Display B. Power supply requirement: 2 x LR03 (AAA) alkaline batteries Supply voltage: 2.2 V~3.3V Operation time:50hrs C. Operating current: ≤50mA D. SpO Parameter Specifications Transducer: dual-wavelength LED Measurement wavelength: Red light: 663 nm, Infrared light: 890 nm. - Page 35 User Manual for Wrist Oximeter F. Preset limits: Low limit setting: Pulse Rate limit setting range: Upper limit: 120bpm Lower limit: 50bpm G. Update rate: 6 seconds moving average for SpO and 8 beats average for Pulse Rate readings. H. Perfusion Index Display Range: 0.2%~20% Performance under low perfusion condition The accuracy of SpO...
- Page 36 User Manual for Wrist Oximeter Dimensions: W 59mm×D 49mm×H 22mm Net Weight: about 60g (not including batteries) M. Classification The type of protection against electric shock: Internally powered equipment. The degree of protection against electric shock: Type BF applied part. The degree of protection against harmful ingress of liquids: IP22.
-
Page 37: Accessories
User Manual for Wrist Oximeter 6 Accessories ● A data cable (optional) ● Oximeter Data Manager software (optional) ● A Wristband ● A SpO Probe ● Two batteries (AAA) ● A User Manual Note: The accessories are subject to change. See the items and quantity in your hand for detailed. -
Page 38: Repair And Maintenance
User Manual for Wrist Oximeter 7 Repair and Maintenance 7.1 Maintenance The service life (not a warranty) of this device is 5 years. In order to ensure its long service life, please pay attention to the maintenance. ● Please change the batteries when the low-voltage indicator lightens. - Page 39 User Manual for Wrist Oximeter Do not immerse the device in liquid. -32-...
-
Page 40: Cleaning And Disinfecting Instruction
User Manual for Wrist Oximeter 7.2 Cleaning and Disinfecting Instruction ● Surface-clean sensor with a soft gauze by wetting with a solution such as 75% isopropyl alcohol, if low-level disinfection is required, use a 1:10 bleach solution. Then surface-clean with a damp cloth and dry with a piece of cloth. -
Page 41: Troubleshooting
User Manual for Wrist Oximeter 8 Troubleshooting Trouble Possible Reason Solution The SpO 1. The finger is not 1. Place the finger and Pulse Rate placed far enough correctly inside and display inside. try again. instable 1. The batteries are drained or almost 1. - Page 42 User Manual for Wrist Oximeter Trouble Possible Reason Solution 1. Connect the 1. The probe is not probe to the connected to the oximeter properly oximeter properly. and try again.; Always 2. The finger is not display 2. Place the finger placed well.
-
Page 43: Appendix
User Manual for Wrist Oximeter 9 Appendix A Common Knowledge for SpO Measurement 1 Meaning of SpO is the saturation percentage of oxygen in the blood, so called O concentration in the blood; it is defined by the percentage of oxyhemoglobin (HbO ) in the total hemoglobin of the arterial blood. - Page 44 User Manual for Wrist Oximeter the structure character of the tissue by which the light passes. Due to that oxygenated hemoglobin (HbO ) and deoxygenated hemoglobin (Hb) have different absorption character in the spectrum range from red to infrared light (600nm~1000nm wavelength), by using these characteristics, can be determined.
- Page 45 User Manual for Wrist Oximeter Factors affecting SpO measuring accuracy (interference reason) Intravascular dyes such as indocyanine green or methylene blue Exposure to excessive illumination, such as surgical lamps, bilirubin lamps, fluorescent lights, infrared heating lamps, or direct sunlight. ...
- Page 46 User Manual for Wrist Oximeter Factors causing low SpO Measuring value (pathology reason) Hypoxemia disease, functional lack of HbO2 Pigmentation or abnormal oxyhemoglobin level Abnormal oxyhemoglobin variation Methemoglobin disease Sulfhemoglobinemia or arterial occlusion exists near sensor ...
-
Page 47: B Wristband Installation And Disassembly
User Manual for Wrist Oximeter B Wristband Installation and Disassembly Step 1: Fix the wristband on your left wrist(Fig.A). Fig. B Wristband underlay Wristband Fig. A Fig.C Step 2: Put the oximeter on the proper site of the wristband. Then press the oximeter to make the wristband underlay(Fig.B) stick to the wristband firmly. - Page 48 User Manual for Wrist Oximeter Manufacturer North-vision Tech. Inc. Address: 1st Fl., No.15, Gongye E. 2nd Rd., East Dist., HsinChu City 30075, Taiwan R.O.C. International Sales North-vision Tech. Inc. Address: 1st Fl., No.15, Gongye E. 2nd Rd., East Dist., HsinChu City 30075, Taiwan R.O.C.
- Page 49 User Manual for Wrist Oximeter European Representative: CMC Medical Devices & Drugs S.L. C/Horacio Lengo N 18, CP 29006 Malaga, Spain TEL: +34951214054 FAX:+ 34952330100 -42-...
Need help?
Do you have a question about the Wrist-100 and is the answer not in the manual?
Questions and answers