
Related Manuals for Resodyn LabRAM II H


Summary of Contents for Resodyn LabRAM II H
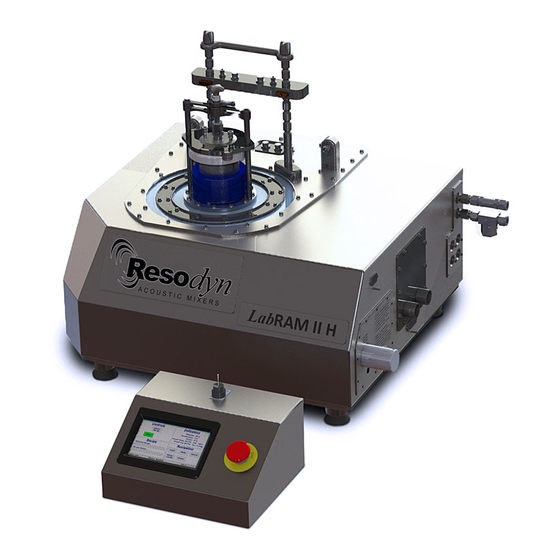
- Page 1 LabRAM II H Installation and Users’ Manual Resodyn Acoustic Mixers 130 N. Main Street Butte, MT 59701 406-497-5333 www.resodynmixers.com...
- Page 2 Notes & Information Date of Purchase Date of Installation Pilot Testing Production Start Maintenance Record Resodyn Acoustic Mixers Rev 062520...
-
Page 3: Table Of Contents
Standard Vessel Fixture and Vessels................13 System Specifications ....................14 Voltage Level ......................14 Power Consumption ....................15 Installation ........................15 Unpacking, Lifting, and Placing LabRAM II H ..............15 Mounting ........................15 Remove the Shipping Lock Bar ...................16 Vessel Holder Assembly .....................16 Purge System ......................18 Electrical Installation ....................19 Purge Air Connections ....................20... - Page 4 Preventive Maintenance .....................66 14.2 Cleaning Procedures ....................66 14.3 Accelerometer Calibration ...................66 14.4 Maintenance .......................66 14.5 Replacement of Serviceable Parts ................67 Troubleshooting and Service ..................71 Appendices A Electrical Installation ..................A Appendices B Component Arrangement .................. G Resodyn Acoustic Mixers Rev 062520...
-
Page 5: Introduction
Moreover, as the materials properties in the processing vessel change properties the impedance to the system Resodyn Acoustic Mixers Rev 062520... - Page 6 For more information on the basics and practice of RAM technology, visit the Resodyn website at www.https//ResodynMixers.com, or contact Resodyn at 406 497-5333.
-
Page 7: Definitions
A condition (nominally at 60 Hz for RAM devices) at which the RAM mechanical system operates in the most powerful and efficient manner Torr: Units of vacuum used on Resodyn Manual Vacuum pressure based on an absolute scale. This method displays the same measure regardless of altitude. -
Page 8: Safety
LabRAM II H Operations Manual Safety Safety Every effort has been made to assure that the LabRAM II H is easy to use, reliable, and safe. This section outlines the general safety considerations and defines caution and warning symbols used throughout this manual. -
Page 9: Hazardous Location Notes
Resodyn Acoustic Mixers Technical Support. (406) 497-5333 Hazardous Location Notes The LabRAM II H system is designed to be operated in Class I Div I, and Class II, Div 1 and 2, Groups C-G. The purge controller ensures that adequate positive air pressure is present inside of the LabRAM II H unit, before power is applied to internal electronics. -
Page 10: Customer Responsibility
• objects. The LabRAM II H mixer is 350 lbs. with no additional options. The mixer should be lifted using a forklift. The LabRAM II H was packaged in a wooden crate and should be removed from the crate by performing the following instructions: 1. -
Page 11: Mounting
Mounting Feet Locations Do not attempt to lift or carry the LabRAM II H with a single person or multiple people. Only lift the equipment with proper lifting equipment and methods. Guards and Safety Devices Ensure all safety devices (limit switches, etc.) are functioning correctly, and regularly check their... -
Page 12: Technical Support For Mixer Operation
3.10 Technical Support for Mixer Operation: The LabRAM II H system should only be operated when it is in good working condition. If the system shows any signs of visible damage or fails to operate as outlined in this manual, the system should not be operated. -
Page 13: System Overview
These devices shall not be installed in the Hazardous Area. The Remote Control is connected to the LabRAM II H machine through both the Emergency- Stop cable and fiber optic communication cables for HMI Touch Screen control and USB interface. -
Page 14: Resonantacoustic ® Mixing Platform
Remote Panel and Touch Screen Human Machine Interface (HMI) The remote panel HMI is the primary user interface on the LabRAM II H. The LabRAM II H is digitally controlled through the HMI. All data entry and operations are provided through software keypads and buttons on the screen. -
Page 15: Standard Vessel Fixture And Vessels
A variety of vessel sizes and types, along with the appropriate hold-down fixtures are available for the LabRAM II H. The standard and supplied vessel hold-down fixture is a 5” diameter vessel holder that accommodates vessels between the heights of 4.5” and 7”. For vessels shorter than 4.5”, spacers can be purchased from Resodyn Acoustic Mixers as well as shorter standoffs and... -
Page 16: System Specifications
3) Fuse Access Cover, 4) Machine Cooling Fluid Connectors, 5) Panel for Vacuum Option, and 6) Fiber Communication Connectors. All external connections are found on the stainless acoustic enclosure of the LabRAM II H machine. See Section 4, System Overview, Page 11 for detailed illustrations. -
Page 17: Power Consumption
Installation Unpacking, Lifting, and Placing LabRAM II H Upon receipt of the LabRAM II H, do not unpack or remove any packaging materials until positioned as close to the installation location as possible. When in position, remove all wrapping and strapping, and retain shipping paperwork for your records. Retain all packaging material for 1 year should machine movement or unexpected warranty service be necessary. -
Page 18: Remove The Shipping Lock Bar
Installation Remove the Shipping Lock Bar The LabRAM II H is shipped with a Lock Bar to secure the resonator during transportation. The Lock Bar MUST be removed before proceeding with installation or attempting to operate the LabRAM II H. - Page 19 Mounting hole pattern for the standard 5” vessel holder is ¼-20 threads measuring 5.75” center- to-center. The mounting plate that comes standard with the LabRAM II H also has mounting holes to accept fixtures and vessels from the original LabRAM. The fastener holes are four ¼-20 threads measuring 4.375”...
-
Page 20: Purge System
It also has two pneumatic connections: incoming supply, and purge air going to the LabRAM II H. The purge air must be clean and dry; see Table 6-1 for the exact requirements. Wiring, plumbing and operating the purge control unit can be found in the unit’s manual. All wiring shall be rated for the hazardous location and installed by a qualified electrician. -
Page 21: Electrical Installation
Bypass Mode unless it is absolutely necessary, and the area is known to be nonhazardous. As soon as maintenance or service is complete, deactivate the Bypass Mode. Please contact Resodyn Acoustic Mixers for the Bypass Mode password. -
Page 22: Purge Air Connections
The purge control unit controls the airflow going to the LabRAM II H. A 3/8” outer diameter stainless steel tube needs to be run from the purge control unit to the LabRAM II H. The tubing length and the number of bends should be limited to minimize the pressure drop in the line. -
Page 23: Fiber Optic Communication
Filter Fiber Optic Communication The LabRAM II H is controlled remotely by the HMI on the Remote Control panel. The communication between the remote panel and the LabRAM II H machine is over the fiber optic cables. Two ST-type fiber optic connectors are provided for transmit and receive connections, shown below. -
Page 24: Temperature Measurement And Rtd And Vacuum Line Holder Option
A height adjustable RTD and vacuum line bridge is permanently mounted to the LabRAM II H. The line holder allows for user adjustability of the height of the RTD connectors. Connector cables between the connectors on the acoustic enclosure and the connectors on the RTD and vacuum line holder are provided below. -
Page 25: Jacketed Vessel And Jacketed Vessel Plumbing (Option)
LabRAM II H Operations Manual Installation operation at the home screen. Both RTD temperatures are recorded for every run. To view the temperature of RTD #2 during a mix, the viewer must be used. 6.11 Jacketed Vessel and Jacketed Vessel Plumbing (Option) - Page 26 LabRAM II H Operations Manual Installation Jacketed Vessel Installation: 1. Using a 1/8” hex key, remove the four ¼-20 brass plugs and rubber disk from the resonator plate as shown above 2. ¼”-20 hex bolts and washers 3. With the provided O-rings in the O-ring grooves of the lid of the jacketed vessel assembly, carefully place the lid assembly on the jacketed vessel housing, making sure to keep the O-rings in position.
- Page 27 LabRAM II H Operations Manual Installation RTD Cable (14mm Wrench) RTD/Vacuum Line Holder Assembly Heating/Cooling 6mm Anti-Static Line Mounts Vacuum and Vacuum (1/4” NPT Sensor Lines Connection) Use 10mm Wrench Use ½” Wrench (Use 9/16” Wrench) Jacketed Vessel Operation: The jacketed vessel system schematic is shown to the right.
-
Page 28: Vacuum Control System (Option)
LabRAM II H Operations Manual Installation 6.12 Vacuum Control System (Option) The vacuum control system option includes: 1) internal vacuum control wiring and control 2) filter and trap for vacuum sense and vacuum lines 3) RTD/Vacuum line holder The wetted parts in the system include:... -
Page 29: Remote Usb Connection (Option)
Components Inside Vacuum Module 6.13 Remote USB Connection (Option) The USB type B connection on the back of the LabRAM II H remote box is used for data download and firmware upgrades. To download the machine data and/or update the firmware a computer with RAM Tools software installed. -
Page 30: Quick Start
LabRAM II H. Setup To first set up the LabRAM II H mixer, the mixing vessel must be installed. The fixture must have a vessel installed before operating the mixer. (See Section 6.4) 7.1.1 Securing Container in the Vessel Holder Place the mixing vessel centered on the Lower Base, ensuring to align over the bottom dot, as described in Section 6.4 Vessel Holder Assembly. - Page 31 Power LED - When purging initiates, the screen will read, “VOLUME EXCHANGED XX%” increasing in percentage as the purge proceeds. When purging is complete, the LabRAM II H will receive power and the Enclosure Power LED will turn green. Enclosure Power...
- Page 32 LabRAM II H Operations Manual Quick Start 7.2.2 Remote Control Make sure the power cord is plugged into Rear View of the power cord socket of the Remote Remote Control Control panel. Turn the switch above the cord socket to the on, or “I” position.
-
Page 33: Login
LabRAM II H Operations Manual Quick Start Login Before running the LabRAM II H, a user login is required. For quick-start, the lowest level login will be used. Both the username and password are “operator”. 1. Touch the <Login/Logout> button. -
Page 34: Select The Recipe
Quick Start Select the Recipe The LabRAM II H is provided with a demonstration recipe to use as a reference and guideline. The following demonstrates how to select a recipe for mixing using that demonstration recipe. 1. Touch the <Select Recipe> button. The “Select Recipe” screen is displayed. -
Page 35: Run The Recipe
Repeat the Demo Mix recipe for familiarization if necessary or required. Completion When the middle section of the Recipe Status Bar reads “Status: Ready”, the LabRAM II H’s doors can be opened and the mix container can be removed. -
Page 36: Hmi (Human Machine Interface) - Overview
HMI Operation – Modes of Operation HMI (Human Machine Interface) – Overview The HMI is the primary user interface on the LabRAM II H. The LabRAM II H is digitally controlled through the HMI. All data entry and operations are achieved through software keypads and buttons on the HMI screen. -
Page 37: Login
HMI Operation – Modes of Operation Login As illustrated in the Quick Start section, in order to operate the LabRAM II H, user authentication (login) is required. Four different login levels are provided to control access to machine features. The LabRAM II H is delivered with pre-configured users at each level of login for demonstration purposes. -
Page 38: Hmi Operation - Security And Login
HMI Operation – Security and Login HMI Operation – Security and Login To protect the LabRAM II H from unauthorized use and to maintain a record of which users operated the mixer, the system uses a user authentication system. Users are required to enter a username and password before operating the mixer. -
Page 39: Log Files
(image 2 above). Log Files Every login attempt, successful or not, is logged to data files in the LabRAM II H’s memory. These files can be uploaded to a PC via USB for data archiving. See Section 13.8 Data Tab. -
Page 40: Hmi Operation - Modes Of Operation
10 HMI Operation – Modes of Operation As previously noted, the LabRAM II H is controlled in one of two operating modes, which are referred to as Auto Mode and Recipe Mode. Recipe Mode is the primary mode used by operators, while Auto Mode is used by higher levels to characterize a mixing process for eventual recipe programming. - Page 41 0C and 0inHg, respectively. When the timer of the final segment expires, the The LabRAM II H can be stopped by touching the mixer will stop. The <Stop Mixer> button changes <Stop Mixer> button during a recipe mix. Normally, to and the <Start Mixer>...
- Page 42 The LabRAM II H can then be restarted finished. by touching the <Start Mixer> button. 11. The LabRAM II H will give the option of starting from the beginning of the recipe by touching the <Start Over> button or continuing from the point the mixer was stopped by touching the <Resume>...
-
Page 43: Screen Operations - Auto Mode
HMI Operation – Alarming Screen Operations - Auto Mode The following table details the steps for operating the LabRAM II H in Auto Mode. Note that this sequence assumes the user has already logged in to the system with authorized login credentials to operate in Auto Mode. - Page 44 Configuration, touch the <Config/Alarms> button. NOTE: If the LabRAM II H is mixing or in acceleration, the setpoint would be used as soon as a valid setpoint was entered. The LabRAM II H does not wait for you to touch <Done>. Resodyn Acoustic Mixers...
- Page 45 LabRAM II H Operations Manual HMI Operation – Alarming The “Auto Mode Configuration and Alarms” screen 10. The “Select Configuration” dialog will appear, and is displayed. This screen allows a user to enter the Configuration can be selected from the list (only limitations that will shut the machine down (and one configuration is defined in the image).
- Page 46 LabRAM II H will begin accelerating/mixing. The text entered in this screen is stored in a log file in <Start Mixer> button changes to the <Stop Mixer> the LabRAM II H’s memory. Touch <OK> when button. Depending on Auto Mode Timer mode finished.
-
Page 47: Hmi Operation - Alarming
Auto Mode mix timer. 11 HMI Operation – Alarming The LabRAM II H protects itself and the user by monitoring parameters that could cause damage or injury. When any of these parameters are violated, the mixer will stop accelerating/mixing. - Page 48 “Door Opened During Operation” alarm has been triggered. This alarm is triggered if the LabRAM II H is mixing and the door is opened. Note - when an alarm is active but not acknowledged the alarm message will be red. The columns of the table are as follows: •...
-
Page 49: Hmi Operation - Viewer
HMI Operation – Setup and Configuration 12 HMI Operation – Viewer The LabRAM II H measures several parameters important to mixing efficiency. These measure parameters can be viewed in real-time as a time-history plot. To view real-time plots, touch the <Viewer>... -
Page 50: Hmi Operation - Setup And Configuration
Configuration screen provides user control of optional features, and manages the configuration of the LabRAM II H. The Setup and Configuration screen is accessed by touching the <Setup/Config> button from the Main Screen. If logged in at Level 0 (operator), this button is displayed, and the button is enabled for all other login levels (refer to image), but the content of the Setup and Configuration screen is adjusted based on the user’s login level. - Page 51 LabRAM II H Operations Manual HMI Operation – Setup and Configuration The Setup and Configuration screen is laid out in a tabbed format, like many modern web browsers. Touching a tab title will switch Tab Name Login Level Required between tabs. Tabs are added/removed...
-
Page 52: Status Tab
13.3 Recipe Tab The Recipe Tab is used to create and edit recipes and recipe groups. The LabRAM II H has the capability to store 10 recipe groups with 10 recipes per group, for a total of 100 recipes. Recipe groups can be thought of “folders”... - Page 53 That is because no recipe group has been selected yet. After touching the recipe name, an arrow will appear The recipe contents will be read from the LabRAM II H’s indicating that the recipe has been selected. To view/edit memory and displayed in the screen shown above. The the contents of this recipe touch the <Edit Recipe>...
- Page 54 Touch the textbox and enter 51 using these options are equipped on the LabRAM II H. Touch the “Numeric Entry” dialog and then touch the <Enter> the <Add> button on the left-side of the screen to append button.
- Page 55 LabRAM II H Operations Manual HMI Operation – Setup and Configuration A new segment, segment 4, is now added to the end of 10. Now, another segment will be added to the recipe, except the this recipe. Using the methods previously described, the <Insert>...
- Page 56 LabRAM II H Operations Manual HMI Operation – Setup and Configuration 15. A confirmation dialog will appear. Touch <Yes> to save. 13.3.2 Screen Operations – Create New, Rename, and Delete The following walk-through covers how to create a new recipe group and then add a new recipe to that group.
- Page 57 LabRAM II H Operations Manual HMI Operation – Setup and Configuration The “Select Configuration” dialog will appear. When a new recipe is created, a default name is given to the recipe. Also, a blank segment 1 is automatically Configurations will be discussed in a later section. Touch <OK>.
- Page 58 LabRAM II H Operations Manual HMI Operation – Setup and Configuration 11. The “Bad Recipe Segment” dialog will appear identifying 12. Correcting the contents of the recipe allows saving. that something is wrong with the definition of segment 1. Touch <Save File>.
- Page 59 LabRAM II H Operations Manual HMI Operation – Setup and Configuration 17. Touch <Yes> on the “Recipe Delete Confirmation” dialog 18. Selecting “new group” again will reveal that the recipe has to delete the recipe. indeed been deleted. Recipe Groups are also renamed and deleted from this screen.
-
Page 60: Setup1 Tab
13.4.3 Machine Options Group Box If a LabRAM II H user decides to enable features after initial purchase, a keycode will need to be entered to turn those features on. The Machine Options Group Box allows the user to enable optional features by entering a keycode. -
Page 61: Setup2 Tab
Clear Mix Comment: By default, the previous Mix Log Comment is retentive • between LabRAM II H starts. Checking this option will clear the Mix Log Comment between starts and force the user to re-type the mix comment. 13.5 Setup2 Tab Currently, only two buttons are present on the Setup2 Tab. - Page 62 LabRAM II H Operations Manual HMI Operation – Setup and Configuration 13.5.1 Screen Operations – User Management This walk-through describes how to create a new Level 2 (Calibration) user login. Touch the <Edit User/Password> button. The “User Management” dialog appears. Touch the <Add User>...
-
Page 63: Setting Date And Time
LabRAM II H Operations Manual HMI Operation – Setup and Configuration The password has been changed when the “User Confirm user delete by touching the <Yes> button in the Management” dialog reappears. Otherwise, a failure “User Delete Confirmation” dialog. dialog will notify the user of failed password change. To delete a user, select it, and touch the <Remove User>. - Page 64 HMI Operation – Setup and Configuration 13.7.1 Screen Operations – Edit a Configuration The following walk-through modifies the configuration provided with the LabRAM II H called “default.” This sequence assumes that temperature measurement option is equipped, and that temperature #1 was not used initially.
- Page 65 Additionally, all fixture and user temperature alarm limits will be active. The name given to the original fixture shipped with the LabRAM II H is also referred to as “default”. Touch the textbox next to “Fixture:”. NOTE: A fixture contains operational parameters associated with a mix container holder and mix container.
- Page 66 LabRAM II H Operations Manual HMI Operation – Setup and Configuration Deselect temperature #1. Touch <Save Config> to save Touch <Yes> on the “Configuration Save Confirmation” this configuration that does not use temperature dialog box. monitoring. 13.7.3 Configuration Usage This section will provide a refresher of how Configurations are used. Configurations are used for both Recipe and Auto Mode.
-
Page 67: Data Tab
HMI Operation – Setup and Configuration Data Tab The LabRAM II H stores log files for a variety of purposes. The list below summarizes the files that are captured on the LabRAM II H. Data Logs: Measured parameters are captured and written to data log files when the •... -
Page 68: Care And Maintenance
(IPA) or white spirit free of aromatic compounds. 14.3 Accelerometer Calibration The LabRAM II H acceleration should be calibrated once a year or per the end users specified preventative maintenance schedule or whenever the accelerometer is replaced. The calibration kit can be purchased or rented from Resodyn Acoustic Mixers. -
Page 69: Replacement Of Serviceable Parts
003277 The recommended spare parts list for the temperature measurement option are listed in Table 14-2, as well as their recommended quantities to have on hand. Table 14-2. LabRAM II H Temperature Measurement Option Spare Parts List. Description Part Number... - Page 70 The fuses can be replaced by pulling out on the fuse holder finger catch, which will rotate the fuse out. Once the fuses are replaced, put the fuse panel back on in the reverse order. If the machine does not turn on after replacing the fuse, please call Resodyn Acoustic Mixers Customer Service (406-497-5333) immediately.
- Page 71 14.5.2 Bellows Replacement The LabRAM II H is equipped with a sealed inner enclosure that houses the Resonator and Electrical equipment. The interior of the machine is sealed with inner and outer bellows between the moving plates and the enclosure. These bellows are designed for operational life greater than 2,000 hours.
- Page 72 14.5.3 Accelerometer Replacement The LabRAM II H is equipped with an accelerometer that is mounted to the underside of the Payload Plate, shown above. The accelerometer is designed for an operational life greater than 2,000 hours. Replacement instructions for the accelerometer are provided with the replacement part when ordered.
-
Page 73: Troubleshooting And Service
Troubleshooting and Service 15 Troubleshooting and Service The LabRAM II H systems should only be operated when it is in good working condition. If the system shows any signs of visible damage or fails to operate as outlined in this manual, the system should not be operated. - Page 74 HMI Comms Error The HMI has ceased to Ensure fiber optic cable is connected to communicate with the main both the LabRAM II H and the Remote controller Control Box. The purge cycle has not Verify that the Purge Controller light is solid completed or is in an error state green.
- Page 75 LabRAM II H Operations Manual Appendices ELECTRICAL INSTALLATION APPENDIX A (NEXT 2 PAGES) Resodyn Acoustic Mixers Revision 062520...
- Page 76 LabRAM II H Operations Manual Appendices (WHITE SPACE EDITED FOR VISUAL CLARITY IN FOLLOWING DRAWINGS) Resodyn Acoustic Mixers Revision 062520...
- Page 77 LabRAM II H Operations Manual Appendices Resodyn Acoustic Mixers Revision 062520...
- Page 78 LabRAM II H Operations Manual Appendices Resodyn Acoustic Mixers Revision 062520...
- Page 79 LabRAM II H Operations Manual Appendices Resodyn Acoustic Mixers Revision 062520...
- Page 80 LabRAM II H Operations Manual Appendices Resodyn Acoustic Mixers Revision 062520...
- Page 81 LabRAM II H Operations Manual Appendices APPENDIX B COMPONENT ARRANGEMENT Control Room (Non-Hazardous Area) US Version Color Description Comments Machine Emergency Stop Cable 10 ft. of bare cable supplied from HMI. 22” of conduit supplied on LabRAM II-H. Customer must supply remaining wiring and conduit.
- Page 82 LabRAM II H Operations Manual Appendices Machine Room (Hazardous Area) (See table on the following page for detail) Resodyn Acoustic Mixers Revision 062520...
- Page 83 LabRAM II H Operations Manual Appendices Color Description Comments Machine Power Cable 22” of ¾” NPT hazardous conduit supplied on LabRAM II-H. Customer must supply remaining wiring and conduit. Purge Controller compressed air supply Customer-supplied hose / piping Orange Vessel vacuum supply hose...
- Page 84 LabRAM II H Operations Manual Appendices Electrical/Plumbing Connections Separating Wall Color Description Comments White Remote HMI Power Cable Supplied by Resodyn Resodyn Acoustic Mixers Revision 062520...
- Page 85 LabRAM II H Operations Manual Appendices Table Information for International Machine Installations Color Description Comments Machine Power Cable ½” NPT hazardous rated gland and 100 ft of cable provided. Customer must supply remaining conduit. Machine Emergency Stop Cable ½” NPT hazardous rated gland and 100 ft of cable provided.
- Page 86 LabRAM II H Operations Manual Appendices Resodyn Acoustic Mixers Revision 062520...
Need help?
Do you have a question about the LabRAM II H and is the answer not in the manual?
Questions and answers