Table of Contents
Advertisement
Quick Links
W W W . T U F F C A R E . C O M
TUFFCARE, INC. ALL RIGHTS RESERVED
©
RHINO ELECTRIC LIFT_V2.3TW
R
h
i
n
o
P
a
R
h
i
n
o
P
a
P
4
2
0
,
P
P
4
2
0
,
P
O
p
e
r
a
t
i
n
O
p
e
r
a
t
i
ATTENTION
Before using this Medical Device read this manual. If you are unable to
understand, contact your equipment provider for technical support before
attempting to use this product.
t
i
e
n
t
L
i
f
t
e
r
t
i
e
n
t
L
i
f
t
e
r
4
2
5
,
P
6
5
5
4
2
5
,
P
6
5
5
g
M
a
n
u
a
l
n
g
M
a
n
u
a
l
Advertisement
Table of Contents

Related Manuals for Tuffcare Rhino P420


Summary of Contents for Tuffcare Rhino P420
- Page 1 W W W . T U F F C A R E . C O M ATTENTION Before using this Medical Device read this manual. If you are unable to understand, contact your equipment provider for technical support before TUFFCARE, INC. ALL RIGHTS RESERVED RHINO ELECTRIC LIFT_V2.3TW © attempting to use this product.
-
Page 2: Table Of Contents
TABLE OF CONTENTS S P E C I F I C AT I O N S TABLE OF CONTENTS S P E C I F I C AT I O N S Height at Sling Hook-up - MAX.: 81 inches Table of Contents Height at Sling Hook-up - MIN.: 36 inches Specifications... -
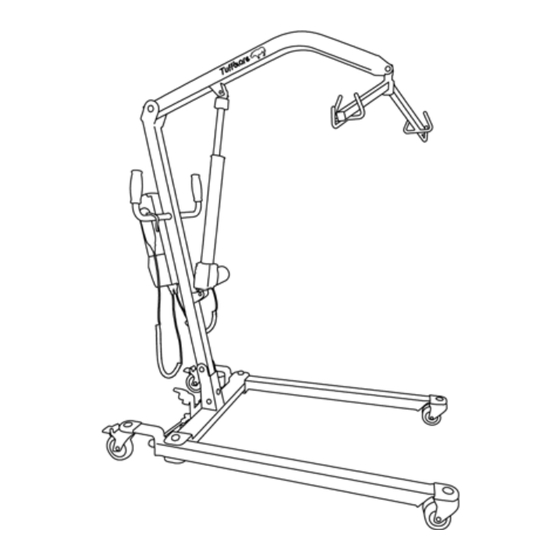
Page 3: Product Diagram
PRODUCT DIAGRAM PRODUCT DIAGRAM FULL ELECTRIC PATIENT LIFTER P425, P655 SEMI ELECTRIC PATIENT LIFTER P420 A. Lift Arm B. Attachment (Sling) Cradle A. Lift Arm B. Attachment (Sling) Cradle C. Up-Down Actuator D. Hand Pendant C. Up-Down Actuator D. Hand Pendant E. -
Page 4: General Guidelines
TUFFCARE patient lifters. can install a properly grounded outlet. Slings and accessories designed by other manufacturers are not to be utilized as a component of Tuffcare’s patient lifter system. 5. The Rhino floor lifter is intended to be used for patient within weight limit indicated for the lifter. - Page 5 P420, P425 and 650 lbs for P655. transfer) from around the patient. ASSEMBLING THE LIFTER TUFFCARE DOES NOT suggest locking the rear cast- DO NOT over-tighten mounting hardware. It will cause ers of the patient lifter when lifting a patient. When lift damage to the mounting brackets.
-
Page 6: Assembly
1. Position the up-down actuator between the mast WARNING bracket. Use only Tuffcare parts to complete this floor type patient lifter. 2. Install the pin through ASSEMBLING THE MAST ASSEMBLY TO THE BASE the holes of the up-down STEP DOWN TO LOCK actuator and mast bracket and secure with hitch pin. - Page 7 ATTACH THE POWER BASE ACTUATOR TO THE MAST ASSEMBLY( FOR P425 and P655) 4. Place the small flat washer 1. Locate the base actuator at onto the bolt. the space between the two rear casters. 2. Turn counter clockwise to 5.
-
Page 8: Attaching The Control Unit On Mounting Bracket
ATTACHING DRIVE UNIT ATTACHING DRIVE UNIT ATTACHING THE CONTROL UNIT ON THE MOUNTING BRACKET 1. Temporarily remove the controller setting screw from the mounting plate. 2. Align the controller to the mounting plate at about a 5 degree angle. 3. Make sure the 2 grooves at the lower back of the controller WARNING slide are positioned over the 2 extrusions at the bottom of the Make sure there is an audible click when plugging battery... -
Page 9: Attaching The Battery Pack On Control Unit
2. Set the battery pack on top of the controller at about a 5 degree angle. 4. Place the controller mounting screw back into the same place and tighten. 3. While holding onto the lever latch inside the handle, move the battery pack parallel to the controller. -
Page 10: Charging The Battery
CHARGING THE BATTERY CHARGING THE BATTERY PREPARING THE PATIENT LIFT FOR USE 1. Plug the hand control, leg actuator (For P425 and P655 Full Electronic Lifters Only) and up-down actuator into the NOTE: It is suggested to recharge the battery daily to prolong receptacles on the bottom of the control unit. -
Page 11: Operation
OPERATION OPERATION WARNING DO NOT attempt to transfer until the user is assessed by a qualified professional. Thoroughly read and fully understand the instructions in this Owner’s Manual. The bars on the battery meter will begin to flash based on the LOCKING/UNLOCKING THE REAR CASTERS remaining percentage of the charge, the flashing bar slowly increases when the battery is taking charge. - Page 12 ACTIVATING A MECHANICAL EMERGENCY RELEASE CLOSING/OPENING THE LEGS EMERGENCY RELEASE To Open and Close the Legs on P420 To activate the emergency release, twist and pull-down the Step down on left side of “Leg Adjusting Stepper” to close the legs Red Knob located on the top-end of Up-Down actuator drive shift.
-
Page 13: Lifting The Patient
LIFTING THE PATIENT LIFTING THE PATIENT POSITIONING THE PATIENT LIFTER WARNING The legs of the patient lifter MUST be in the maximum WARNING open position for stability and safety. 1. DO NOT exceed the maximum weight limit of 1. Open the leg section of the floor lift to obtain stability. 450/650 lbs FOR P420: Step down on right side of “Leg Adjusting 2.DO NOT attempt to transfer until the user is assessed... -
Page 14: Transfering The Patient
TUFFCARE slings are made specifically for use with TUFFCARE floor type patient lifter. Otherwise, injury or damage may occur. The legs of the patient lifter MUST be in the maximum open position for optimum stability and safety. - Page 15 TRANSFERRING PATIENT FROM BED 4. Elevate the patient into a upright position by raising the head of the bed or by using pillows. 1. Carefully and gently roll the patient on their side. The sling seat should be folded lengthwise and placed under the 5.
- Page 16 Patient’s arms should be inside of the chains or straps. TUFFCARE slings and Hardware are designed specially for use with TUFFCARE Patient Lifter. For the safety of the patient, DO NOT intermix slings and patient lifter of different manufacturers.
- Page 17 TRANSFERRING PATIENT FROM WHEELCHAIR RAISE THE PATIENT FROM THE FLOOR 1. Secure the wheelchair from rolling back by engaging both 1. Roll the patient on their side and place the sling under the wheel locks on the wheelchair. patient. 2. Lean patient forward and set the folded sling behind the 2.
- Page 18 TRANSFER FROM AUTOMOBILE TRANSFER TO AUTOMOBILE 1. Park the automobile on a flat, smooth surface. Open the 1. Push the lifter towards the car door. Approach the car with car door all the way. patient’s back to the car seat. 2.
-
Page 19: Lift Sling Type Reference
LIFT SLING TYPE REFERENCE UNIVERSAL SLINGS WITH HEADREST Tuffcare Rhino slings are made with a three layer soft but Model# Size Recommend sturdy polyester fabric as well as a polyester mesh type of Weight fabric which provides comfort and protects patients who may P135 30”... -
Page 20: Maintenance
(1) year. The warranty period commences on the original manufacture ® date. If within such warranty period any such product proven to Tuffcare DETECTING WEAR AND DAMAGE satisfaction to be defective, such product will be repaired or replaced at ®...
Need help?
Do you have a question about the Rhino P420 and is the answer not in the manual?
Questions and answers