
Related Manuals for Kurabo QuickGene-Auto12S


Summary of Contents for Kurabo QuickGene-Auto12S
- Page 1 Operation Manual Automated Nucleic Acid Isolation Device QuickGene-Auto12S QuickGene-Auto24S Ver. 1.0...
- Page 3 Introduction Thank you very much for purchasing our Automated Nucleic Acid Isolation Device QuickGene-Auto12S / QuickGene-Auto24S (here after referred to as “QG-Auto12S/24S”). This document contains important information about correct and safe use of the functions of this device. Before using, be sure to read this document.
- Page 4 Note: "Note" indicates precautions, instructions to abide by, supplemental explanations, etc. Intended Use QuickGene-Auto12S/24S which collocate with related reagent perform automated isolation of nucleic acid from biological sample. The sample derived from human beings could be different kind of sample such as blood, tissue, plasma, interstitial fluid…., which need to be well pretreatment then performing in this system.
- Page 5 In the event the device overheats, starts to smoke or smells abnormal, immediately unplug the power cable. Do not touch the power plug when thunder is heard or lightning is seen. When the current-limiting fuse is broken, leakage is possible. Do not use this equipment. QuickGene-Auto12S/QuickGene-Auto24S Operation Manual...
- Page 6 Repairs to QG-Auto12S/24S should only be performed by such agencies as are specifically authorized by KURABO Industries., Ltd. Only original KURABO Industries., Ltd. replacement parts should be used. Instruction for handling hazardous substances When handling or disposing of infectious materials, follow local municipal waste ordinances for proper disposal provisions to reduce the environmental impact of waste electrical and electronic equipment (WEEE).
- Page 7 ・ Handle the reagents in the kit in accordance with the safety precautions for handling and use. ・ Use in a laboratory or work space suitable for isolation work. QuickGene-Auto12S/24S Kit List Blood DNA Reagent Kit QuickGene-AutoS DNA Blood kit (AS-DB)
- Page 8 Read and understand operation manual before using this equipment. : Biohazard Risk Label This label indicates a biohazard risk. Warning: Hot Surface Risk of burns: do not touch immediately after operation. Warning: hands pinching Keep hands away. Warning: Hazardous voltage Risk of electrical shock. QuickGene-Auto12S/QuickGene-Auto24S Operation Manual...
- Page 9 Risk of damage to eyes and skin. Markings Mark Description Mark Description Manufacturer information Consult instructions for use European Authorized Serial number Representative Do not dispose of this product Humidity limitation as unsorted municipal waste Caution! Consult Temperature limitation accompanying documents Recyclable materials QuickGene-Auto12S/QuickGene-Auto24S Operation Manual...
- Page 10 ・ No liability is assumed for the results regardless of the purpose of use. ・ Validation of performance on samples shall be based on the judgment and responsibility of the user. When using this device, please thoroughly read this document and abide by the safety rules of your facility. viii QuickGene-Auto12S/QuickGene-Auto24S Operation Manual...
-
Page 11: Table Of Contents
Operation of DNA/RNA Isolation Collection of Isolation Samples After Operation 3 Cleaning and Maintenance p. 25 Daily Maintenance Weekly Maintenance Half a Year Maintenance How to replace the power fuse 4 Before Concluding as a Failure p. 31 Troubleshooting QuickGene-Auto12S/QuickGene-Auto24S Operation Manual... - Page 12 QuickGene-Auto12S/QuickGene-Auto24S Operation Manual...
- Page 13 2 How to Operate The isolation operation is explained. 3 Cleaning and Maintenance The procedures for cleaning and maintenance are explained. 4 Before Concluding as a Failure The handling procedures when you consider a failure has occurred are explained. QuickGene-Auto12S/QuickGene-Auto24S Operation Manual...
- Page 14 QuickGene-Auto12S/QuickGene-Auto24S Operation Manual...
-
Page 15: Installation Procedures
This may cause injury or failure. ・ Do not install this device in a location exposed to direct sunlight or in the proximity of a heating or cooling appliance. This may cause a shortened lifetime or failure. QuickGene-Auto12S/QuickGene-Auto24S Operation Manual... - Page 16 1 Installation Procedures ■ Installation location of QuickGene-Auto12S Please install this device in an indoor location as shown below for normal, safe use. Required footprint: Width ≧68 cm × Depth ≧82 cm × Height ≧79 cm ■ Installation location of QuickGene-Auto24S Please install this device in an indoor location as shown below for normal, safe use.
- Page 17 15–30°C 30-80 % relative humidity, non-condensing Humidity Input power 100-240 V~/50-60Hz Overvoltage category Transient overvoltage category II definition QuickGene-Auto12S: ≧55 kg Table tolerance weight QuickGene-Auto24S: ≧80 kg ■ Operating parameters Item Specification Processing time 20-50 mins (Depend on protocol) 200 µl (Can be customized)
-
Page 18: How To Open The Package
1 Installation Procedures 1.2 How to Open the Package Don’t carry the equipment by alone. Caution: 2 or more people are needed for carrying QuickGene-Auto12S. 4 or more people are needed for carrying QuickGene-Auto24S. Follow the instructions to unpack the device. 1.2.1 Remove the outer carton, four foam pieces, and take out the device. - Page 19 Remove the foam between the Y2 axis and worktable from inside the instrument and cut the cable tie of Collection holder. 1.2.4 Take out the Collection holder, remove the wing screw and take out the UV lamp, then install it. QuickGene-Auto12S/QuickGene-Auto24S Operation Manual...
- Page 20 Plug in the Power Cable and turn on the rear power switch. 1.2.6 Turn on the main switch (Orange). Warning: Do not obstruct the mains plug or position the equipment where the connection to the mains line can be accidentally disconnected. QuickGene-Auto12S/QuickGene-Auto24S Operation Manual...
-
Page 21: Checking Of Packed Contents
□ Power Cable □ Reagent Holder □ Collection Holder □ O-ring □ Plastic tank □ UV Lamp □ Grease Item QuickGene-Auto12S QuickGene-Auto24S Main Unit Operation Manual Power Cable Reagent Holder Collection Holder O-Ring Plastic Tank UV lamp Grease QuickGene-Auto12S/QuickGene-Auto24S Operation Manual... -
Page 22: Device Overview
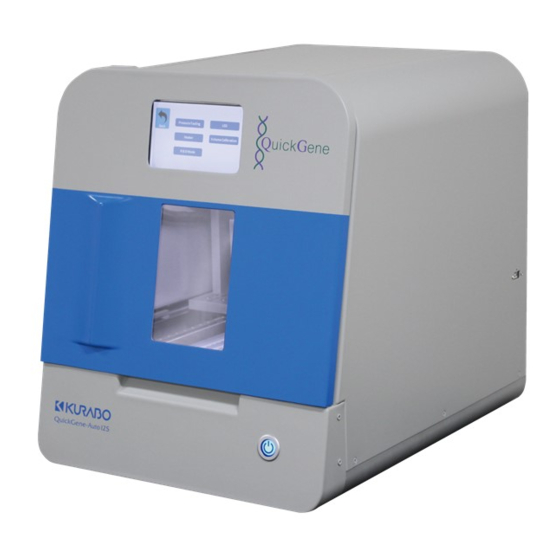
1.4 Device Overview The names of parts and their functions are explained below. ■ QuickGene-Auto12S Operation panel USB Port Front Door Power Switch AC inlet Ventilation hole ■ Interior View of QuickGene-Auto12S Holder guide (upper) Heater Holder guide (under) QuickGene-Auto12S/QuickGene-Auto24S Operation Manual... - Page 23 1 Installation Procedures ■ QuickGene-Auto24S Operation panel USB Port Front Door Power Switch AC inlet Ventilation hole ■ Interior view of QuickGene-Auto24S Holder guide (upper) Heater Holder guide (under) QuickGene-Auto12S/QuickGene-Auto24S Operation Manual...
-
Page 24: Mounting Of Uv Lamp
(1) Insert the UV lamp along the vertical groove of the lamp socket (to the end). (2) Turn the UV lamp clockwise 90° to mount on the lamp socket. (Turn until a clicking sound is heard.) NB: To remove the UV lamp, follow the reverse order of above. QuickGene-Auto12S/QuickGene-Auto24S Operation Manual... -
Page 25: How To Operate
The following articles shall be prepared. NB: They are not included in the package of this system but must be separately prepared. ◆ Specific kits for QuickGene-Auto12S and QuickGene-Auto24S for 48 Specimens/1 Kit Note: Please select the desired kits in accordance with your experiment. -
Page 26: Preparation Of Reagents
Tip pack (need to be set 1ml long tip after setting reagent strip into the Reagent holder) Nothing (need to be set sample tube before starting operation) #5-10: Reagents #11 : Cartridge with Adopter #12 : Elution Buffer ■ Preparation of Reagents Please refer to the Handbook including in the dedicated kits. QuickGene-Auto12S/QuickGene-Auto24S Operation Manual... -
Page 27: Preparation For Operation
(3) Set 1 ml long tip at the #3 of reagent strips. Note: Confirm tip packs is correctly set before setting 1 ml long tip. (4) Check adaptors are correctly set on the cartridges and close the lid. QuickGene-Auto12S/QuickGene-Auto24S Operation Manual... - Page 28 Caution: holder to the equipment. (7) Put the Reagent holder and lock it by four stoppers (front and back) Note: The cartridges should be set at the front side of the device. Enlarged view of a stopper. QuickGene-Auto12S/QuickGene-Auto24S Operation Manual...
- Page 29 Prepare the sample and put it into the bottom of Sample Tube, then put it into #4 of reagent strip. Press it to the end. Please refer to the kit handbook for sample preparation. Warning: If you set inappropriate sample, cartridges may clog. QuickGene-Auto12S/QuickGene-Auto24S Operation Manual...
-
Page 30: Operation Of Dna/Rna Isolation
When the heater temperature reached to 25 C, the touch panel shows the Home screen. Each parts means as follows; S: Cylinder operation (vertical movement) Z: Dispenser operation (vertical movement) Y1: Dispense unit operation (back and forth movement) Y2: Switching operation QuickGene-Auto12S/QuickGene-Auto24S Operation Manual... - Page 31 Next button will show up. (6) Check the protocol information is correct, then press the Start button to proceed the isolation. Then processing will be started. Warning: During the operation please close the door. QuickGene-Auto12S/QuickGene-Auto24S Operation Manual...
- Page 32 When you select “No”, the operation will be continued and the screen will be returned to the previous one. (7) During the running step, the touch panel show the processing and remaining time. (8) After finishing the protocol, the beeper will call, press Home button return to Home screen, then start to next protocol. QuickGene-Auto12S/QuickGene-Auto24S Operation Manual...
- Page 33 When you press Yes, the protocol will be finished. After pressing Yes, the touch panel show “System terminating”. Wait until the panel go back to Home screen. QuickGene-Auto12S/QuickGene-Auto24S Operation Manual...
- Page 34 (1) Press the CUSTOMIZED PROTOCOL (2) Choose Protocol Refer to the “Normalized protocol” operation procedure. Note: When the protocol is not installed, the following page will be showed up. If you need customized protocol, please contact to your distributor. QuickGene-Auto12S/QuickGene-Auto24S Operation Manual...
- Page 35 ■ How to use the System (purple) Press the SYSTEM (2) Operation menu will be showed up. Information You can check Model name, serial number and software version will be showed up. DEMO run (Used by manufacturers and distributors) QuickGene-Auto12S/QuickGene-Auto24S Operation Manual...
- Page 36 (2) UV irradiation will start and continue for 5 minutes. (3) Press Pause button to stop UV irradiation (4) Press “Stop” if you really want to terminate UV irradiation. Press “Continue” if you want to continue UV irradiation. QuickGene-Auto12S/QuickGene-Auto24S Operation Manual...
- Page 37 2 How to Operate Delivery mode (Used by manufacturers and distributors) As usual, if you proceed the operation, this screen will be showed up. Devices test (Used by manufacturers and distributors) This function is only for engineer use. QuickGene-Auto12S/QuickGene-Auto24S Operation Manual...
-
Page 38: Collection Of Isolation Samples
(2) Securely close the cap of microtubes (collection tubes) on Collection tube holder. (3) Take out the Collection holder from the device. (4) Collect the microtubes (collection tubes). QuickGene-Auto12S/QuickGene-Auto24S Operation Manual... -
Page 39: After Operation
When the operation is to be continued, start from "2.3 Preparation for Operation ". Important: If the device will not be used again for more than 1 week, refer to "3.2 Weekly Maintenance" and carry out maintenance. QuickGene-Auto12S/QuickGene-Auto24S Operation Manual... -
Page 40: Cleaning And Maintenance
Apply 0.1% Sodium Hypochlorite solution to area and wait for at least 1 minute (no greater than 5 minutes, prolonged metal/bleach contact will pit the surface). iii. Apply deionized/distilled water and wipe off bleach. Apply 70% ethanol. QuickGene-Auto12S/QuickGene-Auto24S Operation Manual... - Page 41 If Collection holder has been contaminated, loosen the wing screw of Plastic tank and take it off. Wash Collection holder with water and air dry then replace the new Plastic tank and tight the screw. Notice the direction! Front: For Waste Tube iii. Clean system worktable. QuickGene-Auto12S/QuickGene-Auto24S Operation Manual...
-
Page 42: Weekly Maintenance
3.3 Half a Year Maintenance It is recommended to replace O-ring every half a year. (It may be changed up to your frequency of use.) Use a sharp blade to cut off old O-ring Put grease on O-ring QuickGene-Auto12S/QuickGene-Auto24S Operation Manual... -
Page 43: How To Replace The Power Fuse
Take out the in use (broken one) fuse, and replace the new one. In use (broken) Back up (new one) iii. Make sure the fuse is installed in the middle. Two side silver parts (red frame) should be exposed outside. QuickGene-Auto12S/QuickGene-Auto24S Operation Manual... - Page 44 3 Cleaning and Maintenance Insert the fuse holder to AC inlet. Ensure the direction is correct. If it is available. Please prepare spare fuse for further used. Specification: AC250V, 5A QuickGene-Auto12S/QuickGene-Auto24S Operation Manual...
- Page 45 3 Cleaning and Maintenance QuickGene-Auto12S/QuickGene-Auto24S Operation Manual...
-
Page 46: Before Concluding As A Failure
Something may interfere machine position. is working. operation. Power off and contact to local distributor. Abnormal noise from system. Possibility of system failure. Contact to local distributor. Strange smell from the system. Possibility of system failure. Contact to local distributor. QuickGene-Auto12S/QuickGene-Auto24S Operation Manual... - Page 47 Check the cylinder and air tube is Elution volume is less. cartridge? working well. Wash buffer is not passed through Sample input is too much. Elution volume is more. completely. Please follow the recommended Maybe Tube is clogged. volume in the operation manual. QuickGene-Auto12S/QuickGene-Auto24S Operation Manual...
- Page 48 ・ The contents of this document are subject to change without prior notification. ・ Kurabo Industries Ltd. is not liable for violation of any patent rights or other rights of a third party caused by the use of data described in this document.
- Page 49 18 ℃ - 30 ℃ 30%-80% KURABO INDUSTRIES LTD. Doc ID: 602656...
Need help?
Do you have a question about the QuickGene-Auto12S and is the answer not in the manual?
Questions and answers