Table of Contents
Advertisement
Quick Links
Advertisement
Table of Contents

Related Manuals for Kurabo QuickGene-810


Summary of Contents for Kurabo QuickGene-810
- Page 1 Operation Manual Rev. 1.7 Original Instructions Rev. 2.1...
- Page 3 810"). Easy operation of this device enables extraction of DNA and RNA from various samples including whole blood/tissue/cells/plants/virus and others. This manual contains important information regarding the safe use of the QuickGene-810. Read this manual carefully before using. Keep this manual after reading, for reference whenever necessary.
- Page 4 Notations This manual contains important information regarding the safe use of the QuickGene-810. Read this information carefully before using the QuickGene-810, and start operation. The meanings of safety precaution marks are as follows: "WARNING" indicates a dangerous condition that may lead to death WARNING: or serious injury.
- Page 5 这是一本用于调查研究的指南手册。 KURABO INDUSTRIES KURABO INDUSTRIES KURABO INDUSTRIES KURABO INDUSTRIES KURABO INDUSTRIES KURABO INDUSTRIES KURABO INDUSTRIES KURABO INDUSTRIES KURABO INDUSTRIES KURABO INDUSTRIES KURABO INDUSTRIES 2005-2010 QuickGene-810 Operation Manual Rev. 1.7...
- Page 6 QuickGene-810 Operation Manual Rev. 1.7...
- Page 7 Ce manuel est destiné aux chercheurs. Merci d’avoir choisi le Système d’isolation de l’aide nucléique QuickGene-810 (appelé ci-après "QuickGene-810"). Le fonctionnement simple de cet appareil permet l’extraction d’ADN et d’ARN de divers échantillons comprenant les sang complet/tissu/cellules/plantes/virus et autres. Ce manuel contient des informations importantes concernant l’utilisation en toute sécurité du QuickGene- 810.
- Page 8 Ce manuel contient des informations importantes concernant l’utilisation en toute sécurité du QuickGene- 810. Lisez attentivement ces informations avant d’utiliser et de faire fonctionner le QuickGene-810. Les significations des symboles de sécurité utilisés sont les suivantes : "WARNING" signale des conditions de dangerosité qui, si elles WARNING: n’étaient pas évitées, pourraient entraîner la mort ou des blessures...
- Page 9 Diese Anleitung richtet sich an Wissenschaftler. Wir danken Ihnen für den Kauf des Nukleinsäureisolierungssystems QuickGene-810 (im Folgenden als „QuickGene-810“ bezeichnet). Mit diesem Gerät kann durch einfache Bedienung eine DNA- und RNA- Extraktion durchgeführt werden, unter anderem aus Vollblut-, Gewebe-, Zell-, Pflanzen-, Virus- und anderen Proben.
- Page 10 Warnhinweise Diese Anleitung enthält wichtige Informationen zur sicheren Verwendung des QuickGene-810. Lesen Sie diese Informationen sorgfältig durch, bevor Sie das QuickGene-810 in Betrieb nehmen. Die Bedeutung der verschiedenen Sicherheitshinweise wird im Folgenden erläutert: „WARNING“ weist auf gefährliche Betriebsbedingungen hin, die zu WARNING: ernsthaften Verletzungen oder Verletzungen mit Todesfolge führen...
- Page 11 Do not overload the power outlet with too many devices. Do not use the QuickGene-810 with a damaged power plug or a loose socket. When dust is on the prongs of the power plug or the plug socket, clean with a dry cloth.
- Page 12 Otherwise, you may hurt your back or hands because of the weight of QuickGene-810 (more than 20kg). For correct and safe use of QuickGene-810, install it in a location that meets the following conditions: • A location where power can be provided. Use an AC100±10% to AC240V±10%, 50Hz or 60Hz outlet.
- Page 13 搬运操作人员行走于右边或左边或者操作台装置水平移动过程中,切勿插入手指。 KURABO INDUSTRIES KURABO INDUSTRIES QuickGene-810 Operation Manual Rev. 1.7...
- Page 14 KURABO INDUSTRIES QuickGene-810 Operation Manual Rev. 1.7...
- Page 15 électrique. • Ne placez – ou ne faites tomber – aucun objet sur le QuickGene-810. De même, évitez de lui faire subir des chocs ou des coups, cela pourrait entraîner des défaillances ou un mauvais fonctionnement de l’appareil.
- Page 16 Vous risquez, autrement, de vous faire mal au dos ou aux mains du fait du poids de l’appareil (plus de 20 kg). Pour une utilisation correcte et sûre du QuickGene-810, installez-le dans un emplacement qui répond aux conditions suivantes : •...
- Page 17 Sicherheitsinformationen In diesem Kapitel sind die Sicherheitsmaßregeln beschrieben. Um Verletzungen zu vermeiden, befolgen Sie bitte die Bedienungsrichtlinien für QuickGene-810 auf den folgenden Seiten. Informationen zum Gerät • Bei Missachtung der folgenden Warnhinweise besteht Brand- und WARNING: Stromschlaggefahr. Verwenden Sie ein Netzkabel, das den geltenden Bestimmungen Ihres Landes entspricht, oder wenden Sie sich an Ihren örtlichen Händler.
- Page 18 Personen durchgeführt werden. Ansonsten kann es aufgrund des Gerätegewichts (über 20 kg) zu Verletzungen des Rückens oder der Hände kommen. Für eine problemlose und sichere Verwendung stellen Sie das QuickGene-810 an einem Ort auf, der die folgenden Bedingungen erfüllt: •...
- Page 19 QuickGene-810 Operation Manual xvii Rev. 1.7...
- Page 20 QuickGene-810 Operation Manual Rev. 1.7...
-
Page 21: Table Of Contents
Operations to Stop Extraction Process........... 29 Quick Guide..................29 Maintenance Before Using the QuickGene-810........... 31 When the QuickGene-810 is left for a Week or More..... 31 Cleaning the QuickGene-810 ............32 Cleaning the Parts ................33 How to Replace the Pump Tube............. 33 How to Set Parameters Parameters .................. - Page 22 Error Messages ................46 When the Buffer is Contaminated........... 46 Appendix A Usable Power Supply Cords............47 Spare Parts..................48 About Services................49 Repair Service Period of Product ........... 49 Notes for Transfer QuickGene-810..........49 Other Information................49 QuickGene-810 Operation Manual Rev. 1.7...
- Page 23 INDEX 1 Installation This chapter explains how to install the QuickGene-810. 2 Basic Functions This chapter explains the basic functions of the QuickGene-810. 3 Operation This chapter explains the extraction procedures. 4 Maintenance This chapter describes how to maintain the QuickGene-810.
- Page 24 QuickGene-810 Operation Manual Rev. 1.7...
-
Page 25: Installation
Otherwise, you may hurt your back or hands because of the weight of QuickGene-810 (more than 20kg). For correct and safe use of QuickGene-810, install it in a location that meets the following conditions: • The space shown in the following figure must be allocated. - Page 26 A location where the temperature does not go up and down suddenly. Warming a cold room suddenly or moving the QuickGene-810 from a room with low temperature to a warm room may cause condensation inside the device (condensing), it may damage the QuickGene-810 system.
-
Page 27: Checking The Quickgene-810 And Accessories
1 Installation 1.2 Checking the QuickGene-810 and Accessories Check that the following are included in the package. Contact your local representative if you notice any missing part(s) or order parts. QuickGene-810 QuickGene-810 Operation Manual Holder Stand Holder Carriage Cartridge Holder... -
Page 28: Remove The Packaging Materials
1 Installation 1.3 Remove the Packaging Materials After unpacking the QuickGene-810 from the box, do as follows: (1) Remove the tape that holds the front cover. Tape (2) Open the front cover, and remove the following items. ・ Clamps for fixing the carrier both side of the Carrier ・... -
Page 29: Overview
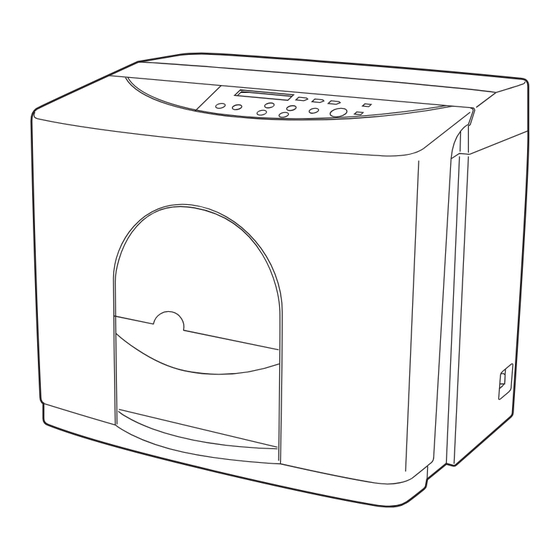
1 Installation 1.4 Overview This section explains the name and function of each part in the QuickGene-810. ■ Front and side view Operation Panel Front Cover Handle Power Swtich Rear view ■ Ventilation Holes Breaker Checkpoint Inlet QuickGene-810 Operation Manual... - Page 30 Presses out the air and uses the pressure to flush out solutions. Wash Buffer Nozzle Provides the wash buffer into Cartridges. Elution Buffer Nozzle Provides the elution buffer into Cartridges. Checks that the carrier is placed in the correct position. Sensor Do not touch the sensors. QuickGene-810 Operation Manual Rev. 1.7...
- Page 31 POWER - When the power is off - When an abnormality is detected in the power unit The green light is on when the QuickGene-810 is ready for operation. READY The light is off during extraction process or setup. The green light is on when the [START] button is pressed.
- Page 32 Discharges the old wash buffer and elution buffer remaining in the tubes. DISCHARGE Discharges the remaining air from the tubes, and fills the tubes with new wash buffer and elution buffer. Switches the extraction modes of QuickGene-810. The button toggles the operation mode. DNA WHOLE BLOOD RNA CELL...
-
Page 33: Setup Parts
Important: Refer to "A.1 Usable Power Supply Cords"(→ page 47)", for details about the power cables that can be used in each country. (1) Connect one of the plugs of the power cable to the inlet of QuickGene-810. (2) Connect the other plug of power cable to the outlet. - Page 34 Note: When setting the Pump Tube, wear gloves. (1) Turn the power on. Press the [1] side of the switch. When the QuickGene-810 has been initialized, the LCD displays "DNA WHOLE BLOOD" (this name Power switch can be changed). It takes about a minute.
- Page 35 Secure the pump cover in place with the Rotor original 2 screws. Fit together to attach Important: •Check the Pump Cover is fixed well to the Rear. Then tighten the screws until the spring washer is squeezed. Spring washer QuickGene-810 Operation Manual Rev. 1.7...
- Page 36 Note: When the carrier is on the left and it is difficult to attach the Buffer Stand, When setting standard conical tubes close the front cover and press the [CR MOVE] button. Then the carrier moves to the right end. QuickGene-810 Operation Manual Rev. 1.7...
- Page 37 (2) Set Tube Holder and Cartridge Holder in Table unit the Holder Carriage. Do not insert fingers under Cartridge Holder PINCHING OF the table unit. FINGERS: Holder Carriage Tube Holder Align the tab and notch QuickGene-810 Operation Manual Rev. 1.7...
-
Page 38: Checking Quickgene-810 Operation
1.6 Checking QuickGene-810 Operation This section explains how to check the operation of QuickGene-810. After all the parts are installed, check the operation of QuickGene-810. To check the operation, use DNase/RNase free water instead of buffers and dissolved samples, and perform the same operation as the normal extraction operation. -
Page 39: Basic Functions
2 Basic Functions Basic Functions This chapter explains the basic functions of the QuickGene-810. 2.1 Components The following describes the main components of the QuickGene-810: Operation unit Pump unit Carrier unit Sample unit Buffer setting unit Component Function Operate the buttons to select an extraction mode and start/stop an extraction process. -
Page 40: Working Process Of Quickgene-810
Note: During the extraction process, do not open the front cover unless it is necessary. Earth leakage breaker ■ When there is an electric leak or current surge caused by failures of the QuickGene-810, the earth leakage breaker will cut off the power supply. If the earth leakage breaker trips, contact your local representative. -
Page 41: Lcd Display Information
Shows the Software version. This appears when you turn on the power. WAIT A MOMENT Initializing the QuickGene-810 or disposing of the waste. "DNA WHOLE BLOOD" mode is set to operate on the QuickGene-810. The operation has not started yet. DNA WHOLE BLOOD A total of seven modes can be memorized. -
Page 42: Main Specifications
2 Basic Functions 2.5 Main Specifications The following describes the main specifications of the QuickGene-810. ■ Main specifications Items Specifications Model name QuickGene-810 Dimensions 448mm (W) x 332mm (D) x 398mm (H) Weight 21kg Rated input voltage AC100V±10% to AC240V±10%... -
Page 43: Operation
In the operation from preparing samples to extraction completion, be careful not to contaminate the samples with sweat, saliva, etc. 3.1 Turn the Power ON and OFF This section explains how to turn the power of QuickGene-810 on and off. Turning on the power ■... -
Page 44: Preparation
3 Operation 3.2 Preparation This section explains the preparation of the QuickGene-810 for an extraction process The following procedures must be performed as preparation of the QuickGene-810: ■ Preparation items Before a test run or extraction operation, perform the following: •... -
Page 45: Preparation Of Lysate (Samples)
Wash buffer Small conical tube: elution buffer Important: Buffers can be used for a day in the conical tube inside the QuickGene-810. Small conical tube Large conical tube (6) Set the conical tubes, which were prepared in (4), into the Buffer Stand, and put Tube Caps on the conical tubes. - Page 46 Waste Tube Put the tubes into the Tube Holder from Elution Tube the left without space. (5) Set the Tube Holder into the Holder Carriage. Align the tab and notch. Align the tab and notch QuickGene-810 Operation Manual Rev. 1.7...
- Page 47 ■ → " Holder Carriage Setup the Holder Carriage"(→ page (10) Close the front cover. (11) Select an extraction mode. Press the [MODE] button several times until the target extraction mode appears. QuickGene-810 Operation Manual Rev. 1.7...
- Page 48 3 Operation (12) Press the [START] button. The QuickGene-810 automatically starts the extraction program. LCD displays "PROCESSING" during extracting. Extraction progress can be checked by each lamp (LED). Note: • Do not open the front cover during the extraction process (while PROCESSING is displayed in the LCD).
- Page 49 When you chose optional operation mode such as "xxx PLUS" mode (a program added WASH 2 process; see "5 How to Set Parameters"(→ page 37)), QuickGene-810 pauses after first WASH and LCD displays "START SW → RESTART". Then the following steps are continued the program.
- Page 50 (2) Take the Tube Holder out of the QuickGene-810. Note: •Take the handle of the Tube Holder. •After taking off the Holder Carriage from the QuickGene-810, the Tube Holder cannot be taken out of the the Holder Carriage. Therefore, take only the Tube Holder out of the QuickGene-810.
- Page 51 Refer to "4 Maintenance"(→ page 31) for maintenance details. Important: After QuickGene-810 operation, if it will not be used for one week or more, put DNase/RNase free water in both new conical tubes, and execute the discharge operation. Then put ethanol to new conical tubes, and execute the discharge operation again.
-
Page 52: Operations To Restart Program From Pause
(2) Press the [START] button when "START SW - RESTART" is displayed on the LCD. QuickGene-810 will restart from the position where the program is paused. Restarting operations vary depending on the timing when the front cover is opened (when the operation is paused). -
Page 53: Operations To Stop Extraction Process
Set cartridges the Tube Holder into the Holder Carriage Cartridges Space Align the tab and notch Dispense lysate Attach to the QuickGene-810 Set in the notch Dispense lysate (samples) Check that the two pins are aligned Holder Carriage the holes. - Page 54 Cartridge Holder order. If they are not in order, a spill of buffer and/or dissolved sample may occur. This results in an extraction failure, and buffer and/or dissolved sample waste. Tube Holder OK OK OK QuickGene-810 Operation Manual Rev. 1.7...
-
Page 55: Maintenance
Tasks required when the device is not used for a week or more ■ If the QuickGene-810 will not be used for a week or more after the operation, perform the following procedures: (1) Put DNase/RNase free water to both new conical tubes for wash buffer and elution buffer, and perform the discharge operation. -
Page 56: Cleaning The Quickgene-810
4 Maintenance 4.3 Cleaning the QuickGene-810 This section explains how to clean the QuickGene-810. Before starting the maintenance work, turn off the power of QuickGene- WARNING: 810 and disconnect the power plug from the outlet. Otherwise, it may cause an electric shock. -
Page 57: Cleaning The Parts
If the Pump Tube is continuously used without this maintenance, the Pump Tube may break and the buffer may leak. It is recommended that the Pump Tube be replaced before the required replacement date. Note: If the QuickGene-810 will not be used for 1 year or more, the Pump Tubes must be removed from the device. - Page 58 Tube on the device side the connection points as shown in the figure. Tube cap (6) Take off the Buffer Stand from the QuickGene-810. (7) Detach the pump cover. Loosen and remove the screws to detach the pump cover. QuickGene-810 Operation Manual Rev. 1.7...
- Page 59 Note: Use the specified Pump Tube. After this, the procedure is the same as in "How to ■ install the Pump Tube". For details, refer to " Setup the Pump Tube"(→ page 10). QuickGene-810 Operation Manual Rev. 1.7...
- Page 60 4 Maintenance QuickGene-810 Operation Manual Rev. 1.7...
-
Page 61: How To Set Parameters
The name of each extraction mode can be selected from 35 names. The parameters set in the QuickGene-810 are stored in 7 separate memory areas. Therefore, even if an extraction mode name is changed, the parameter values will not be changed. - Page 62 Sets the fifth wash buffer discharge rate in the second round. WAS2 VOL5: 250 - 5th WBDR in the 2nd WAS2 VOL5: 750 round Can be specified between 250 - 750 l in increments of 50l. µ QuickGene-810 Operation Manual Rev. 1.7...
-
Page 63: How To Set/Change Parameters
] buttons. ] switch: raises the setting value. ] switch: lowers the setting value. Holding one of the above switches down can change the setting values consecutively. When changing other items, repeat steps (3) and (4). QuickGene-810 Operation Manual Rev. 1.7... - Page 64 (Save the settings) Important: To cancel the saving parameters, press the [STOP] or [RESET] button. SETUP COMPLETED The setup mode ends without saving the changed parameters. DNA WHOLE BLOOD Exit setup mode and display current extraction mode QuickGene-810 Operation Manual Rev. 1.7...
-
Page 65: Parameters In Expert Mode
33 WAS2 R DN T 1 - 100 34 WAS2 FALL 5 - 60 35 WAS2 VOL1 250 - 750 µl 36 WAS2 VOL2 250 - 750 µl 37 WAS2 VOL3 250 - 750 µl QuickGene-810 Operation Manual Rev. 1.7... - Page 66 Change the mode to the EXPERT mode. Settings of parameters in EXPERT mode can be changed with the same procedures as in the normal setup ■ mode. For details, refer to " How to change Parameters"(→ page 39). QuickGene-810 Operation Manual Rev. 1.7...
-
Page 67: Changing Extraction Mode Names
"RENAME MODE? Y → " (4) Press the [ ] button. RENAME mode starts. (5) Press the [ ] or [ ] button several times until the extraction mode name to be applied is displayed on the LCD. QuickGene-810 Operation Manual Rev. 1.7... - Page 68 • To cancel the new name, press the RENAME MODE? Y [STOP] or [RESET] button. The setup mode ends without saving the Exit RENAME mode and change new name, and the current extraction to USER mode mode will be displayed. QuickGene-810 Operation Manual Rev. 1.7...
-
Page 69: Troubleshooting
6.2 Typical Failure Check the following items before contacting your local representative. Phenomenon Cause Appropriate action The QuickGene-810 does not Is the power plug connected Connect the power plug to the outlet start after turning on the to the outlet? completely. -
Page 70: Error Messages
POWER ALARM The power voltage status is not normal. EEPROM ER U19 EEPROM ER U18 The program in the QuickGene-810 is not normal. EEPROM ER ALL EEPROM ER CSUM An error has occurred while writing history HISTORY DATA ERR information. -
Page 71: Usable Power Supply Cords
Note: *1. Be sure that the detachable proper Supply cord has the approval of the appropriate safety agencies of the country where the equipment will be used. Note: *2. Cable length of above Power Supply cord shall be shorter than 4.5 m. QuickGene-810 Operation Manual Rev. 1.7... -
Page 72: Spare Parts
Name: Tube Cap (Large: Blue) Name: Holder Stand Name: Tube Cap (Large: Purple) Name: Tube Cap (Small: Blue) Name: Tube Rack (4pcs) Name: QG810 Carriage Set If you would like to order spare parts, please contact to local representative. QuickGene-810 Operation Manual Rev. 1.7... -
Page 73: About Services
Secure the front cover with tape so that it will not open. → "1.3 Remove the Packaging Materials" (page 4) • After completing the above tasks, pack the QuickGene-810 in its original shipping box or some other equivalent box. A.6 Waste... - Page 74 FUJIFILM Europe GmbH Heesenstrasse 31, 40549 Dusseldorf, GERMANY Type of Equipment: Nucleic Acid Isolation System Model No: QuickGene-810 (From S/N , Parts No. H0901001 PA03384-B021 We herewith declare that the above mentioned products meet the provisions of the following EC Council Directives and Standards.
- Page 75 QuickGene-810 (Pb) (Hg) (Cd) (Cr(VI)) (PBB) (PBDE) SJ/T11363-2006 × SJ/T11363-2006 10 5 QuickGene-810 (Pb) (Hg) (Cd) (Cr(VI)) (PBB) (PBDE) QG810 SJ/T11363-2006 × SJ/T11363-2006 10 5...
- Page 77 Nucleic Acid Isolation System QuickGene-810 Operation Manual Date of issuance: July 2010 December, 2012 FUJIFILM Corporation KURABO INDUSTRIES LTD. Printed in Japan • The contents of this manual may be updated without notice. • FUJIFILM Corporation assumes no liability for damages to third party copyrights or...
- Page 78 KURABO INDUSTRIES LTD Bio-Medical Department Kurabo Neyagawa Techno Center 3F, 14-5, Shimokida-Cho, Neyagawa, Osaka 572-0823, Japan FPT-012207-FP-1 QG810-E-Y10060557-LS 1007-1 TEL +81-72-820-3079 FAX +81-72-820-3095 URL; http://www.kurabo.co.jp/bio/English/...
Need help?
Do you have a question about the QuickGene-810 and is the answer not in the manual?
Questions and answers