Table of Contents
Advertisement
Quick Links
Advertisement
Table of Contents

Related Manuals for Kurabo QuickGene-Mini480


Summary of Contents for Kurabo QuickGene-Mini480
- Page 1 Operation Manual Nucleic Acid Isolation Device QuickGene-Mini480 Extraction Flow Extraction with QuickGene-Mini480 Preparation (Page 14 to 25) Prepare lysate using Applying lysate into the Elution of DNA/ Wash the Isolation Kits. Cartridges Ver. 1.1...
- Page 3 Thank you for purchasing the Nucleic Acid Isolation Device QuickGene-Mini480 (hereafter, called "QuickGene-Mini480"). DNA or RNA can be easily extracted by using QuickGene-Mini480. This guide contains important information regarding the safe use of QuickGene-Mini480. Read this manual carefully before using the device.
- Page 4 Notations This manual contains important information regarding the safe use of QuickGene-Mini480. Read this information carefully before using QuickGene-Mini480, and start operation. The meanings of safety precaution marks are as follows: "WARNING" indicates a dangerous condition that may lead to death or WARNING: serious injury.
- Page 5 业,则应将其外包给对特控医疗垃圾有处理 许可权的操作人员,并同时移交 相应的货单。 通用生物危害性 标记 ■ 免责条款 ・ 本手册的内容如有更新,恕不事先通知。 ・ 对于因使用本手册中任何信息而导致侵犯第三方版权或其他权利的行为,KURABO INDUSTRIES LTD.恕不承担责任。 ・ 对于由非 KURABO INDUSTRIES LTD.或其指定机构所进行的改装、维护及维修等事宜, KURABO INDUSTRIES LTD.恕不对因此而导致的设备故障或损坏承担责任。 ・ 对于因使用第三方产品而导致的设备故障或损坏,KURABO INDUSTRIES LTD.恕不承担责任。 ・ 对于使用非 KURABO INDUSTRIES LTD.所指定的正品作为维修部件而进行的改装、维护及维修等 事宜,KURABO INDUSTRIES LTD.恕不承担责任。 ・ 对于因不遵守本手册中所述的注意事项和操作规程而导致设备出现故障或被损坏的情况, KURABO INDUSTRIES LTD.恕不承担责任。 ・ 对于因设备工作环境(电源、安装环境等)不满足本手册中所述的操作要求而导致设备出现故障或被...
- Page 6 标志 本手册中包含了有关QuickGene-Mini480安全操作的重要信息。请在使用.QuickGene-Mini480之前仔细 阅 读,然后再进行操作。 安全注意事项的含义如下所述: "WARNING" 指示发生时可导致死亡或严重伤害的危险情况。 WARNING: 指示暴露于生物制剂或是面对可能具有传染性或危害性的情况。 "BIOHAZARD" BIOHAZARD: "CAUTION" 指示发生时可导致轻微或中度人身伤害的潜在危险。 CAUTION: "CAUTION" 还可指示意外财产损失。 Important: "Important" 指示重要的使用说明及严禁的操作。 Note: "Note" 指示注解信息、应遵守的操作规程及补充性的使用信息。 QuickGene-Mini480 Operation Manual...
- Page 7 Introduction Merci d’avoir acheté le Dispositif d’isolation d’acide nucléique QuickGene-Mini480 (appelé ci-après "QuickGene-Mini480"). L’extraction de l’ADN ou l’ARN peut être facilement effectuée à l’aide du QuickGene-Mini480. Ce guide contient des informations importantes concernant l’utilisation en toute sécurité du QuickGene- Mini480. Lisez attentivement ce manuel avant d’utiliser l’appareil.
- Page 8 Ce manuel contient des informations importantes concernant l’utilisation en toute sécurité du QuickGene- Mini480. Lisez attentivement ces informations avant d’utiliser et de faire fonctionner le QuickGene-Mini480. Les significations des symboles de sécurité utilisés sont les suivantes : "WARNING" signale des conditions de dangerosité qui, si elles n’étaient WARNING: pas évitées, pourraient entraîner la mort ou des blessures graves.
- Page 9 Einführung Wir danken Ihnen für den Kauf des Geräts zur Nukleinsäureisolierung QuickGene-Mini480 (im Folgenden als „QuickGene-Mini80“ bezeichnet).Mit QuickGene-Mini480 können DNA und RNA leicht extrahiert werden. Diese Anleitung enthält wichtige Informationen zur sicheren Verwendung von QuickGene-Mini480. Lesen Sie die Anleitung vor der Verwendung des Geräts sorgfältig durch. Bewahren Sie diese Anleitung nach dem Lesen zum späteren Nachschlagen auf.
- Page 10 Warnhinweise Diese Anleitung enthält wichtige Informationen zur sicheren Verwendung von QuickGene-Mini480. Lesen Sie diese Informationen sorgfältig durch, bevor Sie QuickGene-Mini480 in Betrieb nehmen. Die Bedeutung der verschiedenen Sicherheitshinweise wird im Folgenden erläutert: „WARNING“ weist auf gefährliche Betriebsbedingungen hin, die zu WARNING: ernsthaften Verletzungen oder Verletzungen mit Todesfolge führen...
- Page 11 - Do not use the power cable attached for the US and Canadian models for other products. - Do not use QuickGene-Mini480 with voltage other than the voltage specified on the device. Do not overload the power outlet with too many devices.
- Page 12 For RNA RNA cultured cell HC kit RNA blood cell kit Noted: The kits are not supplied with QuickGene-Mini480. Select the desired kit(S) and order it(them) separately. About Reagents Not Included in the Kits ⚫ When handling any reagent not included in the kits, observe the safety CAUTION: information and precautions of the reagent.
- Page 13 It is the user’s responsibility to validate the performance of the Isolation Kits and · QuickGene-Mini480. · QuickGene-Mini480 is a device for research and study only. When you use QuickGene-Mini480, read this manual thoroughly and follow the safety management regulations of your facilities (laboratory). QuickGene-Mini480 Operation Manual...
- Page 14 - 请使用附带的电源适配器。 - 请勿将美国和加拿大机型附带的电源线用于其它产品。 QuickGene-Mini480。电源插座上不要插接过多设 备 - 电压未满足设备指定值时,不要使用 ,以免过载。 QuickGene-Mini480 不得使用破损的插头或松垮的插座。 - 如果在电源插头片或插座上有灰尘,请用干布将其去除。 - 从插座上拔下插头时,务必握住插头本身,切勿扯拽电源线。 - 维护时,应从插座上拔下电源插头。 - 打雷时不要触碰电源插头。 ⚫ 不要将任何液体泼溅到 QuickGene-Mini480 上,不要在 QuickGene-Mini480 上 放置任何含有液体的物品。否则可能导致设备故障,或者引起火灾或电击。 ⚫ 如果设备过热,开始冒烟或发出异味,应立即拔下电源线。 未经制造商允许,切勿试图改装 QuickGene-Mini480。否则可能引起火灾或电击。 ⚫ CAUTION: ⚫ 不要在 QuickGene-Mini480 上放置物品或者将物品丢到 QuickGene-Mini480 上,同时禁止撞击或敲打 QuickGene-Mini480,否则将可能导致其出现故障。 ⚫...
- Page 15 ⚫ 核酸提取操作,应在符合标准的相应实验室或工作场所进行。 专用核酸提取试剂盒 DNA 全血提取试剂盒 提取 DNA DNA 组织提取试剂盒 质粒提取试剂盒 RNA 组织提取试剂盒 RNA 培养细胞提取试剂盒 提取 RNA RNA 培养细胞 HC 提取试剂盒 RNA 血液细胞提取试剂盒 注意: 以上试剂盒不包含在 QuickGene-Mini480 之中。请根据样品选择合适的试剂盒并单独订购。 关于 QuickGene 专用试剂盒中未包含的一般试剂 ⚫ 使用专用试剂盒中未包含的其它试剂时,需遵守关于此类试剂的安全信息及注意 CAUTION: 事项。 ⚫ 试剂的各项操作应在相应的实验室或者工作场所进行。某些特殊试剂按照标准在 通风环境下进行操作。 关于清洁、清洗用的洗涤剂 ⚫ 关于清洁、清洗装置及其附属品时使用的洗涤剂,需遵守各洗剂的使用安全注意 CAUTION: 事项。...
- Page 16 使用上的限制 ・ 无论使用目的或应用情况如何, KURABO INDUSTRIES LTD. 不对结果承担任何责任。 ・ 对于各种样品的样品条件、性能的确认,需使用者自行负责测试与验证。 · QuickGene-Mini480 为科研目的的设备。 使用 QuickGene-Mini480 时, 请仔细阅读本手册并遵守所在单位(实验室)的安全管理规程进 行各项操作。 QuickGene-Mini480 Operation Manual...
- Page 17 - N’utilisez pas le QuickGene-Mini480 avec un voltage différent de celui spécifié sur l’appareil. Ne branchez pas trop d’appareils sur la prise électrique. - N’utilisez pas le QuickGene-Mini480 si la fiche est endommagée ou si la prise n’est pas solidement fixée.
- Page 18 Kit ARN cellules de culture humaines Kit ARN cellules sanguines Note: les kits ne sont pas fournis avec QuickGene-Mini480. Sélectionnez le ou les kits de votre choix et commandez-les séparément. À propos des réactifs non inclus dans les kits ⚫ Lorsque vous manipulez l’un des réactifs non inclus dans les kits, CAUTION: respectez les consignes de sécurité...
- Page 19 QuickGene-Mini480. QuickGene-Mini480 est un appareil uniquement destiné à la recherche et l’étude. · Lors de l’utilisation du QuickGene-Mini480, lisez d’abord ce manuel entièrement et respectez les règlements de gestion de risque de votre lieu de travail (laboratoire). QuickGene-Mini480 Operation Manual...
- Page 20 Sicherheitsinformationen In diesem Kapitel sind die Sicherheitsmaßregeln beschrieben. Um Verletzungen zu vermeiden, befolgen Sie bitte die Bedienungsrichtlinien für QuickGene-Mini480 auf den folgenden Seiten. Informationen zum -Zeichen Prüfen Sie alle Beschreibungen, die mit dem -Zeichen versehen sind. Informationen zum Gerät ⚫ Bei Missachtung der folgenden Warnhinweise besteht Brand- und WARNING Stromschlaggefahr.
- Page 21 CAUTION: zu verändern.Dadurch könnte es zu einem Brand oder Stromschlag kommen. ⚫ Legen Sie keine Gegenstände auf QuickGene-Mini480 ab, und lassen Sie keine Gegenstände darauf fallen. Setzen Sie es außerdem keinen Stößen oder ähnlichen Erschütterungen aus, da es dadurch zu einem Ausfall oder zu einer Fehlfunktion von QuickGene-Mini480 kommen könnte.
- Page 22 RNA Kulturzellen HC Kit RNA Blutzellen Kit Note: Die Kits werden nicht mit QuickGene-Mini480 ausgeliefert. Wählen Sie die gewünschten Kits aus und bestellen Sie sie getrennt. Über nicht in den Kits enthaltene Reagenzien ⚫ Beim Umgang mit einem Reagens, das nicht in den Kits enthalten ist, sind CAUTION: die Sicherheitsinformationen und Vorsichtsmaßregeln des jeweiligen...
- Page 23 Es liegt in der Verantwortung des Anwenders, die Eignung des Isolations-Kits und QuickGene-Mini480 zu überprüfen. · QuickGene-Mini480 ist nur für den Einsatz in Forschung und Lehre vorgesehen. Wenn Sie QuickGene-Mini480 einsetzen, lesen Sie diese Anleitung sorgfältig durch, und befolgen Sie die Sicherheitsbestimmungen Ihrer Einrichtung (Labor). QuickGene-Mini480 Operation Manual...
- Page 24 QuickGene-Mini480 Operation Manual...
- Page 25 INDEX 1 Setting Up This chapter explains how to set up QuickGene-Mini480. 2 Operation This chapter explains the extraction procedures. 3 Maintenance This chapter explains how to maintain QuickGene-Mini480. 4 Troubleshooting This chapter describes the procedures that should be taken when you suspect device failures.
- Page 26 This chapter describes the basic specifications of QuickGene-Mini480. Appendix A This chapter describes after-sales services and points to note for transportation. QuickGene-Mini480 Operation Manual...
- Page 27 QuickGene-Mini480 Operation Manual...
-
Page 29: Table Of Contents
Contents 1 Setting Up Operating Environment/Use Conditions Checking QuickGene-Mini480 and Accessories Removing the Packing Materials Overall View Basic Functions Precautions on Transportation Precautions on Storage 2 Operation Turning the Power ON or OFF Preparation Extraction 3 Maintenance Cleaning QuickGene-Mini480 Cleaning the Parts... - Page 30 QuickGene-Mini480 Operation Manual...
-
Page 31: Setting Up
Do not use QuickGene-Mini480 in direct sunlight or close to a heating device. It may shorten the life of QuickGene-Mini480, or cause a trouble. For correct and safe use of QuickGene-Mini480, use it in a location that meets the following conditions: ・... - Page 32 ・ A location far from objects with generates strong magnetic fields (motors, transformers, TV, audio speakers, magnets, etc.) (Bringing QuickGene-Mini480 close to any type of magnetic field may cause a malfunction.) ■Use conditions...
-
Page 33: Checking Quickgene-Mini480 And Accessories
US/Canada: Use the power cable included in the package. Other countries: The power cable is not included in the package. Prepare the power cable that meets your country’s standard. The specification of the power cable for QuickGene-Mini480 is as follows. 100-120V area Power Voltage: 100 to 120 V... -
Page 34: Removing The Packing Materials
1 Setting Up Requirements for the plug/connector: AC 125 V 3 A Requirements for the cable: SJT 2 x 18 AWG 60°C 200-240V area Power Voltage: 200 to 240 V Requirements for the plug/connector: AC 250 V 3 A Requirements for the cable: CENELEC 2 x 0.75 mm 70°C 1.3 Remove the Packing Materials Refer to the attached file. -
Page 35: Overall View
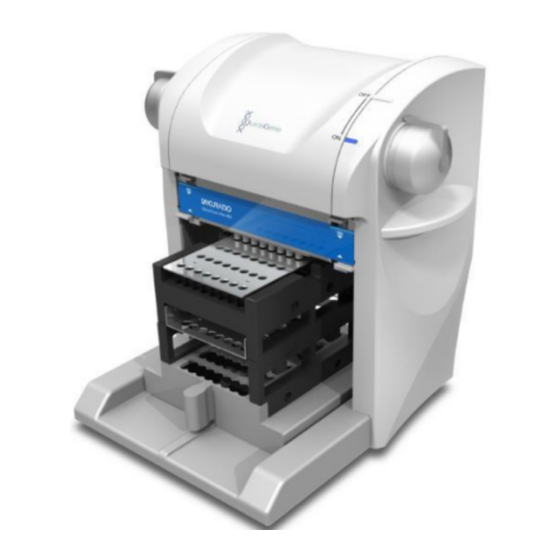
1 Setting Up 1.4 Overall view This section explains the name and function of each part in QuickGene-Mini480 ■ Front view Rotary Switch Lamp (LED) Handle Handle Pressure Adapter Pressure Head ■Rear view Inlet Pressure Modes Switch Plug AC Adapter... - Page 36 1 Setting Up...
- Page 37 1 Setting Up ■ Pressure Seal Plate Surface Back side Packing ■ Cartridge Holder ■ Waste Tube Holder ■ Collection Tube Holder Cartridge (CA) (Not supplied with QuickGene- Mini480) ■ Separator Collection Tube (CT) Waste Tube (WT) (Not supplied with QuickGene- Mini480) (Not supplied with QuickGene- Mini480)
- Page 38 1 Setting Up ■Label ON/OFF Mark Name Description ON / OFF Mark ON Mark: Rotating the switch to the ON Mark starts pressure application. OFF Mark: Rotating the switch to the OFF Mark finishes pressure application. ■Pressure Control Switch -Switch Pressure value +Switch Name...
-
Page 39: Basic Functions
1 Setting Up 1.5 Basic Functions The following describes the main components of QuickGene-Mini480. Component Function Main Unit Start/stop putting pressurized air into Cartridges by operating the Rotary Switch. Pressure application automatically stops in about Rotary Switch one minute. (Pressure value can be changed using Pressure Control Switch) Operating state is indicated by the lamp (LED). - Page 40 1 Setting Up ■Lamp (LED) indication information The following describes the lamp (LED) indications. Lamp (LED) indication Description Indicates that the power is ON and pressure application can be performed. Blink Indicates that pressure application is in progress. Note: When pressure application is completed, the lamp (LED) indication returns to the ON state.
-
Page 42: Precautions On Transportation
Do not keep it with the Rotary Switch adjusted to the position of turning on with Cartridges set in the Cartridge Holder. ・ When the outside of the QuickGene-Mini480 is heavily soiled, clean it. ・ If the machine will not be used for a long time, clean then cover it before storing. -
Page 43: Operation
2.1 Turning the power ON and OFF This section explains how to turn the power of QuickGene-Mini480 on and off. Note: Since QuickGene-Mini480 is not equipped with a power switch, the power is turned on/off by connecting/disconnecting the power cable. - Page 44 2 Operation ■Turning off the power (1) Disconnect the plug of the power cable from the outlet. The lamp (LED) turns off, then the QuickGene-Mini480 turns off. Note: Plug Do not place any objects near the outlet so that the plug of the power cable can be disconnected immediately in case of emergency.
-
Page 45: Preparation
2 Operation 2.2 Preparation The following preparations are required for extraction operation. ■Items to be prepared - Gloves - Mask - Safety Goggles - Collection Tubes (CT) * - Waste Tubes (WT) * - Cartridges (CA) * - Buffer (Wash Buffer, Elution Buffer) * - Lysate (Samples) For the preparation of samples, refer to the handbook of each kit. -
Page 46: Extraction
2 Operation 2.3 Extraction This section explains extraction procedure including before and after extraction operations. Be sure to perform extraction in the following order. Note: Use the provided Cartridges, Waste Tubes and Collection Tubes in the Isolation Kit. ■Before Extraction Operation (1) Turn on the power by connecting the power cable and then make sure the lamp (LED) lights. - Page 47 2 Operation (4) Set the Waste Tubes into the Waste Tube Holder in order. Then insert the Cartridge Holder into the correct position of the Waste Tube Holder. Important: ・ Make sure the bulges of Cartridge Holder are inserted into the side notches of the Waste Tube Holder.
- Page 48 If the Pressure Seal Plate gets dirty, clean it before using. 「3.2 Cleaning the Parts」 (3) Set the Cartridge Holder and Waste Tube Holder into QuickGene-Mini480. Make sure that the first row of Cartridge/Waste Tube Holder unit is placed at the stopper which located just under the Pressure Head...
- Page 49 2 Operation (4) Rotate the rotary switch toward the front side to lower the Pressure Heads. Important: Use both hands to rotate the rotary switch. Rotate up to here. (5) The lamp (LED) blinks and pressurized air is put into the Cartridges row by row.
- Page 50 2 Operation (7) Return the rotary switch to the position OFF to raise the pressure heads. Do not pull out the Cartridge/Waste Tube Holder while the pressure heads are lowered. Important: Use both hands to rotate the rotary switch. Rotate up to here. (8) Repeat the pressure process for the rest rows of the Cartridges.
- Page 51 2 Operation < Wash > (10) Apply Wash Buffer to each Cartridge. Use the single- or multi-channel pipette to apply Wash Buffer to each Cartridge through the hole of the Pressure Seal Plate. In this operation, take care not to touch the Cartridges. Note:...
- Page 52 2 Operation (13) After wash process is completed, return the rotary switch to the “OFF” position to raise the pressure heads. Important: ・ Use both hands to rotate the rotary switch. ・ Make sure that no liquid remains in the Cartridges.
- Page 53 2 Operation < Elution > Use both hands (15) Remove the Cartridge Holder from the Waste Tube Holder, and set it to the correct position of the Cartridge Collection Tube Holder. Holder Note: Waste Tube ・ Use both hands to remove the Cartridge Holder. ・...
- Page 54 2 Operation (18) Apply Elution Buffer to each Cartridge. Use the single- or multi-channel pipette to apply Elution Buffer to each Cartridge from the hole of the Pressure Seal Plate. In this operation, take care not to touch the Cartridges. Important:...
- Page 55 2 Operation (21) Pull out the Cartridge /Cartridge Holder. ■Notes on Incubation When the extraction process is followed by incubation, return the rotary switch to the “OFF” position, and then leave the QuickGene-Mini480 at room temperature with the Cartridge/Collection Tube Holder.
- Page 56 2 Operation ■After Extraction Operation (1) Pull the Cartridge Holder up from the Collection Tube Holder to correct position as shown in left figure. Note: Use both hands to remove the Cartridge Holder. Pull the Cartridge Holder up to here. (2) Insert the Separator into the interval of the Cartridge Holder and the Collection Tube Holder as shown in the left figure.
- Page 57 2 Operation (4) Put Caps (included in the QuickGene Isolation Kits) on the Collection Tubes and then remove them. (5) Remove the Waste Tubes from the Waste Tube Holder, and then dispose of them. Note: Dispose of the Waste Tubes and waste solution according to appropriate laws and rules.
- Page 58 2 Operation...
-
Page 59: Maintenance
3 Maintenance 3 Maintenance To use QuickGene-Mini480 properly, check whether or not each part is clean and in normal condition before use. If necessary, perform cleaning and/or part replacement referring to the descriptions in this chapter. 3.1 Cleaning QuickGene-Mini480 This section explains how to clean QuickGene-Mini480. -
Page 60: Cleaning The Parts
3 Maintenance 3.2 Cleaning the Parts The following table describes how to clean the Parts of QuickGene-Mini480. Parts Cleaning methods Cartridge Holder Clean the parts with neutral detergent then wash out with 0.1% sodium Waste Tube Holder hypochlorite solution. Next, wash the solution out with DEPC water and... - Page 61 3 Maintenance (4) While pressing the upper knobs, take the upper protruding parts out of the QuickGene-Mini480 as shown. Note: Do not use excessive force otherwise it may cause the Pressure Adapter failures. Upper protruding parts (5) Take out the lower protruding parts of Pressure Adapter in the direction as shown.
-
Page 62: How To Replace The Pressure Heads
Rotary Switch to eject the Pressure Heads. Note: Before lying the device face up, spread a cloth, etc. on the table to avoid damaging the body. (3) While holding the QuickGene-Mini480 by one hand, remove the Pressure Heads. (4) While holding the QuickGene-Mini480 by one hand, insert new Pressure Heads. -
Page 63: Troubleshooting
• The AC adapter is not • Connect the AC adapter to connected to QuickGene-Mini480 completely. QuickGene-Mini480. • The power cable is not • Connect the power cable to the connected to the AC adapter. - Page 64 4 Troubleshooting...
-
Page 65: Main Specifications
5 Main Specifications 5 Main Specifications The following describes the main specifications of QuickGene-Mini480. ■Main specifications Item Specifications Modal name QuickGene-Mini480 280mm (W) × 255mm (D) × 295mm (H) Dimensions Weight Approx. 3.3kg (Main body) Samples Max. 48 can be processed simultaneously Temperature: 15 ~... - Page 66 5 Main Specifications...
-
Page 67: Replacement/Optional Parts
Appendix A A.1 Replacement/Optional Parts Name : Cartridge Holder Name : Waste Tube Holder Name : Collection Tube Holder : 40321301401 : 40321301402 : 40321301403 : Pressure Seal Plate (×3) Name Name : Separator Name : Pressure Adapter Set : 40321301404 : 40321301405 : 40321301408 : Pressure Heads (8 pcs.) - Page 68 5 Main Specifications...
-
Page 69: Product Guarantees
The guaranty period shall be one year from the delivery of the product. ・ Any part which fails to function properly under normal use, provided that all warnings and cautions in this manual are observed, during the guarantee period will be repaired by KURABO INDUSTRIES free of charge. -
Page 70: Disposal Of Device
Printed in Japan ・The contents of this manual may be updated without notice. ・KURABO INDUSTRIES LTD assumes no liability for damages to third party copyrights or other rights arising from the use of any information in this manual. ・Contents of this manual are not to be reproduced without permission from KURABO INDUSTRIES LTD. - Page 71 Cambridge CB1 2JD . Registration No. 03257373 ADS BIOTEC INC and ADS BIOTEC LIMITED are authorized by Kurabo Industries as distributors of the Kurabo equipment and consumables. ADS BIOTEC and YOUR PATH TO DISCOVERY are trademarks of ADS BIOTEC INC. All other trademarks are trademarks of their respective owners.
Need help?
Do you have a question about the QuickGene-Mini480 and is the answer not in the manual?
Questions and answers