Table of Contents
Advertisement
Quick Links
Advertisement
Table of Contents

Related Manuals for Inateck BCST-43


Summary of Contents for Inateck BCST-43
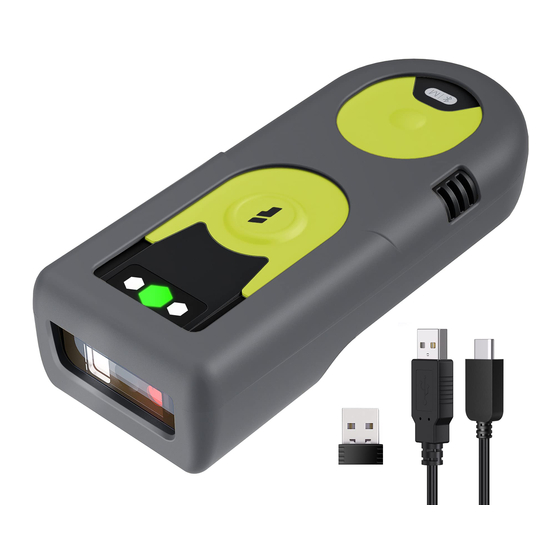
- Page 1 BCST-43 2.4G/Bluetooth® 1D Barcode Scanner Instruction Manual...
-
Page 2: Table Of Contents
Content Notes ..............................1 Product Overview ..........................2 Product Specification ......................2 LED Indicator ..........................2 Buzzer............................3 Barcodes Supported ......................4 How to Set up the Scanner ......................5 How to Use Buttons for Quick Function Switch ..............6 Basic Settings ............................. 7 System Setting.......................... - Page 3 Bluetooth SPP Mode ....................21 Bluetooth GATT Mode ....................22 Set Bluetooth Name ....................23 Barcode Settings ..........................24 Codabar ........................... 24 Enable/Disable Codabar ..................24 Transmit START/STOP Characters ................. 24 Code 11............................. 24 Enable/Disable Code 11 .................... 24 Checksum Code ......................24 Code 128 ..........................
- Page 4 Checksum Code ......................30 ISBN ............................30 Convert EAN-13 into ISBN ..................30 Convert EAN-13 into ISSN ..................30 MSI ............................30 Enable/Disable MSI ....................30 Checksum Code ......................31 UPC-A............................32 Enable/Disable UPC-A ....................32 UPC-A Outputs 0 ......................32 Checksum Code ......................
- Page 5 Upper/Lower Case Setting ....................39 Additional Code ........................40 Mode of Recognition Only for Barcodes with Additional Code ......40 Separation Character ......................41 Caps Lock Control ......................... 41 Read Code with Specific Initial Characters Only............41 Read 1D Inverted Barcode....................42 Hide Special Initial Character ...................
-
Page 6: Notes
Notes Safety Notes Please do not dismantle the barcode scanner or place any foreign parts in it to prevent short circuit or circuit damage. Please do not leave the barcode scanner or battery near fire. Maintenance Notes Use a clean wet mop to wipe the outer shell of the barcode scanner. Store the barcode scanner at the place that is dustless, dry, away from light and strong magnetic area. -
Page 7: Product Overview
Product Overview Product Specification Model BCST-43 Material PC+TPU Voltage DC 5V Battery Capacity 1200mAh Codabar, Code 11, Code 128, GS1-128, USPS, FedEx, Code 39, Code 32, Code 93, EAN-8, Barcode Supported EAN-13, ISBN, ISSN, MSI, UPC-A, UPC-E, IATA 25, Industrial 25 / Standard 25, Interleaved 25,... -
Page 8: Buzzer
Two short sounds (volume Indicate correct settings from low to high) Two short sounds (volume The BCST-43 has disconnected from a from high to low) computer/phone Two long sounds (volume The scanner has been powered on under wireless from high to medium) -
Page 9: Barcodes Supported
Barcodes Supported The barcode types supported by the BCST-43 can be found in the chart below. For more details, please refer to the barcode type setting in Barcode Type Setting. Barcodes Supported Preset Codabar Enabled Code 11 Disabled Code 128... -
Page 10: How To Set Up The Scanner
You may change the settings of BCST-43 barcode scanner by reading the setting barcode in this manual. The examples of settings for the BCST-43 scanner are as below. Note:If there is a (*) before a certain setting barcode in this manual, it indicates the factory preset. -
Page 11: How To Use Buttons For Quick Function Switch
How to Use Buttons for Quick Function Switch How to Enter Bluetooth/Wireless Adapter Pairing Mode Long press the pairing/multi-functional button and the middle indicator will flash when the scanner enters pairing mode. How to Check Your Battery Status Quickly Short press the pairing/multi-functional button . -
Page 12: Basic Settings
Note: If you want to use the BCST-43 with an Android device, please use the Gboard input method, and set the scanner as "Windows/Android Mode" and the input keyboard as "American Keyboard". -
Page 13: Write To Custom Defaults
Enter Setup Japanese Keyboard (Roman Character) Canadian Keyboard Serbian Keyboard Write to Custom Defaults You may change factory defaults and customize some functions suitable for your own applications when using your scanner. You need to scan 'Enter Setup' → 'Function setup barcode you want to customize (e.g.: Output Code ID)' →"Write to Custom Defaults"... -
Page 14: Reveal Battery Status
Restore Factory Setting Reveal Battery Status If you want to know the remaining battery volume of the BCST-43, you may scan the barcode "Reveal Battery Status" without scanning the "Enter Setup" barcode. And the remaining battery amount will be output to the device connected with the BCST-43. -
Page 15: Auto Sleep
Enter Setup Set Data Transmission Interval as 32ms Set Data Transmission Interval as 64ms Set Data Transmission Interval as 96ms Set Data Transmission Interval as 128ms Set Data Transmission Interval as 256ms Auto Sleep To save battery, you may set the interval for the scanner to enter auto sleep mode. -
Page 16: Buffer Settings
Enter Setup Set Auto Sleep Interval as 30min Set Auto Sleep Interval as 60min Buffer Settings When the scanner is out of the transmission range, the barcodes scanned will be kept in the built-in memory/buffer/cache temporarily. If you want to upload the data stored in the built-in memory/buffer/cache to your computer or phone, please double-click the scan button when the barcode scanner is in the transmission range. - Page 17 Enter Setup Note: You do not need to scan "Enter Setup" or "Exit with Save" when reading the barcodes below. The functions can be achieved simply by scanning the corresponding function setting barcodes. Enter Inventory Mode (*) Return to Common Mode If you want to erase the data in buffer, scan the "Erase Buffer"...
-
Page 18: Illuminative Light Control
Enter Setup defaults "Disable Duplicate Scan Check". You may enable "duplicate scan check" as per your needs. Enable Duplicate Scan Check (*) Disable Duplicate Scan Check Illuminative Light Control (*) Light up When Scanning Stay on Stay off Navigation Light Control (*) Light up when Scanning Stay on Stay off... -
Page 19: Volume Control
Enter Setup Volume Control Silent Low Volume (*) Medium Volume High Volume Vibration Alert Disable Vibration Alert (*) Enable Slight Vibration Alert Enable Strong Vibration Alert Scanning Mode Auto Red Light Shut off Mode Auto red light shut off mode is the default mode. When under this mode, the red light will not become lit unless you press the scan button. -
Page 20: Consecutive Scanning Mode
Enter Setup 2. Scan the "Auto Red Light Shut off Mode" barcode. 3. Scan the "Auto Red Light Shut off Time Setting" barcode. 4. Scan the "1s" barcode. 5. Scan the "Exit and Save" barcode. (*) Auto Red Light Shut off Mode Auto Red Light Shut off Time Setting (*)2s Consecutive Scanning Mode... -
Page 21: Manual Scanning Mode
Enter Setup Consecutive Scanning Mode Consecutive Scanning Interval Setting 400ms 800ms (*) 2s Manual Scanning Mode When under the manual scanning mode, a red-light beam will appear when you press the scan button which indicates the scanner is ready to scan barcodes. The red light will not go off until one of the situations below occurs. -
Page 22: Hands-Free Scanning Mode
Enter Setup Manual Reading Mode Hands-free Scanning Mode When under the hands-free scanning mode, the red light won't go off when the scanner reads a barcode successfully. Each barcode will be read only once no matter how long it exposes under the red light. Hands-free Mode Exit and Save... -
Page 23: Connection
Plug the adapter into your computer. b) Scan "Enter Setup". c) Scan " Pair one or more scanners with one USB adapter" and get Inateck BCST- 43 as close as possible to the USB adapter (within 2 meters). Pair one or more scanners with one USB adapter... -
Page 24: Wireless Bluetooth Mode
Wireless Bluetooth Mode Bluetooth HID Mode If the BCST-43 has never been paired with any device via Bluetooth, it will enter the pairing mode automatically after powers on. You may use your phone to search the BCST-43 and click to pair. Besides that, you may adjust the scanner to pairing mode by scanning the pairing barcode below. - Page 25 Enter Setup When under the Bluetooth HID mode, the phone will hide the virtual keyboard automatically after connected with the BCST-43. If you are on an iOS device and want to pop out the virtual keyboard when scanning, you may long press the scan button for 3s and for another 3s to hide the virtual keyboard, which is illustrated in the picture below.
-
Page 26: Bluetooth Spp Mode
When switched to Bluetooth SPP mode, the BCST-43 will enter Bluetooth broadcasting mode and the blue LED indicator will flash. Then you can search for the Bluetooth of BCST-43 and have it paired with your phone/computer. After successful pairing, you need to run the serial debugging tool on your computer and select Open Bluetooth COM Port. -
Page 27: Bluetooth Gatt Mode
Enter Setup To disconnect the Bluetooth, please close the serial debugging tool. To use the Bluetooth SPP mode of BCST-43 on another computer, there is no more operation needed for BCST-43, just disconnect BCST-43 with the previous connected computer and then BCST-43 will enter Bluetooth broadcasting mode. -
Page 28: Set Bluetooth Name
Set Bluetooth Name The BCST-43 features Bluetooth name setting with length limited to 32 characters. To change the Bluetooth name, please first make sure the BCST-43 is under Bluetooth HID or GATT mode and then scan the "Enter Setup" - "Set Bluetooth Name"... -
Page 29: Barcode Settings
Enter Setup Barcode Settings Codabar Enable/Disable Codabar (*) Enable Codabar Disable Codabar Transmit START/STOP Characters (*) Enable Codabar START/STOP Disable Codabar START/STOP Characters Characters Code 11 Enable/Disable Code 11 Enable Code 11 (*) Disable Code 11 Checksum Code Data in a Code 11 barcode may not include the checksum code. If there is, the checksum code is the last one or two digit(s) of the data output. -
Page 30: Code 128
Enter Setup After you set the "Code 11 with 1-digit Checksum" function, the scanner will take the last one digit of the data as checksum and won't be able to read Code 11 without checksum or Code 11 with 2-digit checksum. After you set the "Code 11 with 2-digit Checksum"... -
Page 31: Gs1-128 (Ucc-128/Ean-128 )
Enter Setup GS1-128 (UCC-128/EAN-128 ) Enable/Disable GS1-128 (UCC-128/EAN-128 ) Enable GS1-128 (*) Disable GS1-128 USPS and FedEx Barcode Enable/Disable USPS and FedEx Barcode (*) Enable USPS and FedEx Barcode Disable USPS and FedEx Barcode Code 39 Enable/Disable Code 39 (*) Enable Code 39 Disable Code 39 Transmit START/STOP Character Enable Code 39 START/STOP... -
Page 32: Ascii Code Recognition Range Setting
Enter Setup checksum code is the last character of the data. The checksum code is the value added from all data collected, to check if the data is correct. After you set the "Code 39 without Checksum" function, the scanner will recognize all Code 39 normally. -
Page 33: Vin (Vehicle Identification Number)
BCST-43 defaults disabling Code 32. Enable Code 32 (*) Disable Code 32 The fixed initial character of a Code 32 is "A". The BCST-43 supports the function of enabling or disabling the initial character, and defaults disabling it. Enable Initial Character Output "A"... -
Page 34: Code 93
Enter Setup Code 93 Enable/Disable Code 93 (*) Enable Code 93 Disable Code 93 EAN-8 Enable/Disable EAN-8 (*) Enable EAN-8 Disable EAN-8 Checksum Code (*) Transmit EAN-8 Checksum Code Do not Transmit EAN-8 Checksum Code EAN-13 Enable/Disable EAN-13 (*) Enable EAN-13 Disable EAN-13 Exit and Save... -
Page 35: Checksum Code
Enter Setup Checksum Code (*) Transmit EAN-13 Checksum Do not Transmit EAN-13 Checksum ISBN Convert EAN-13 into ISBN You may decide whether to convert EAN-13 into ISBN. The scanner won't convert EAN-13 into ISBN by default. Convert EAN-13 into ISBN (*) Do not Convert EAN-13 into ISBN Convert EAN-13 into ISSN You may decide whether to convert EAN-13 into ISSN. -
Page 36: Checksum Code
Enter Setup Checksum Code The MSI barcode contains 1-digit compulsory checksum code. If there is a checksum code, it will be the last 1 or 2 digit(s). The checksum is the value added from all data collected to check if the data input is correct. After you set the "MSI without Checksum"... -
Page 37: Upc-A
Enter Setup Do not Transmit MSI Checksum UPC-A Enable/Disable UPC-A (*) Enable UPC-A Disable UPC-A UPC-A Outputs 0 You may decide whether to add a character "0" to the output of UPC-A. The scanner defaults disabling the 0 output. UPC-A Outputs 0 (*) UPC-A Do not Output 0 Checksum Code You may decide whether to transmit checksum code. -
Page 38: Upc-E
Enter Setup (*) UPC-A Outputs Number System UPC-A Do not Output Number System Digit Digit UPC-E Enable/Disable UPC-E (*) Enable UPC-E Disable UPC-E Enable/Disable UPC-E1 The initial digit of most UPC-E is "0". If you want to read UPC-E barcodes with initial digit "1", please first enable the UPC-E and then set the "Enable UPC-E1"... -
Page 39: Convert Upc-E To Upc-A
Enter Setup Convert UPC-E to UPC-A Convert UPC-E to UPC-A (*) Do not Convert UPC-E to UPC-A Checksum Code (*) Transmit UPC-E Checksum Do not Transmit UPC-E Checksum IATA 2 of 5 Enable/Disable IATA 2 of 5 Enable IATA 2 of 5 (*) Disable IATA 2 of 5 Interleaved 2 of 5 Enable/Disable Interleaved 2 of 5... -
Page 40: Matrix 2 Of 5
Enter Setup Matrix 2 of 5 Enable/Disable Matrix 2 of 5 Enable Matrix 2 of 5 (*) Disable Matrix 2 of 5 Standard 2 of 5 / Industrial 2 of 5 Enable/Disable Standard 2 of 5 / Industrial 2 of 5 Enable Standard 2 of 5 / Industrial 2 of 5 (*) Disable Standard 2 of 5 / Industrial 2 of 5... -
Page 41: To Edit Data Format
Enter Setup To Edit Data Format Code ID A Code ID character identifies the code type of a scanned barcode. This is useful when decoding more than one code type. You may decide whether to add code ID in front of a barcode output. The scanner defaults disabling Code ID. -
Page 42: Code End Character Setting
4. Read the "Set Suffix" barcode. 5. Read the "D" barcode in Appendix I. 6. Read the "Exit and Save" barcode. Note: After you successfully set prefix and suffix, the BCST-43 will by default output scanning result with prefix and suffix. Set prefix... -
Page 43: Delete Characters On Output Result
Hide suffix Delete Characters on Output Result When outputting scanning result, the BCST-43 supports deleting 0–99 digit(s) front characters and 0–99 digit(s) end characters from a barcode. Steps to set deleting front 12-digit characters and end 4-digit characters are as below: 1. -
Page 44: Upper/Lower Case Setting
9 Digits Upper/Lower Case Setting BCST-43 can convert all letters in a barcode into upper case form, or all into lower case form. The case of letters remains unchanged by default. You may change the setting of the upper and lower case by reading the barcodes below. -
Page 45: Additional Code
You may decide whether to recognize the 2-digit additional code by set this function that is applicable to EAB-8, EAN-13, ISBN, ISSN, UPC-A, and UPC-E. The BCST-43 defaults disabling the recognition of 2-digit additional code. Enable 2-Digit Additional Code (*) Disable 2-Digit Additional Code... -
Page 46: Separation Character
(*) Do not Add Separation Character Caps Lock Control When using the BCST-43 on a Windows system, the content of a barcode may change with the status of the caps lock key. To avoid errors caused by such change, you may enable the "Rid Barcode of Caps Lock Control". -
Page 47: Read 1D Inverted Barcode
4. Read the "6" barcode in Appendix I; 5. Read the "Exit and Save" barcode. Note: After you set the initial characters by steps above, the BCST-43 will only recognize the barcodes with specific initial characters. If you want to disable the function, please read the "Enter Setup"... -
Page 48: Use Of Shortcut Barcodes
Please refer to the Appendix II and Appendix III. If the shortcut barcode is enabled and you scan some shortcut barcodes of input type, BCST-43 will output corresponding characters. When you scan the shortcut barcodes of function type, BCST-43 will simulate the effect on a keyboard, like a standalone function key or combination ones. -
Page 49: Replace Gs (^]) With Specific Character
4. Read the "Exit and Save" barcode. Note: After you complete setting the replacement character by following steps above, the BCST-43 will automatically enable the replacing GS with other characters function. If you want to disable the function, please read the "Enter Setup"... - Page 50 Enter Setup Set the Replacement Character Enable Replacing GS with Other Characters (*) Disable Replacing GS with Other Characters Exit and Save...
-
Page 51: Appendix Ⅰ: Characters
Enter Setup Appendix Ⅰ: Characters " & Exit and Save... - Page 52 Enter Setup < Exit and Save...
- Page 53 Enter Setup > Exit and Save...
- Page 54 Enter Setup Exit and Save...
- Page 55 Enter Setup Exit and Save...
- Page 56 Enter Setup Exit and Save...
- Page 57 Enter Setup Exit and Save...
-
Page 58: Appendix Ⅱ: Independent Function Key
Enter Setup Appendix Ⅱ: Independent Function Key Enter Key Space Key Exit and Save... - Page 59 Enter Setup Backspace Delete Move Cursor Upward Move Cursor Downward Move Cursor Leftward Move Cursor Rightward Ctrl Insert Home Page Up Page Down Exit and Save...
-
Page 60: Appendix Ⅲ: Function Key Combinations
Enter Setup Appendix Ⅲ: Function Key Combinations NUL(Ctrl+@) SOH(Ctrl+A) STX(Ctrl+B) ETX(Ctrl+C) EOT(Ctrl+D) ENQ(Ctrl+E) ACK(Ctrl+F) BEL(Ctrl+G) BS(Ctrl+H) HT(Ctrl+I) LF(Ctrl+J) VT(Ctrl+K) FF(Ctrl+L) CR(Ctrl+M) Exit and Save... - Page 61 Enter Setup SO(Ctrl+N) SI(Ctrl+O) DLE(Ctrl+P) DC1(Ctrl+Q) DC2(Ctrl+R) DC3(Ctrl+S) DC4(Ctrl+T) NAK(Ctrl+U) SYN(Ctrl+V) ETB(Ctrl+W) CAN(Ctrl+X) EM(Ctrl+Y) SUB(Ctrl+Z) ESC(Ctrl+[) Exit and Save...
- Page 62 Enter Setup FS(Ctrl+\) GS(Ctrl+]) RS(Ctrl+^) US(Ctrl+-) Exit and Save...
Need help?
Do you have a question about the BCST-43 and is the answer not in the manual?
Questions and answers