Table of Contents
Advertisement
Quick Links
ENDODONTIC TREATMENT INSTRUMENT
C-SMART-I
Us
*Thanks for applying the
C-SMART
the sake of safety and efficient use of the product, please read this manual first.
e manual
endodontic treatment instrument. For
Content
Ⅴ Assemble
ⅱ. Operation
Ⅷ
Ⅸ Troubleshooting
Advertisement
Table of Contents

Related Manuals for Coxo C-SMART-I


Summary of Contents for Coxo C-SMART-I
-
Page 1: Table Of Contents
Content Ⅰ Safety caution ENDODONTIC TREATMENT INSTRUMENT Ⅱ Introduction and technical parameter C-SMART-I Ⅲ Standard configuration Ⅳ Structure and theory Ⅴ Assemble Ⅵ Function and settings e manual ⅰ. Mode and function ⅱ. Program settings ⅲ. Apex position setting Ⅶ Use method ⅰ.Preparation before the use... -
Page 2: Ⅰ Safety Caution
12. This unit is just for the professional user. Ⅰ Safety caution Ⅱ Introduction and technical parameter Warning: before use, please read the safety instruction carefully for Intended use: making good use of this instrument. C-Smart Endo Motor is the supplementary root-canal treatment device, which can assist the dentists to operate more standard root- canal in the process of 1. -
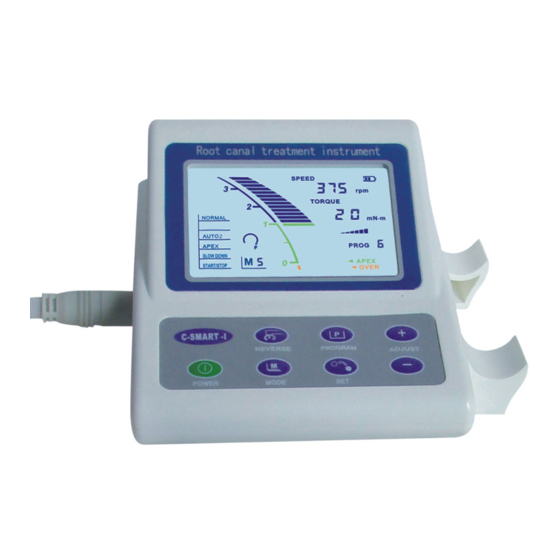
Page 3: Ⅲ Standard Configuration
Ⅲ Standard configuration: ①. Hole for adaptor ②. Hole for foot switch 1 pcs 1. Main unit ③. Hole for test wire 1 pcs 2. Adaptor ④. Hole for endo motor 1 pcs 3. Motor handle ⑤.POWER ........on/off button 1 pcs 4. -
Page 4: Ⅵ Function And Settings
7.Use motor with apex locator function( M5 - M9),please insert the test wire (single hole) to the hole on the main unit. Connect the stainless electrode to ⑧ test wire and hang the stainless strap on the contra angle. ④ Ⅵ... -
Page 5: Ⅱ. Program Settings
Press SET button,apex module flashing,the apex position flash last set position, SLOW DOWN:When the file is approaching to apex, the file automatically indicating having been entering into the setting mode,adjust the apex slows down for safer treatment position with pressing “ADJUST +” and “ADJUST -” button, the range START/STOP:... -
Page 6: Ⅲ.power Manage
M5: Apex locator and motor function, press foot switch and the file automatically, and will rotate forward when the torque is disappeared. rotates forward, the file stops working when it reaches the setting Release the foot switch, the file stops. apex position. -
Page 7: Ⅷ Maintenance And Sterilization
To fully recharge the battery, you should connect the unit to adaptor at least Resistance in Increase the torque by for 4 hours or more (The new battery requires at least 8 hours or more) , root-canal is too manual adjusting the File stops the sign will be running during the battery charging. -
Page 8: Ⅹ Services For Product And Technology
The opening of root Enlarge it The file canal is too small(M6-M9) reverses The file is too big (M6-M9) Change a smaller size continually Don't use the adaptor for Electromagnetic charging Interference Charge the battery at The using time Not fully charged least 4 hours of battery is too short...
Need help?
Do you have a question about the C-SMART-I and is the answer not in the manual?
Questions and answers