
Related Manuals for Coxo C-SMART-I


Summary of Contents for Coxo C-SMART-I
- Page 1 ENDODONTIC TREATMENT INSTRUMENT C-SMART-I Usage manual 0482 C-SMART-I Thanks for using the endodontic treatment instrument.For the sake of safety and efficient use of the product, please read this manual carefully.
- Page 2 Content Ⅰ Safety caution Ⅱ Introduction and technical parameter Ⅲ Standard configuration Ⅳ Structure and theory Ⅴ Assemble Ⅵ Function and settings ⅰ. Mode and function ⅱ. Program settings ⅲ. Apex position setting Ⅶ Use method ⅰ. Preparation before the use ⅱ.
- Page 3 Ⅰ Safety caution Before use, please read the safety instruction carefully for making good use of this manual. This unit must be used comply the user s guide, not for other purpose. Please refer to the usage instruction strictly. We won t take the responsibility for the damage caused by improper use.
-
Page 4: Intended Use
Ⅱ Introduction and technical parameter Intended use: C-Smart -I is the supplementary root-canal treatment device, which assist the dentists to operate more standard root canal in the process root canal treatment. Features: Colorful, wide LCD screen Rotation speed and torque can be adjusted, with 9 memory settings. Automatic torque reverse Dual-frequency apex locator 5 operation modes... - Page 5 Main unit Adaptor File holder Foot switch Test wire ENDODONTIC TREATMENT INSTRUMENT C-SMART-I Usage manual *Thanks for applying the C-SMART-II endodontic treatment instrument. For l carefully . the sake of safety and efficient use of the product, please read this manua...
-
Page 6: Main Unit
Ⅳ Structure and theory Main unit: ①. adaptor jack ②. foot switch jack adjust button test wire jack set button endo motor jack program select button mode select button forward/reverse button on/off button... -
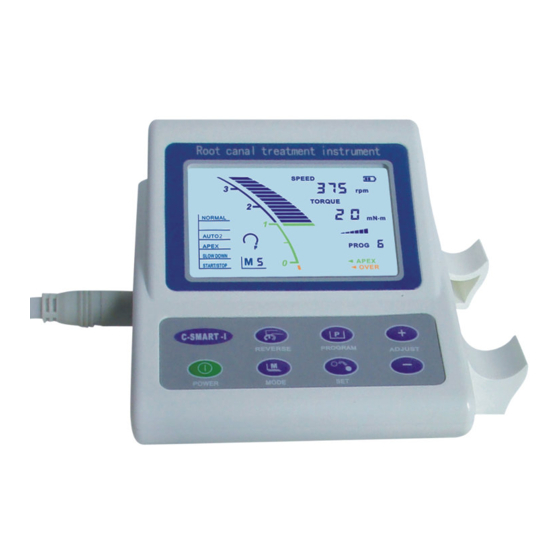
Page 7: Lcd Display
LCD display: ⑧ ④ ⑤ ⑥ ⑦ ① ② ③ ① Mode module ② Forward & reverse sign: display for forward or reverse rotation ③ Apex locator module ④ Rotation speed setting value ⑤ Torque setting value ⑥ Current torque indicator ⑦... - Page 8 Ⅴ Assemble Please put the instrument on Insert the foot switch plug into the jack on the main a solid place unit ø In M3-M5( automatic function , foot switch is unnecessary. Connect the plug of the mot- 4. Connect the 1:1 contra angle to the motor and or wire to the main unit m- clamp the file into the...
- Page 9 5. And then put the well conn- 6. Insert the adaptor plug into ected main unit on the handle the jack on the main unit holder reposefully. only for charge. Notice: when the instrument is being used , please don t use the adaptor for avoiding the electromagnetic interference IF ONLY USE THE APEX LOCATOR FUNCTION (M ) please insert the test wire...
- Page 10 ( 3- 5) USE MOTOR WITH APEX LOCATOR FUNCTION M 9.please insert the test wire .Connect the stainless electr- (single hole) to the hole on the ode to test wire and hang the st- main unit. ainless strap on the contra angle. (see the silicone sheath intalla- tion card...
- Page 11 Ⅵ Function and settings ⅰ. Mode and Function This unit has 5 modes and consists of 5 function options Working Mode Table Function option MODE Apex Normal Automatic2 Slow down Start/stop ü ü ü ü ü ü ü ü ü ü...
- Page 12 If not select the AUTO MATIC 2 function, the file will stop when the file goes to the setting value. : START/STOP The file starts rotating automatically when inserted into the canal and it stops automatically upon withdrawal : APEX Apex locator slow down operation depth...
- Page 13 5 MODES Mode, you can assemble the unit as follow: Mode, you can assemble the unit as follow: : , M1 Manual motor mode press foot switch, file rotates forward when , the torque reaches the setting torque file reverses automatically and will rotate forward when the torque is disappeared Release the foot switch, the file stops.
- Page 14 Mode, you can assemble the unit as follow: Mode, you can assemble the unit as follow: : In this mode, only apex locator functions, methods of operation are as follows: NOTICE: It can not get an exact value of the apex length when the treatment is in an unstable condition.
- Page 15 When you need to pull out the test wire, please don t pull the wire but hold its pin and pull it out. ü 2. Clip the metal part of the file with the holder and hang the stainless electrode up at any side of the patient's mouth. ,...
- Page 16 4. Deciding the working length of root canal When the figure on the LCD screen shows 0.5mm then measure distance from the bottom of rubber vernier caliper to the tip of the file Take note of this figure subtract 0.5-1.0mm from the above data is the working length of root-canal.
- Page 17 M3-M5 M3-M5 Mode, you can assemble the unit as follow: Mode, you can assemble the unit as follow: InM3-M5(Automaticmotormodes),footswitchisunnecessary. Apex locator and motor function the file starts to rotate forward when it enter the root canal and when it reach the setting apex position, the file stops working the setting apex ( the...
- Page 18 Apex locator & auto reverse 2 motor& automatically start and stop function. The file starts to rotate forward when it entering into the root canal and reverse when it reaches the setting apex position and stops automatically upon withdrawal. auto star auto stop reverse 0.5mm...
- Page 19 Apex locator & auto reverse 2 motor & automatically start and stop & slowdown The file starts to rotate forward when it entering into the root canal and automatically slows down when approaching to apex and reverses automatically when it reaches the setting apex position and stops without touching the root canal setting apex...
- Page 20 : Notice When the torque reaches or exceeds the setting torque in M3-M5, and no matter the root canal enlarged file reaches the set data or not the file will reserves automatically reach the setting the setting turque apex Reverse Press the “...
-
Page 21: Setting Method
ⅱ. Program settings Before use, the user should set the speed and torque and save the programs. There are 9 programs can be set by the user. Setting method: Notice: The program only can be set in M1 modes (without apex locator function) Step1. - Page 22 (the adjustable speed range: 125,250,375,500,625 rmp) press press (the adjustable torque range: 3,6,9,12,15,18,21,25,30,35, 40 ,52 mN.m) (the adjustable program range: 1-9)
- Page 23 ⅲ.Apex position setting Dentist can adjust the apex position if necessary. For example you can set the apex position 0.5mm away to the apex hole and unit will memorize this position automatic and endo file will auto- matic reverse or stop when file reaches this position. Set method: Notice: Dentist can set the apex position only in M2 mode (apex locator mode).
- Page 24 press range within 0.0-1.0 Ⅶ Use Method ⅰ. Preparation before the use Check each component connection 2. Press POWER button, make sure the information displayed in the LCD screen is completed 1) LCD displays last working mode 2) LCD displays last program 3) LCD displays apex module in mode 4) Indicating the power of battery quantity...
- Page 25 3. When first use, you should preset the program or the apex location firstly you need.(see the program setting & apex position setting 4. Press “ MODE ” button to select the working mode press 5. Press “ PROGRAM ” button to select the working program press Notice: when the instrument is being used, please don t use the adaptor for avoiding the electromagnetic...
- Page 26 ⅲ.Power manage 1. Battery power LCD displays the current battery power, the number of lattice shows , more, and the power is fuller. If there is no electricity the lattice will flicker which means the battery power is about to run out , at this status the beeper will ring per 3S and unit will shut down after 60S beep...
- Page 27 Automatic power off The instrument will shut down automatically when it ceases working for 3 minutes. In that case all display and function will stop. Notice: When power off, the LCD will show recharging sign when charging Ⅷ Maintenance and sterilization 1.
-
Page 28: Ⅸ Troubleshooting
Ⅸ Troubleshooting If the equipment is not normal work, before call our after-sales center, please check the table below. Reason analyses Problem shooting Phenomenon Low battery Can t power on Recharge the battery Check the wire and Bad contact in foot make sure the foots switch switch works well... - Page 29 The file hasn t been into The file will start when the root canal goes into the root canal File can t start Root canal is too dry Infuse some normal (M3-M5) saline The pin or electrode is in Clean or change the bad contact pin/electrode Oral mucosa is too dry...
- Page 30 Ⅹ Guarantee The main unit is guaranteed for 24 months from the date of purchase The accessories (except the handle base which is not covered by warranty are guaranteed for 6 months The guarantee is valid for normal usage conditions. Any modification or accidental damage will render the guarantee void.
- Page 31 Ⅻ Mark illustration Direct current Ⅱ Class equipment (adaptor) Type B equipment Caution! Please read the instruction WEEE IPX1 Protection against ingress of liquids: drip-proof footswitch CE marked product...
- Page 32 Foshan COXO Medical Instrument Co. Ltd , Address: 21 Wufeng Si Road, Foshan, Guangdong China Wellkang Ltd. Address: Suite B, 29 Harley Street London W1G QR United Kingdom Ver3.0...
Need help?
Do you have a question about the C-SMART-I and is the answer not in the manual?
Questions and answers