
Subscribe to Our Youtube Channel
Related Manuals for NTI VEEMUX Series


Summary of Contents for NTI VEEMUX Series
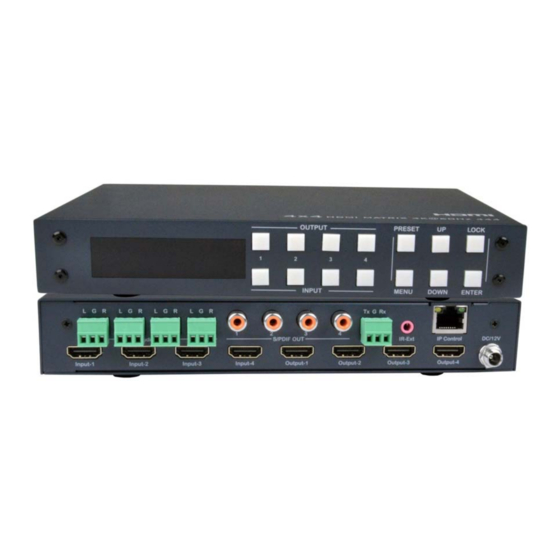
- Page 1 ® VEEMUX Series SM-4X4-4K18GBA-LCV2 Low-Cost 4K 18Gbps HDMI Video Matrix Switch Installation and Operating Manual Front and Rear View of SM-4X4-4K18GBA-LCV2 MAN422 Rev Date 7/06/2022...
- Page 2 TRADEMARK VEEMUX and the NTI logo are registered trademarks of Network Technologies Inc in the U.S. and other countries. All other brand names and trademarks or registered trademarks are the property of their respective owners. COPYRIGHT Copyright © 2022 by Network Technologies Inc. All rights reserved. No part of this publication may be reproduced, stored in a retrieval system, or transmitted, in any form or by any means, electronic, mechanical, photocopying, recording, or otherwise, without the prior written consent of Network Technologies Inc, 1275 Danner Drive, Aurora, Ohio 44202.
-
Page 3: Table Of Contents
TABLE OF CONTENTS Introduction..................................1 Materials ..................................2 Features and Functions..............................3 Connections..................................5 Operation..................................6 Remote Control Features ............................6 LCD Panel Control............................... 7 Video switch operation:............................. 7 Video Switching ................................ 8 Turn ON/OFF Output ..............................9 Audio Control Interface ............................10 Switch Output Audio ............................ -
Page 4: Introduction
NTI 4x4 HDMI2.0 Matrix Switch INTRODUCTION The VEEMUX® Low-Cost 4K HDMI Matrix Switch routes digital 4Kx2K HDMI video and audio signals from up to four HDMI video sources (computers, Blu-Ray players, satellite receivers, etc) to up to four displays (monitors, 4K TV’s, projectors, etc). -
Page 5: Materials
NTI 4x4 HDMI2.0 Matrix Switch MATERIALS Materials supplied with this kit NTI SM-4X4-4K18GBA-LCV2 HDMI Matrix Switch 110-240VAC, 50 or 60Hz-12VDC/2A AC Adapter Remote Control IR Receiver Extension Cable 5 pcs 3-Terminal plugs for RS232 cable termination and Audio termination ... -
Page 6: Features And Functions
NTI 4x4 HDMI2.0 Matrix Switch FEATURES AND FUNCTIONS SM-4X4-4K18GBA-LCV2 Front Panel LABEL INTERFACE DESCRIPTION IR Receiver Sensor for receiving IR signal from Remote Control None (behind window) BUTTONS Press to choose an output, press again to cancel / Press and hold to... - Page 7 NTI 4x4 HDMI2.0 Matrix Switch SM-4X4-4K18GBA-LCV2 Rear Panel: LABEL INTERFACE DESCRIPTION 3-Terminal Blocks For connecting to analog speakers L/R Audio Out -L/G/R BNC connections For connecting to S/PDIF type speakers S/PDIF OUT 3-Terminal Block For connection to RS232 terminal RS232 Tx/G/Rx 3.5mm Jack...
-
Page 8: Connections
NTI 4x4 HDMI2.0 Matrix Switch CONNECTIONS 1. Connect HDMI video and audio source devices to the Input ports of the matrix 2. Connect HDMI Output ports to Televisions or other HDMI sink devices. 3. Optional: connect an RS232 cable from a computer's RS232 port. -
Page 9: Operation
NTI 4x4 HDMI2.0 Matrix Switch OPERATION Remote Control Features Power ON/Standby. M: Mute the HDMI output audio W: Lock remote control Output 1-4 All outputs select INPUT-y: a.Press ALL button b.Press INPUT-y button (y means 1 to 4 of the Inputs),then INPUT-y is switched to ALL OUTPUTS. -
Page 10: Lcd Panel Control
NTI 4x4 HDMI2.0 Matrix Switch LCD Panel Control Video switch operation: Signal switching includes 4 switching channels, which can be randomly configured as input/output according to requirements to form a 1×4~4×4 matrix. It can switch any input signal to 1 channel output or all channels output. -
Page 11: Video Switching
NTI 4x4 HDMI2.0 Matrix Switch Video Switching Operation: 1. Select "Video" in the main menu, press "ENTER" button. 2. Press “up and down” button to choose “Switching” . 3. Press "ENTER" to enter the next sub-menu 4. Press the “up and down” button to select “Output1~4” (“All” means switching all outputs )... -
Page 12: Turn On/Off Output
NTI 4x4 HDMI2.0 Matrix Switch Turn ON/OFF Output You can turn ON/OFF any output port, or turn ON/OFF all output ports. Output video is ON by default Operation: 1. In the main menu, select "Video" and press "ENTER" button 2. Press “up and down” button to select “On/Off”... -
Page 13: Audio Control Interface
NTI 4x4 HDMI2.0 Matrix Switch Audio Control Interface There are 2 sub-menus in audio control interface: Line out and De-Embed (both are default open) Switch Output Audio “Line out” means switch HDMI output audio ON/OFF, with which you are able to mute the TV sound from any one channel HDMI output. -
Page 14: Audio Extraction Control
NTI 4x4 HDMI2.0 Matrix Switch Audio Extraction Control: “De -Embed” enables you to set the output audio (for both analog and SPDIF audio). You can select any one Channel audio output or mute. : Operation 1. Select “Audio” in main menu and press ”ENTER” button. -
Page 15: Edid Setting Interface
NTI 4x4 HDMI2.0 Matrix Switch EDID Setting Interface: EDID management: User EDID, built-in EDID, Copy EDID mode. The default EDID is "Default1” for all input channels. Default1 4K60 444-LPCM: 2.0, HDR:HLG Default2 4K60 420-LPCM: 2.0, HDR:None Default3 4K30 444-LPCM: 2.0, HDR:None Default4 1080P60 444-LPCM: 2.0, HDR:None... -
Page 16: Preset Application
NTI 4x4 HDMI2.0 Matrix Switch Preset Application Preset interface can save the current video, audio, EDID, system settings, etc..., there are 8 slots available for preset configurations. They can be configured through web, command, panel buttons, and recall. Preset control interface has three sub-menu: ... -
Page 17: Setup Interface
NTI 4x4 HDMI2.0 Matrix Switch Setup Interface Setup Interface can set serial port Baud Rate, DHCP ON/OFF, device Reboot and Factory Reset. Baud rate setting There are 4 options for baud rate setting: 9600,19200,57600,115200. The default serial port baud rate is 115200 The example below is setting baud rate to 9600. -
Page 18: Dhcp Switch
NTI 4x4 HDMI2.0 Matrix Switch DHCP switch DHCP On = dynamic IP address; DHCP Off = static IP address (default is DHCP Off) DHCP On operation: 1. Select “Setup” in main menu and press ”ENTER” button. 2. Press “up and down” button to select “DHCP” setting 3. -
Page 19: Reboot
NTI 4x4 HDMI2.0 Matrix Switch Reboot Reboot the device. : Operation 1. Select “Setup” in main menu and press ”ENTER” button 2. Press “up and down” button to select ”Reboot” 3. Press “ENTER” to enter the next sub- menu. 4. Press “up and down” button to select “Yes”... -
Page 20: View Information Interface
NTI 4x4 HDMI2.0 Matrix Switch View Information Interface View IP and System Information. : System interface View company name, device name and version information : IP interface View device IP address, MAC address and DHCP status. : Operation 1. Select “INFO” in main menu and press ”ENTER” button 2. -
Page 21: Rs232 Control
NTI 4x4 HDMI2.0 Matrix Switch RS232 CONTROL 1. Open CommUart Assistant. (This can be downloaded from https://www.networktechinc.com/4k-matrix- switch.html) 2. Comport setting: Choose correct COM port settings that connect to a computer in the parameter configuration area Baud Rate: 115200 bps(Default) -
Page 22: Web Control
NTI 4x4 HDMI2.0 Matrix Switch WEB CONTROL If DHCP (page 14) is set to ON, you will not need to change the IP address of the computer. Only do this if DHCP is set to OFF. Change IP address of the computer Before configuring the matrix through the website, it is necessary to configure the IP address of the computer to be attached to the matrix (mainly to ensure that the computer and the matrix are set in the same network segment). - Page 23 NTI 4x4 HDMI2.0 Matrix Switch Log in by browser Default IP address for log-in: 192.168.1.168 (if DHCP is set to "OFF"). If DHCP is "ON", check the IP address from "Menu" -> "INFO" -> "IP" (see page 16). Type in user name and password...
- Page 24 NTI 4x4 HDMI2.0 Matrix Switch...
- Page 25 NTI 4x4 HDMI2.0 Matrix Switch Audio Interface Click output1-4 HDMI:mute HDMI output audio; Operation: example: mute audio of the TV connected to HDMI output1 Click output1 HDMI, color will change and TV will have video but no audio. Re-click to un-mute the audio.
- Page 26 NTI 4x4 HDMI2.0 Matrix Switch EDID Interface 1. Input:00>>Input1,00~16= EDID number,Input1~4 = HDMI input1~4 2. Output:00~03=default EDID,04~07 =user EDID,08~11=copy EDID,12~15=input EDID,16=Temp EDID,refer to below for more details: 4K60 444-LPCM: 2.0, HDR:HLG 4K60 420-LPCM: 2.0, HDR:None 4K30 444-LPCM: 2.0, HDR:None 1080P60 444-LPCM: 2.0, HDR:None...
- Page 27 NTI 4x4 HDMI2.0 Matrix Switch Network Interface MAC address can not be modified, this is for display only. Static IP: Click DHCP switch (DHCP Off), you can modify IP address, then click the “Apply” button. It will countdown. If the device IP address is the same as client IP, it will re-login to the web interface.
- Page 28 NTI 4x4 HDMI2.0 Matrix Switch System Setting Interface: 1. System Setting: Reboot: Click to reboot device Factory Common: Click to reset device for partial functionality; Factory All: Click to reset device completely; “Reboot” will not clear user set parameters;...
- Page 29 NTI 4x4 HDMI2.0 Matrix Switch Firmware Upgrade MCU application layer upgrade 1. Connect unit to computer with USB2.0 to RS232 cable. 2. Open software”UART_ISP_V1.x.exe”, 3. Select the correct port, 4. Set baud rate at 115200, 5. Type “A1” in PORT block 6.
- Page 30 NTI 4x4 HDMI2.0 Matrix Switch Web Firmware Upgrade: 1. Connect unit to PC with USB2.0 to RS232 cable 2. Open software ”UART_ISP_V1.6.exe”, 3. Select correct port, 4. Set baud rate at 115200, 5. Type “F0” in PORT block 6. Select PATH and enter path to the software file...
-
Page 31: Technical Specifications
NTI 4x4 HDMI2.0 Matrix Switch TECHNICAL SPECIFICATIONS Video Input Ports 4x HDMI Female Video Output Ports 4x HDMI Female HDMI Supported HDMI 2.0 HDCP Compliant HDCP2.2 and HDCP1.4 Bandwidth 18 Gbps Supported common 4096x2160@60Hz resolutions 3840x2160@60Hz 1920x1200@60Hz 1920x1080@144Hz Color Format...
Need help?
Do you have a question about the VEEMUX Series and is the answer not in the manual?
Questions and answers