
Related Manuals for pro.point 9028002


Summary of Contents for pro.point 9028002
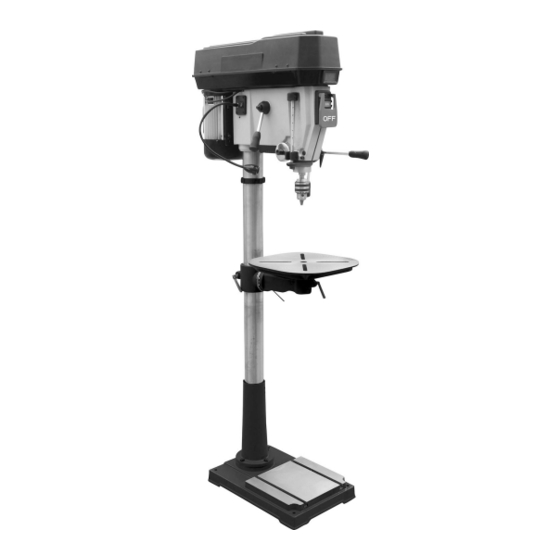
- Page 1 V1.0 9028002 FLOOR MOUNT DRILL PRESS Please read and understand all instructions before use. Retain this manual for future reference.
- Page 2 This page is intentionally left blank.
-
Page 3: Specifications
V1.0 VARIABLE-SPEED FLOOR-MOUNT DRILL PRESS 9028002 SPECIFICATIONS Horsepower 1-1/2 HP Drive Type Drive Belt Voltage Rating 120V AC Amperage Rating Phase Frequency Rating 60 Hz Number of Speeds Variable-speed Speed Rating 600 to 2,400 RPM Chuck Size 5/8 in. Spindle Travel 6 in. - Page 4 9028002 VARIABLE-SPEED FLOOR-MOUNT DRILL PRESS V1.0 HAZARD DEFINITIONS Please familiarize yourself with the hazard notices found in this manual. A notice is an alert that there is a possibility of property damage, injury or death if certain instructions are not followed.
-
Page 5: Specific Safety
V1.0 VARIABLE-SPEED FLOOR-MOUNT DRILL PRESS 9028002 Do not wear gloves when operating a tool that can snag the material and pull the hand into the tool. Wear the appropriate type of full-face shield in addition to safety googles, as the work can create chips, abrasive or particulate matter. - Page 6 9028002 VARIABLE-SPEED FLOOR-MOUNT DRILL PRESS V1.0 material as the point may move around under pressure, damaging the workpiece. Ensure the bit shank size matches the tool’s chuck or collet size. Tighten the chuck so the shank is tightly held with no room to move.
- Page 7 V1.0 VARIABLE-SPEED FLOOR-MOUNT DRILL PRESS 9028002 POWER TOOL PRECAUTIONS Do not use any power tool with a malfunctioning power switch or control. A power tool that fails to respond to the controls is dangerous and can cause an injury. A qualified technician must repair and verify the power tool is operating correctly, before it can be used.
-
Page 8: Electrical Safety
9028002 VARIABLE-SPEED FLOOR-MOUNT DRILL PRESS V1.0 Use a clamp to hold the material if the tool includes a clamping system. Use special care when working on corners, sharp edges or flexible material. The workpiece has a tendency to snag the drill bit. - Page 9 V1.0 VARIABLE-SPEED FLOOR-MOUNT DRILL PRESS 9028002 with a qualified electrician if you are in doubt as to whether the outlet is properly grounded. If the tool should electronically malfunction or break down, grounding provides a low resistance path to carry electricity away from the user.
-
Page 10: Assembly And Installation
9028002 VARIABLE-SPEED FLOOR-MOUNT DRILL PRESS V1.0 ASSEMBLY & INSTALLATION BEFORE STARTING Remove the protective coverings from the base, the column and the head assembly. Strip the protective oil coat from the table and the column using household grease removers. Apply a coat of paste wax on the table and the column to prevent rust. - Page 11 V1.0 VARIABLE-SPEED FLOOR-MOUNT DRILL PRESS 9028002 arm, which should fully mesh with the Helical Gear. Hold it in this position. The worm gear shaft will extend through the housing to be ready for the crank to be attached in a later step.
- Page 12 9028002 VARIABLE-SPEED FLOOR-MOUNT DRILL PRESS V1.0 ASSEMBLE THE DRILL HEAD Loosen the set screw on the left-hand side of the drill head assembly. Slide the head assembly onto the column. Position the drill head so the set screw is on the left-hand side and the column's rack is on the right-hand side.
-
Page 13: Operation
V1.0 VARIABLE-SPEED FLOOR-MOUNT DRILL PRESS 9028002 the feed handles to press the spindle and chuck into place. OPERATION Fig. 9 INSTALLING A DRILL BIT Insert the drill bit into the jaws of the chuck approximately 1 in., ensuring that the jaws do not touch the flutes of the drill bit. - Page 14 9028002 VARIABLE-SPEED FLOOR-MOUNT DRILL PRESS V1.0 assembly arm and rack move as one around the column. Tilt the table by loosening the bevel table locking screw, removing the alignment pin and tilting to the required angle (Fig. 11). A scale is provided on the arm measured in degrees to assist in setting the Fig.
- Page 15 V1.0 VARIABLE-SPEED FLOOR-MOUNT DRILL PRESS 9028002 Tighten the rear nut nut until it contacts the spring housing. Then back the nut out 1/4 turn from the spring housing. Tighten the front nut against the rear nut to hold the housing in place.
-
Page 16: On/Off Button
9028002 VARIABLE-SPEED FLOOR-MOUNT DRILL PRESS V1.0 The depth is set. FLEXIBLE LAMP Bend the lamp's shaft to an angle that will illuminate the workpiece. Make sure it will not interfere with the task. Press the lamp switch to turn the light on. - Page 17 V1.0 VARIABLE-SPEED FLOOR-MOUNT DRILL PRESS 9028002 OPERATING THE DRILL PRESS WARNING! If the drill bit grabs and spins the workpiece, do not attempt to stop the spinning with your hands, as it can cause an impact injury. Step back and turn the drill press off.
-
Page 18: Care And Maintenance
9028002 VARIABLE-SPEED FLOOR-MOUNT DRILL PRESS V1.0 (softwood). Increase the drill speed until the bore hole is smooth with clean edges. Pull down on the feed handle and slowly drill a hole into the workpiece. Once the desired depth is reached, slowly push the feed handle up until the drill bit clears the workpiece. -
Page 19: Troubleshooting
V1.0 VARIABLE-SPEED FLOOR-MOUNT DRILL PRESS 9028002 STORAGE When not in use for an extended period, apply a thin coat of lubricant to the steel parts to avoid rust. Remove the lubricant before using the tool again. Components should be kept dry, with machined surfaces lightly oiled. - Page 20 9028002 VARIABLE-SPEED FLOOR-MOUNT DRILL PRESS V1.0 Problem(s) Possible Cause(s) Suggested Solution(s) Performance • Keep the drill bit sharp. • The drill bit is dull or decreases over Replace as needed damaged time. Overheating Forcing machine to Allow machine to work at its work too fast.
-
Page 21: Parts Breakdown
V1.0 VARIABLE-SPEED FLOOR-MOUNT DRILL PRESS 9028002 PARTS BREAKDOWN Page 21 Assistance available at www.princessauto.com or 1-800-665-8685... -
Page 22: Parts List
9028002 VARIABLE-SPEED FLOOR-MOUNT DRILL PRESS V1.0 PARTS LIST DESCRIPTION DESCRIPTION Pan head screw Flat washer Set screw Upper belt cover Set screw Label Rubber bushing Lower belt cover Hex nut Knob Serrated washer Chuck key seat Pan head screw Gear shaft... - Page 23 V1.0 VARIABLE-SPEED FLOOR-MOUNT DRILL PRESS 9028002 DESCRIPTION DESCRIPTION Arbor Flat head screw Chuck key Handle Chuck Handle case Emergency stop cover Lock nut Pan head screw Led work light Switch button panel Terminal Switch Wire Grounding label Wire Pan head screw...
- Page 24 9028002 VARIABLE-SPEED FLOOR-MOUNT DRILL PRESS V1.0 DESCRIPTION DESCRIPTION Retaining ring Hex head bolt Table Crank handle Chain Set screw Rack Column collar Column Set screw Column support Set screw Helical Gear Hex head bolt Table support bracket Hex nut Worm gear...
- Page 25 V1,0 9028002 PERCEUSE À COLONNE VITESSES VARIABLES À MONTAGE SUR PLANCHER Vous devez lire et comprendre toutes les instructions avant d'utiliser l'appareil. Conservez ce manuel afin de pouvoir le consulter plus tard.
- Page 26 Cette page a été laissée blanche intentionnellement.
-
Page 27: Spécifications
V1.0 PERCEUSE À COLONNE DE VITESSES VARIABLES À MONTAGE SUR LE PLANCHER 9028002 SPÉCIFICATIONS Puissance 1 1/2 CV Type de prise Courroie d’entraînement Tension nominale 120 Vca Intensité de courant nominale 13 A Phase Fréquence nominale 60 Hz Nombre de vitesses... -
Page 28: Aire De Travail
9028002 PERCEUSE À COLONNE DE VITESSES VARIABLES À MONTAGE SUR LE PLANCHER V1.0 DÉFINITIONS DE DANGER Veuillez vous familiariser avec les avis de danger qui sont présentés dans ce manuel. Un avis est une alerte indiquant qu’il existe un risque de dommage matériel, de blessure ou de mort si on ne respecte pas... - Page 29 V1.0 PERCEUSE À COLONNE DE VITESSES VARIABLES À MONTAGE SUR LE PLANCHER 9028002 ÉQUIPEMENT DE PROTECTION INDIVIDUELLE Portez toujours des lunettes antiprojections qui offrent une protection frontale et latérale pour les yeux. L’équipement de protection des yeux devrait être conforme à la norme CSA Z94.3-07 ou ANSI Z87.1 en fonction du type de travail effectué.
- Page 30 9028002 PERCEUSE À COLONNE DE VITESSES VARIABLES À MONTAGE SUR LE PLANCHER V1.0 SÉCURITÉ SPÉCIFIQUE AVERTISSEMENT! Peu importe votre aisance ou votre familiarité avec le produit (à force de vous en servir), respectez TOUJOURS et strictement les règles de sécurité.
- Page 31 V1.0 PERCEUSE À COLONNE DE VITESSES VARIABLES À MONTAGE SUR LE PLANCHER 9028002 jamais d'essence. Laissez sécher avant l'utilisation. Jetez l'embout si vous ne parvenez pas à enlever la gomme ou la poix. Nettoyez régulièrement les évents de l’outil électrique. Le ventilateur du moteur aspire de la poussière et d’autres particules...
- Page 32 9028002 PERCEUSE À COLONNE DE VITESSES VARIABLES À MONTAGE SUR LE PLANCHER V1.0 préventives réduisent le risque d’une mise en marche imprévue de l’outil. Ne forcez jamais la perceuse à colonne. Une pression excessive pourrait briser l’outil, entraînant ainsi des dommages au niveau de la pièce à...
- Page 33 V1.0 PERCEUSE À COLONNE DE VITESSES VARIABLES À MONTAGE SUR LE PLANCHER 9028002 Utilisez une bride pour retenir le matériau si l'outil comprend un système de serrage. Faites particulièrement attention lors du travail dans les coins, avec des bords coupants ou des matériaux flexibles. La pièce a tendance à...
- Page 34 9028002 PERCEUSE À COLONNE DE VITESSES VARIABLES À MONTAGE SUR LE PLANCHER V1.0 Advenant une panne de courant, éteignez ou débranchez l’appareil dès que le courant est interrompu. Il pourrait y avoir un risque de blessure accidentelle advenant le retour du courant si l’appareil n’a pas été...
-
Page 35: Assemblage Et Installation
V1.0 PERCEUSE À COLONNE DE VITESSES VARIABLES À MONTAGE SUR LE PLANCHER 9028002 Tête de perçage Table C. Colonne D. Support de table Base de piédestal Réglage de la poignée de la table G. Poignées d'alimentation (3) H. Poignée de réglage de la vitesse Clé... - Page 36 9028002 PERCEUSE À COLONNE DE VITESSES VARIABLES À MONTAGE SUR LE PLANCHER V1.0 ASSEMBLAGE DE LA BASE ET DE LA COLONNE Avant de procéder à l'assemblage, boulonnez la base sur un plancher solide, plat et de niveau qui est capable de soutenir le poids de la perceuse à...
- Page 37 V1.0 PERCEUSE À COLONNE DE VITESSES VARIABLES À MONTAGE SUR LE PLANCHER 9028002 colonne. Cependant, assurez-vous que la crémaillère n’est pas coincée et qu’il existe un jeu entre la crémaillère et le collier. Fixez solidement le collier au moyen de sa vis de calage.
- Page 38 9028002 PERCEUSE À COLONNE DE VITESSES VARIABLES À MONTAGE SUR LE PLANCHER V1.0 Ouvrez au maximum les mâchoires du mandrin au moyen de la clé de mandrin. Assurez-vous que le mandrin et la broche sont parfaitement propres, secs et exempts de bavures.
- Page 39 V1.0 PERCEUSE À COLONNE DE VITESSES VARIABLES À MONTAGE SUR LE PLANCHER 9028002 Avant de serrer le mandrin, assurez-vous que le foret est centré à l'intérieur des mâchoires. Serrez solidement le mandrin au moyen de la clé de mandrin comprise.
- Page 40 9028002 PERCEUSE À COLONNE DE VITESSES VARIABLES À MONTAGE SUR LE PLANCHER V1.0 Une échelle en degrés est fournie sur le bras afin de faciliter le réglage de l’angle. La table devrait être réglée à 0° pour effectuer toutes les opérations normales.
- Page 41 V1.0 PERCEUSE À COLONNE DE VITESSES VARIABLES À MONTAGE SUR LE PLANCHER 9028002 RÉGLAGE DE LA PROFONDEUR DE PERÇAGE La perceuse à colonne comprend une butée de profondeur pour contrôler la profondeur du trou. Il est possible de régler la profondeur de deux façons soit en alignant le repère à...
-
Page 42: Bouton Marche/Arrêt
9028002 PERCEUSE À COLONNE DE VITESSES VARIABLES À MONTAGE SUR LE PLANCHER V1.0 LAMPE FLEXIBLE Pliez le manche de la lampe à un angle qui permet d’éclairer la pièce à travailler. Assurez-vous que cela ne nuit pas à la tâche. - Page 43 V1.0 PERCEUSE À COLONNE DE VITESSES VARIABLES À MONTAGE SUR LE PLANCHER 9028002 UTILISATION DE LA PERCEUSE À COLONNE AVERTISSEMENT ! Si le foret accroche et fait tourner la pièce à travailler, ne tentez pas de l'immobiliser avec les mains, puisque l'impact pourrait vous blesser. Éloignez- vous et arrêtez la perceuse à...
-
Page 44: Soin Et Entretien
9028002 PERCEUSE À COLONNE DE VITESSES VARIABLES À MONTAGE SUR LE PLANCHER V1.0 Les rotations par minute apparaîtront sur l’écran numérique. Des marques de polissage sur la pièce à travailler indiquent que la vitesse de la perceuse est trop élevée pour la taille du foret ou pour la dureté... -
Page 45: Mise Au Rebut
V1.0 PERCEUSE À COLONNE DE VITESSES VARIABLES À MONTAGE SUR LE PLANCHER 9028002 Enlevez régulièrement toute saleté, poussière ou débris des évents pour empêcher l’outil de surchauffer. AVERTISSEMENT! Seul le personnel d’entretien qualifié devrait effectuer la réparation de l’outil. Un outil mal réparé... - Page 46 9028002 PERCEUSE À COLONNE DE VITESSES VARIABLES À MONTAGE SUR LE PLANCHER V1.0 Problème(s) Cause(s) possible(s) Solution(s) proposée(s) La perceuse à Vérifiez si la source L’alimentation fournie colonne ne d’alimentation est toujours est interrompue. démarre pas. disponible. L’interrupteur de Remplacez l’interrupteur marche/arrêt est...
- Page 47 V1.0 PERCEUSE À COLONNE DE VITESSES VARIABLES À MONTAGE SUR LE PLANCHER 9028002 Problème(s) Cause(s) possible(s) Solution(s) proposée(s) Surchauffe Surcharge mécanique Laissez l'appareil de l'appareil (vitesse fonctionner à son propre excessive). rythme. Le foret est émoussé ou Gardez du foret bien endommagé.
- Page 48 9028002 PERCEUSE À COLONNE DE VITESSES VARIABLES À MONTAGE SUR LE PLANCHER V1.0 RÉPARTITION DES PIÈCES Assistance available at www.princessauto.com or 1-800-665-8685 Page 24...
-
Page 49: Liste Des Pièces
V1.0 PERCEUSE À COLONNE DE VITESSES VARIABLES À MONTAGE SUR LE PLANCHER 9028002 LISTE DES PIÈCES DESCRIPTION QTÉ DESCRIPTION QTÉ Vis à tête cylindrique Anneau de retenue Rondelle plate Roulement à billes Protecteur supérieur de Entretoise courroie Vis de pression Étiquette... - Page 50 9028002 PERCEUSE À COLONNE DE VITESSES VARIABLES À MONTAGE SUR LE PLANCHER V1.0 DESCRIPTION QTÉ DESCRIPTION QTÉ Vis de profondeur Vis à tête cylindrique Écrou de bouton Vis à tête cylindrique Ressort Couvercle en plastique Écrou de limitation de Capuchon de poignée profondeur Écrou hexagonal...
- Page 51 V1.0 PERCEUSE À COLONNE DE VITESSES VARIABLES À MONTAGE SUR LE PLANCHER 9028002 DESCRIPTION QTÉ DESCRIPTION QTÉ Plaque de montage de Ferrure de support de moteur table Boulon à tête Vis sans fin hexagonale Levier de verrouillage Rondelle plate Support de table Rondelle plate Repère d’angle...
- Page 52 Cette page a été laissée blanche intentionnellement.
Need help?
Do you have a question about the 9028002 and is the answer not in the manual?
Questions and answers