Table of Contents
Advertisement
Quick Links
Advertisement
Chapters
Table of Contents

Related Manuals for Andonstar ADSM201


Summary of Contents for Andonstar ADSM201
- Page 1 HDMI Microscope ADSM201 User Manual...
-
Page 2: Table Of Contents
General Rules ..............................2 Basic Parameters .............................. 2 Structure diagram ............................3 Assembly ................................3 General use ................................ 4 Displaying on an External HDMI Monitor ....................5 USB output mode ............................5 1 / 12... -
Page 3: General Rules
Do not allow unsupervised access by infants or toddlers. · Your ADSM201 is not intended for field use . It is not waterproof, and should not be exposed to extreme temperatures. Treat as you would any other electronic device, such as a laptop or tablet. -
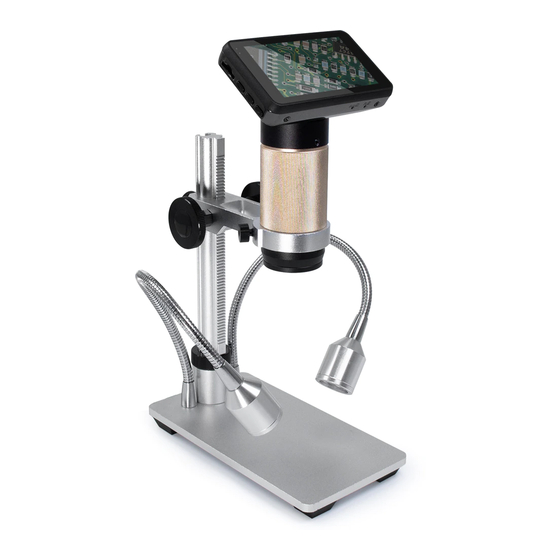
Page 4: Structure Diagram
Structure diagram Assembly 1. Bend the spotlights down(⑤), so that they are out of the way. 2. Screw the locking ring(⑥) all the way on to the optical bracket(①). 3. Screw the optical bracket( ①) on to the base( ⑦). Once you have done so, it is likely the bracket will not be aligned over the base(⑦). -
Page 5: General Use
6. Tighten the thumbscrews( ④ ) to hold the microscope in place. If done correctly, you should be able to turn the focus controller(②) of the microscope freely, while the rest of it remains in place. 7. Remove the protective film from the display at the top of the microscope. General use 1. -
Page 6: Displaying On An External Hdmi Monitor
Displaying on an External HDMI monitor ·Fisrt, make sure that the monitor connecting to the microscope is literally HDMI monitor. Otherwise it won’t perform as good as we expect. ·Second, connect the microscope to the HDMI monitor, also, connect it to the power supply. Because there is no built-in battery in the device, so make sure the microscope is always in charging when you use it. - Page 7 Warranty User’s name: Address: Phone number: Post code: email: Model name: Purchase date: Fault feedback: Date: Fault: Notice: Our warranty doesn’t cover: If users can not provide the purchase proof or the Warranty. If users use it in an improper environment, such as incompatible power supply, high temperature environment etc.
- Page 8 电子显微镜 A 使用说明书 DSM201 总章 ..................................8 基本参数 ................................8 ADSM201 结构示意图 ............................9 独立使用操作步骤 ............................... 9 HDMI 输出模式 ..............................10 USB 输出模式 ..............................10 7 / 12...
-
Page 9: 基本参数
总章 ◆为了您能更好的使用本产品。我们希望您能一直保留这份说明书。如果因为违背手册指导的操作步 骤对产品造成损坏,不在保修范围内。由于不遵守手册告知的安全需知而造成对使用者的伤害或者其 他损失,本公司不承担任何责任和义务。 ◆不遵守警告和说明可能导致触电,火灾或严重伤害。 ◆不遵守本说明可能导致设备永久性损坏。 ◆保存和运输:不恰当的运输可能会危害设备, 运输设备时一定放在包装箱内,以防止损坏。 ◆处置办法:电子设备不属于生活垃圾,需要按照相关的法律规定处理。 ◆安全需知 1. 保持设备处在干净干燥的环境。原离油、水、瓦斯以及其他可能导致腐蚀的材料。 2. 残障人士、心理疾病患者或者敏感状况的人士不适合使用本产品。 3. 产品中包含微小的零件且不可食用,请小孩在监护人或者教师的指导下操作,避免误食。 4. 不要过度操作。产品的各个部件之间的调整都有限度,为保持工作达到最佳状态请保持设备整体 的平衡。 5. 机身绝大部分属于金属质地,不防水。请远离导电介质,且不可再高温下过度曝露。 6. 为了保证达到良好的使用体验,每次使用前请用柔软干净的微纤维布擦拭主机镜头下方的保护镜。 基本参数 图像传感器 3 百万像素高清传感器 数字放大 4 倍 视频格式 放大率 最高可达 300 倍(连接 22 寸高清显示屏时) 照片分辨率 照片格式 JPEG 对焦范围... -
Page 10: Adsm201 结构示意图
ADSM201 结构示意图 独立使用操作步骤 1.用 USB 线连接显微镜到电源。将载物台背后的两个 LED 灯的 USB 开关线连接电源 2.按下显示器上的“开/关”按钮。 (有时显微镜在连接电源时会自动打开) 3.打开 LED 指示灯,调节物距高度以获得足够的放大倍数,与此同时对准调焦筒以获得所清晰的图 像。 4.使用按键“上“或者”下”进行数字变焦。 *设置菜单 9 / 12... -
Page 11: Hdmi 输出模式
1.视频模式下长按“菜单” 键直到屏幕上出现菜单。 2.按“上“、”下”找到需要设置的参数,按“OK”进入要设置的内容。 3.完成设置后再按“菜单”键,退出菜单。 *切换模式 1. 短按“模式”键切换不同模式。 2. 不同模式图标释义: :视频模式; : 拍照模式; : 录制模式; : 图片播放模式 :视频回放模式(当文件为视频时,按“确定”播放视频文件) :锁定正在录制的视频文件。 *拍摄图片 短按“模式”键进入拍摄模式。 按“OK”拍摄照片。 *录制视频 1.短按“模式”键进入视频模式。按“OK”开始录制。 2.按“OK”键停止录制。 HDMI 输出模式 •首先,确保连接显微镜的显示器是真高清显示器, 否则图像效果将无法达到 1080 的分辨率。 •然后,将显微镜通电并连接到高清显示器。显微镜中没有内置电池,所以请确保显微镜在使用时一 直处于通电状态。 •第三,打开显微镜,将观察对象放在载物台上并调整焦距和物距。 •当显微镜连接到其他设备时,它本身的屏幕上不会显示内容。 因此, 当您用 HDMI 显示屏输出时, 显微镜自带的 3 寸屏幕无图像是正常现象。 •如果显微镜中有存储卡,您还是可以拍照,但是不能录像。... - Page 12 5. 捕获图片: 1) 选择图片存储路径:capture→still→folder 2) 初始设置:capture→still→enable√, Options→Preview√ 3) 捕获屏幕:capture→snap(或者直接按键盘上的 “Enter” 即可) 6. 录制视频: 1) 选择视频存储路径: File→Set capture file→ 目标文件夹 2) 录像:Capture→start capture→OK→stop capture。 保修卡 用户名称: 详细地址: 电话: 邮编: 邮箱: 产品型号: 购买日期: 故障反馈: 日期: 故障现象: 敬请注意: 下列情况造成的产品故障不在保修之列 不能出示产品的有效保修凭证和有效购物凭证。 使用环境或条件不当,例如电源不合、环境温度、湿度、雷击等而导致产品故障。 由于事故、疏忽、灾害、操作不当等造成产品故障。 由非本公司授权机构的维修人员改装、修理、拆卸,或未按照经被公司授权机构的售后的处理意见进行擅自 改装、修理、拆卸等而造成的故障或损坏。...
Need help?
Do you have a question about the ADSM201 and is the answer not in the manual?
Questions and answers