Table of Contents
Advertisement
Quick Links
Advertisement
Table of Contents

Related Manuals for Walkin’ Pets Walkin' Wheels MINI


Summary of Contents for Walkin’ Pets Walkin' Wheels MINI
- Page 1 Owner's Manual MINI FRAME Luna THE PROVEN LEADER IN PET MOBILITY...
-
Page 2: Table Of Contents
(603) 577-8854 or Email us at: HelpMe@WalkinPets.com Contents The Walkin' Wheels MINI: 3 Sizes ............3 Parts of the Walkin’ Wheels® MINI ............3 Teach Your Pet to Use the Walkin’ Wheels® ..........4 Quick Start Guide ................5 Attaching the Leg Rings and Clamps ............7 Stirrups ....................8... -
Page 3: The Walkin' Wheels Mini: 3 Sizes
The Walkin’ Wheels MINI: 3 Sizes ® Depending on your pet's measurements you were sent one of the following wheelchairs. MINI B2 MINI B3: MINI B1: Leg strut Leg strut Back connector Back connector Side Adjustment extender Side knobs extender Adjustment 2"... -
Page 4: Teach Your Pet To Use The Walkin' Wheels
Teach Your Pet to Use the Walkin’ Wheels ® We created the Walkin’ Wheels with the intention that you will adjust the ® wheelchair, put your pet in it, and in a few moments watch him/her run- ning and playing again. It can happen that way, but it doesn’t always. A wheelchair can be an adjustment for an animal. -
Page 5: Quick Start Guide
Quick Start Guide Your Walkin’ Wheels MINI box contains everything you need to get your pet rolling. 1. Take wheelchair out of box. Front harness red strap will be on the bottom and blue strap on the top. Release the two clips on the blue and black strap so they hang down, keeping it attached to the wheelchair. - Page 6 Width To set the width of the wheelchair frame to the correct size, measure your pet’s chest, and then add 1/2 inch to this measurement; the width of the wheelchair frame should be set to this size. If the width needs to be adjusted, unscrew the rear knobs counterclockwise until the back connector comes off, being careful not to lose the small washers that are inside the knobs.
-
Page 7: Attaching The Leg Rings And Clamps
Attaching the Leg Rings and Clamps After you have the wheelchair adjusted for your pet, you can now install the Leg Ring Clamps. These will prevent the leg rings from sliding forward. You will attach 4 Leg Ring Clamps to the frame, 2 on each side of the knuckle. 1. -
Page 8: Stirrups
Stirrups If your pet's legs are paralyzed, use the stirrups to hold his/her legs off the ground. The top end of each stirrup is secured around each back knob. The top ball lock is used to hold each stirrup in place, and the bottom lock ball is secured above the hock. -
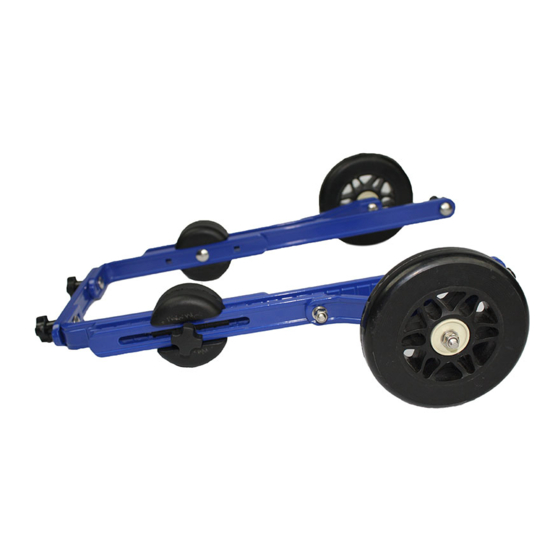
Page 9: Walkin' Wheels Mini Front Wheel Attachment
Walkin’ Wheels Mini Front Wheel Attachment Purchased Separately The Walkin’ Wheels Front Wheel Attachment gives mobility to dogs with front leg weakness or weakness in all four legs. It is ideal for helping disabled pets get exercise and for rehabilitation while they are healing. Like the rest of the Walkin’... -
Page 10: Set-Up For Rear Mini Walkin' Wheels
Set-up for Rear Mini Walkin' Wheels (This must be done first): 1. Remove the rear clamps, leg rings, and front harness. 2. Remove adjustment knob and small washer from the knuckle. 3. Pull out the strut/wheel assembly. 4. Remove both sides of the black round knuckle. 5. - Page 11 Side Extender Knuckle Knuckle Flat washer Carriage Loosen to adjust bolts height on both sides Adjustment (Do not remove knob knob completely) Le hand The knuckles come bonded together strut assembly for proper angle setting Right hand strut assembly Carriage bolt Flat washer Lock washer Adjustment knob...
-
Page 12: Is The Wheelcahir Adjusted Properly
Is the Wheelcahir Adjusted Properly? Front knuckle should be Front struts are angled Width is set at pets’ shoulder blade so the wheels are in front to pet’s widest of pets’ legs part of body Caster mount should be Knot parallel to ground Push... -
Page 13: What's In The Bf1 Package
What's in the BF1 Package (Follow the same instructions for assembling the BF2) The BF1 package Installing the BF1 Front Wheels contains: on to the Frame: Knuckle Side extender Adjustable Knuckle Front Adjustment knob Knuckle leg rings Bolts knobs Flat Strut Clamps for washer... -
Page 14: Return/Exchange Policy
Return/Exchange Policy We accept returns and exchanges for all of our products as long as they are returned within 30 days of receiving them in like new condition with all parts and pieces included. What does "like new" mean? It means that you return the product exactly as you received it. - Page 15 Walkin’ Ski Attachment ® www.WalkinPets.com/walkin-ski-attachment The Walkin’ Ski Attachment glides through snow and keeps your pet active all winter long. Easily interchange your dog’s standard wheels/struts for skis to help your dog have fun playing or trekking through the snow. Indoor Mobility Solutions Walkin’...
- Page 16 Ritchie Tinker BE MOVING BE HAPPY Piper BE AMAZED BE TOGETHER MIRACLES IN MOTION 105 Rt 101A, Suite 18 • Amherst, NH 03031 • (888) 253-0777 www.WalkinPets.com Patents: US 7549398 • Japan 5385584 • Canada 2641092 • EPO 2 050 418 Trademarks: Walkin’...
Need help?
Do you have a question about the Walkin' Wheels MINI and is the answer not in the manual?
Questions and answers