
Related Manuals for Walkin’ Pets Walkin’ Wheels Rear Medium Wheelchair


Summary of Contents for Walkin’ Pets Walkin’ Wheels Rear Medium Wheelchair
- Page 1 Owner’s Manual MEDIUM FRAME with Optional Full Support Front Wheel Attachment Lupin THE PROVEN LEADER IN PET MOBILITY...
-
Page 2: Table Of Contents
Thank you for purchasing Walkin’ Wheels Medium dog wheelchair. ® Questions or comments? Call us at (888) 253-0777 or email us at: HelpMe@WalkinPets.com Contents Parts of the Walkin’ Wheels Rear Medium Wheelchair ........3 ® Tips to Teach Your Dog to Use Walkin’ Wheels ..........4 ®... -
Page 3: Parts Of The Walkin' Wheels ® Rear Medium Wheelchair
Parts of the Walkin’ Wheels Rear ® Medium Wheelchair The Wheels, attached to snap-in struts, are packaged inside the box with the frame. 15" 6" 26" 9" Width Connectors. The Aluminum wheelchair Length Extenders. 6" connector is already frame Width Connector The 15"... -
Page 4: Tips To Teach Your Dog To Use Walkin' Wheels
8" 16" 12" 4" Wheels attached to Struts (one set for each wheelchair) Several sizes shown here. Tips to Teach Your Dog to Use Walkin’ Wheels ® We created the Walkin’ Wheels with the intention that you will adjust ® the wheelchair, put your pet in it, and in a few moments watch him or her running and playing again. - Page 5 1. When starting this process we suggest that you use the dog’s favorite treats to reward your dog for walking forward. You won’t need to keep using these treats every day, just in the beginning of the training process. A hungry dog is a motivated dog! Work with your dog before you have fed him a meal.
-
Page 6: Setting Up The Dog Wheelchair
Setting Up the Dog Wheelchair Adjusting the Knuckle The frame is shipped flat. Set the legs perpendicular to the frame by turning the dial caps counter-clockwise to loosen the knuckle assembly. Don’t remove the dial caps. Move the leg to the correct position using the raised indicators as your guide. -
Page 7: Use Snap Buttons To Adjust Length, Width And Height
Angle of the legs Normally, the wheels are set straight up and down as shown on the black dog. Setting the wheels back slightly, like the tan and white dog, will stop him from falling backwards but does put more pressure on the front. Use Snap Buttons to Adjust Length, Width and Height The Snap Buttons are an easy way to adjust the length, width, and height... - Page 8 Replacing Length Extenders and Width Connectors The Walkin’ Wheels comes with two sizes of width connectors and ® length extenders. For larger or smaller dogs you may need to switch them. To remove an extender or connector, depress the snap button until extender or connector slides out of the wheelchair tube.
-
Page 9: Adjusting The Length
Adjusting the Length The extenders are for length adjustments. The kit comes with two sets, one set is 15” and the other set is 26” long. Start by using the set that is already installed in your wheelchair. Is the Length Correct? The end of the extenders (black cap) should be positioned at the center of the dog’s shoulder blades. -
Page 10: Adjusting The Width
Adjusting the Width Use the snap buttons on the width connector to adjust the wheelchair to the proper width. There should be at least ½” on each side of the hips. The width adjustment will be determined by the widest part of the dog which is usually the chest. -
Page 11: Stirrups
Stirrups Stirrups are optional for paws that are dragging or knuckling under. The stirrups attach to the back of the wheelchair on each silver metal loop (also called “eye pads”). The rubber tubes on the stirrups need to be above the dog’s hock (see photo on p.10). -
Page 12: Clip The Leg Rings To The Wheelchair
Clip the Leg Rings to the Wheelchair The leg ring straps go over the frame, and the black plastic harness clips have a slot that fits over the shoulder socket screws. Put your thumb into the round circle and push upward to lock (you will hear it click into place). -
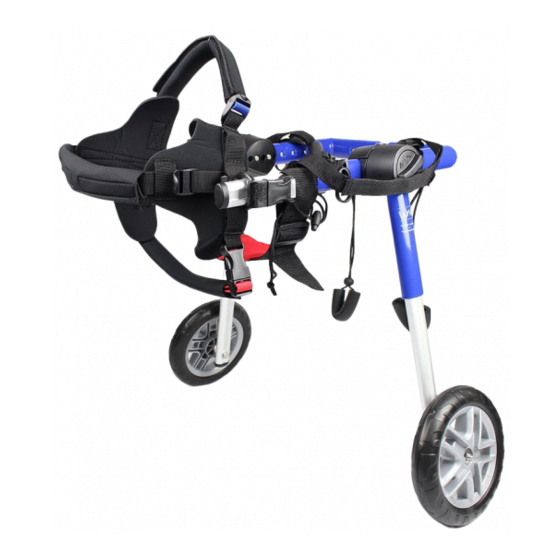
Page 13: Front Harness Attachment
Front Harness Attachment Adjust the extenders so they reach the harness clips on the front harness. The extender ends will go through each D-ring (see D-ring below) and then clip into the side of extender. The D-rings should be positioned just behind the shoulder blades. -
Page 14: Is The Wheelchair Adjusted Properly
Step 2: Push out (B) top piece Step 3: Remove (A) bottom which holds (C) D-Ring piece from middle pocket and replace into desired pocket screws Step 4: Connect (C) D-Ring Step 5: Replace screws (2) on to (B) top piece and slide into opposite side of entry point (A) bottom piece Is the Wheelchair Adjusted Properly? -
Page 15: Optional Set Screws For Noise Reduction
When the wheelchair is adjusted properly, the dog stands in a natural position. Here is what to check: Knuckles should be in line with the hips. Front harness D-Ring clips: clip into extenders behind shoulder blade. Back should be straight. Extenders parallel to the ground and do not extend past the front legs (see photo on bottom of p.9) Toe pads touching the ground, or... -
Page 16: Belly Belt, If Needed
Belly Belt, if Needed Some animals will need additional support under their belly. You can tell the dog needs additional support if their spine bows downward. It is also helpful for overweight dogs or dogs with spinal or disc issues. One end of the Belly Belt has a tri-glide (rectangular with bar in the middle) attached and the other side has touch fastener strapping. -
Page 17: Foam Wheels 4", 8", 12" And 16
Air Filled vs Foam Filled Air-Filled Foam Foam Wheels: 4", 8", 12", 16" • Lightweight, high density foam material that offers a smooth ride • Wear extremely well and will never go flat • Made for all terrain • 4" and 8" wheels have ¼" hub, 12" and 16" have ½" hub with bearings •... -
Page 18: Walkin' Wheels ® Front Wheel Attachment For Full Support/4-Wheel
This Section for Full Support/4-Wheel Wheelchair Walkin’ Wheels Front Wheel Attachment for ® Full Support/4-Wheel (Quad): additional cost The Walkin’ Wheels Front Wheel attachment gives mobility to dogs ® with front leg weakness or weakness in all four legs. It is ideal for helping disabled pets get exercise and for rehabilitation while they are healing. -
Page 19: Assembling The Fully Supportive Wheelchair
Left and Right Extenders (2) Struts and Casters (2) Legs (2) Chin Bar & Extension pieces (3) Allen Key/Wrench (2) Front Bar Screws (2) Chin Bar Comfort Cover (1) Front Leg Rings (1 Pair) IMPORTANT: The LEFT and RIGHT Struts and Casters (B) must match the LEFT and RIGHT Legs (C). - Page 20 Step 2: Side Extenders Remove the existing side extenders from your rear Walkin’ Wheels ® and snap in the left and right front extenders (A). Step 3: Insert the Strut and Caster Assembly (B) into the Leg (C) These are marked with “L” and “R”. It is very important that they are installed on the correct sides.
- Page 21 The Chin Bar attachment only has threads on one side of the bar. You will notice that the bar with the large holes has no thread. That is the side the screw needs to feed through. Attach the extension piece to the outside of the Chin Bar using the included screws and washers.
-
Page 22: Putting The Dog Into The Fully Supportive Wheelchair
Step 5. Clip on the Front Leg Rings (H) the same way you attached the rear leg rings. Putting Dog Into Full Support/4-Wheel Wheelchair There are many ways to get your dog into the Full Support wheelchair. We suggest that you view the videos below for some ideas: WalkinPets.com/instructional-videos-medium-fully-supportive-dog- wheelchair Height –... -
Page 23: Wear, Maintenance, Liability And Guarantee
Wear, Maintenance, Liability and Guarantee Maintenance With proper use and maintenance, the wheelchair is designed to last a lifetime. When you need replacement parts for the wheels, harnesses, and other wear-and-tear items, they may be purchased at: WalkinPets.com/spare-parts. The wheelchair frame will not rust. If dirt or sand gets inside the wheelchair, you can hose it off. -
Page 24: Optional Items And Accessories
Optional Items and Accessories Walkin’ Lift Combo Harness ® www.WalkinPets.com/walkin-lift-combo-harness The Walkin’ Lift Combo Harness provides com- ® plete lifting assistance and mobility support for a dog’s front and rear legs. Fully compatible with the Walkin’ Wheels dog wheelchair. Front and ®... - Page 25 Walkin’ Belly Support ® www.WalkinPets.com/walkin-belly-support The Walkin’ Belly Support helps provide ad- ® ditional support for your pet’s back while in the Walkin’ Wheels wheelchair. Made of lightweight ® but strong neoprene fabric, the Belly Support helps raise the middle of the pet’s body to relieve undue stress on back.
- Page 26 Walkin’ Wheelchair Leash ® https://www.handicappedpets.com/walkin-wheelchair-leash/ The Walkin’ Wheelchair Leash at- taches easily to Walkin’ Wheels wheelchairs to help control and guide your dog. It may also be used to walk two dogs at the same time (without wheelchairs). Walkin’ Scooter ®...
-
Page 27: Handicapped Pets Foundation
Handicapped Pets Foundation www.hpets.org The Handicapped Pets Foundation is a 501(c)3 nonprofit corporation dedicated to the health and well-being of elderly, disabled, and injured pets. Its mission is to extend the life of pets by helping them move so that they can get the exercise they need to live long, happy, healthy lives;... - Page 28 Luna Buster BE MOVING BE HAPPY Joni Mitchell Panthana BE AMAZED BE TOGETHER MIRACLES IN MOTION 105 Rt 101A, Suite 18 • Amherst, NH 03031 • (888) 253-0777 www.WalkinPets.com Patents: US 7549398 • Japan 5385584 • Canada 2641092 • EPO 2 050 418 Trademarks: Walkin’...
Need help?
Do you have a question about the Walkin’ Wheels Rear Medium Wheelchair and is the answer not in the manual?
Questions and answers