
Related Manuals for Siemens HQ738357M


Summary of Contents for Siemens HQ738357M
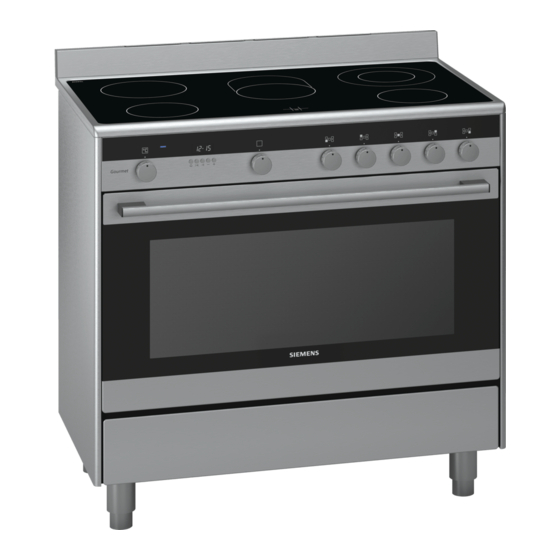
- Page 1 Free standing cooker ﺍﻟﻣﻭﻗﺩ ﺍﻟﻣﺳﺗﻘﻝ HQ738357M en Instruction manual ﺳﺗﻌﻣﺎﻝ ﺩﻟﻳﻝ ﺍﻻ...
-
Page 3: Table Of Contents
The storage compartment ..... 11 replacement parts and services can be found at www.siemens-home.com and in the online shop www.siemens-eshop.com Accessories . -
Page 4: Intended Use
Intended use 8Intended use (Important safety information Read these instructions carefully. Only then I n t e n d e d u s e will you be able to operate your appliance Warning – WHAT TO DO IF YOU SMELL safely and correctly. -
Page 5: General Information
Important safety information General information Warning – Risk of burns! The appliance becomes very hot. Never ■ Warning – Risk of fire! touch the interior surfaces of the cooking A draught is created when the appliance compartment or the heating elements. ■... - Page 6 Important safety information Faults or damage to the appliance are Risk of injury! Warning – Risk of electric shock! ■ dangerous. Never switch on a faulty Incorrect repairs are dangerous. Repairs ■ appliance. Unplug the appliance from the may only be carried out and damaged mains or switch off the circuit breaker in the power cables replaced by one of our fuse box.
-
Page 7: Causes Of Damage
Causes of damage Oven ]Causes of damage Caution! Accessories, foil, greaseproof paper or ovenware on ■ the cooking compartment floor: do not place C a u s e s o f d a m a g e accessories on the cooking compartment floor. Do Caution! not cover the cooking compartment floor with any Only use the burners when cookware has been... -
Page 8: Storage Compartment
Environmental protection 7Environmental protection *Getting to know your appliance Your new appliance is particularly energy-efficient. Here t e c t i o n E n v i r o n m e n t a l p r o you can find tips on how to save even more energy Use this section to familiarise yourself with your new when using the appliance, and how to dispose of your y o u r a p p l i a n c e... -
Page 9: The Control Panel
Getting to know your appliance The control panel Function buttons for the electronic clock Explanation Control knob for oven temperature Symbol Meaning Oven indicator light Timer Opens the menu for setting the timer. The Buttons and display symbol shows that the Control knob for oven functions timer is set. -
Page 10: The Hob
Getting to know your appliance The hob Precautions for use The following advice is intended to help you save Warning – Risk of burns! energy and prevent pan damage: Hot air flows out from the ventilation opening on the Use pans which are the hob. -
Page 11: The Oven
Getting to know your appliance The oven Temperature selector You can use the temperature selector to set the In order to operate the oven, you require two operating temperature. knobs: The function selector and the temperature selector. Setting Meaning Û Control knob for oven 50 - 260 Temperature range in °C... -
Page 12: Accessories
Accessories Telescopic shelf set _Accessories The pull-out rails allow you to pull accessories out completely. When inserting the adapter for the baking Your appliance is accompanied by a range of and roasting shelf, ensure that it locks into place in front A c c e s s o r i e s accessories. -
Page 13: Special Accessories
Before using for the first time Example in the picture: Universal pan KBefore using for the first time Before you can use your new appliance, you must t h e f i r s t t i m e B e f o r e u s i n g f o r make some settings. -
Page 14: Cleaning The Burner Caps And Cups
Operating the appliance Cleaning the burner caps and cups 1Operating the appliance You have already learnt about the controls and how p l i a n c e O p e r a t i n g t h e a p they work. -
Page 15: Oven
Operating the appliance Oven Inserting the rotary spit Warning – Risk of burns! Operating the oven Never touch the hot surfaces of the cooking Switching on the oven compartment or the heating elements. Children must be kept at a safe distance from the appliance at all times. Always keep the appliance door closed when it is Note: Open the appliance door carefully. -
Page 16: Time-Setting Options
Time-setting options Removing the rotary spit OTime-setting options Warning – Risk of burns! Never touch the hot surfaces of the cooking Your appliance has different time-setting options. i o n s T i m e - s e t t i n g o p t compartment or the heating elements. -
Page 17: Cooking Time
Time-setting options Cooking time After a few seconds, the oven adopts the settings and switches to standby. The display shows the time at The cooking time for your meal can be set on the oven. which the dish will be ready. The , symbol lights up When the cooking time has elapsed, the oven switches and the = symbol goes out. -
Page 18: Time
Cleaning agent Time DCleaning agent After the appliance has been connected to the mains for the first time or after an extended power cut, three With good care and cleaning, your appliance will retain zeros and , flash in the display. C l e a n i n g a g e n t its appearance and remain fully functioning for a long time to come. -
Page 19: Surfaces In The Cooking Compartment
Cleaning agent Notes Aluminium and plas- Glass cleaner: Slight differences in colour on the front of the ■ Clean with a soft cloth. appliance are caused by the use of different Gas hob and pan Hot soapy water. materials, such as glass, plastic and metal. supports Use very little water. -
Page 20: Keeping The Appliance Clean
Rails Keeping the appliance clean pRails Always keep the appliance clean and remove dirt immediately so that stubborn deposits of dirt do not Removing the hook-in racks build up. R a i l s The hook-in racks are each fixed to the side panels of Tips the cooking compartment at three points. -
Page 21: Appliance Door
Appliance door Fitting the door panels qAppliance door Reinsert the inner panel. All four fastening pins must engage in the Note: With good care and cleaning, your appliance will retain holders provided for them. A p p l i a n c e d o o r its appearance and remain fully functional for a long Remove the locking pins and close the oven door. -
Page 22: Trouble Shooting
Trouble shooting 3Trouble shooting Warning – Risk of injury! The door may not close properly if the door hinges have not engaged correctly. This will allow heat to escape If a fault occurs, there is often a simple explanation. and the parts of the appliance may become very hot. To T r o u b l e s h o o t i n g Before calling the after-sales service, please refer to the prevent this from happening, remove the door again. -
Page 23: Customer Service
Customer service 4Customer service Our after-sales service is there for you if your appliance C u s t o m e r s e r v i c e needs to be repaired. You will find the address and telephone number of your nearest after-sales service centre in the phone book. -
Page 24: Tested For You In Our Cooking Studio
Tested for you in our cooking studio A lot of steam can build up in the cooking Note: JTested for you in our compartment when cooking food. cooking studio Your appliance is very energy-efficient and radiates very little heat to its surroundings during operation. Due to the high difference in temperature between the Here, you can find a selection of dishes and the ideal appliance interior and the external parts of the... - Page 25 ﻁﺑﺎﻕ ﺍﻟﺗﻲ ﺗﻡ ﺍﺧﺗﺑﺎﺭﻫﺎ ﻓﻲ ﺳﺗﻭﺩﻳﻭ ﺍﻟﻁﻬﻲ ﺍﻟﺧﺎﺹ ﺑﻧﺎ ﺍﻷ ﻋﻧﺩ ﺇﻋﺩﺍﺩ ﺍﻟﻣﻭﺍﺩ ﺍﻟﻐﺫﺍﺋﻳﺔ ﻳﻣﻛﻥ ﺃﻥ ﻳﻧﺷﺄ ﺍﻟﻛﺛﻳﺭ ﻣﻥ ﺑﺧﺎﺭ ﺍﻟﻣﺎء ﻓﻲ :ﺣﻅﺔ ﻣﻼ ﻁﺑﺎﻕ ﺍﻟﺗﻲ ﺗﻡ ﺍﺧﺗﺑﺎﺭﻫﺎ ﻓﻲ ﺳﺗﻭﺩﻳﻭ ﺍﻷ .ﺣﻳﺯ ﺍﻟﻁﻬﻲ ﺍﻟﻁﻬﻲ ﺍﻟﺧﺎﺹ ﺑﻧﺎ ﻳﻧﺑﻌﺙ ﻣﻧﻪ ﻟﻠﺧﺎﺭﺝ ﻙ ﺍﻟﻁﺎﻗﺔ ﻭﻻ ﻳﺗﺳﻡ...
- Page 26 ء ﺧﺩﻣﺔ ﺍﻟﻌﻣﻼ ء ﺧﺩﻣﺔ ﺍﻟﻌﻣﻼ .ء ﻫﻭ ﻭﺟﻬﺗﻙ ﺍﻟﻣﻧﺎﺳﺑﺔ ﺡ، ﻓﻣﺭﻛﺯﻧﺎ ﻟﺧﺩﻣﺔ ﺍﻟﻌﻣﻼ ﺻﻼ ﺇﺫﺍ ﺍﺣﺗﺎﺝ ﺟﻬﺎﺯﻙ ﻟﻺ . ء ﺧ ﺩ ﻣ ﺔ ﺍ ﻟ ﻌ ﻣ ﻼ .ء ﻟﻙ ﻭﺭﻗﻣﻪ ﺍﻟﻬﺎﺗﻔﻲ ﻓﻲ ﺩﻟﻳﻝ ﺍﻟﻬﺎﺗﻑ ﺳﺗﺟﺩ ﻋﻧﻭﺍﻥ ﺃﻗﺭﺏ ﻣﺭﻛﺯ ﺧﺩﻣﺔ ﻋﻣﻼ ﺧﺭﻯ...
- Page 27 ﺕ، ﻣﺎ ﺍﻟﻌﻣﻝ؟ ﻻ ﺧﺗﻼ ﺍﻻ ﺕ، ﻣﺎ ﺍﻟﻌﻣﻝ؟ ﻻ ﺧﺗﻼ ﺍﻻ !ﺻﺎﺑﺔ ﺧﻁﺭ ﺍﻹ – ﺗﺣﺫﻳﺭ ﻳﺗﻡ ﻏﻠﻕ ﺍﻟﺑﺎﺏ ﺇﺫﺍ ﻛﺎﻧﺕ ﻣﻔﺻﻠﺔ ﺍﻟﺑﺎﺏ ﻏﻳﺭ ﻣﺛﺑﺗﺔ ﺑﺎﻟﺷﻛﻝ ﺍﻟﺻﺣﻳﺢ، ﻓﻘﺩ ﻻ ﺑﺻﻭﺭﺓ ﺻﺣﻳﺣﺔ، ﻭﻳﻣﻛﻥ ﺃﻥ ﺗﺗﺳﺭﺏ ﻭﺗﺳﺧﻥ ﺃﺟﺯﺍء ﺍﻟﺟﻬﺎﺯ ﺑﺷﺩﺓ. ﻭﻟﺗﺟﻧﺏ ﺣﻳﺎﻥ...
- Page 28 ﺑﺎﺏ ﺍﻟﺟﻬﺎﺯ ﺗﺭﻛﻳﺏ ﺯﺟﺎﺝ ﺍﻟﺑﺎﺏ ﺑﺎﺏ ﺍﻟﺟﻬﺎﺯ .ﺃﻋﺩ ﺗﺭﻛﻳﺏ ﺍﻟﺯﺟﺎﺝ ﺍﻟﺩﺍﺧﻠﻲ ﺭﺑﻌﺔ ﻓﻲ ﻣﻭﺍﺿﻊ ﺍﻟﺗﺛﺑﻳﺕ ﻳﺟﺏ ﺃﻥ ﺗﺳﺗﻘﺭ ﺧﻭﺍﺑﻳﺭ ﺍﻟﺗﺛﺑﻳﺕ ﺍﻷ :ﺣﻅﺔ ﻣﻼ ﺍﻟﻌﻧﺎﻳﺔ ﺍﻟﺟﻳﺩﺓ ﺑﺟﻬﺎﺯﻙ ﻭﺗﻧﻅﻳﻔﻪ ﺑﺎﻫﺗﻣﺎﻡ ﻳﺣﺎﻓﻅ ﻋﻠﻰ ﺟﻣﺎﻟﻪ ﻭﻛﻔﺎءﺗﻪ ﺍﻟﻭﻅﻳﻔﻳﻪ . ﺑ ﺎ ﺏ ﺍ ﻟ ﺟ ﻬ ﺎ ﺯ .ﺍﻟﻣﻘﺭﺭﺓ...
- Page 29 ﺍﻟﻘﺿﺑﺎﻥ ﺍﻟﻣﺣﺎﻓﻅﺔ ﻋﻠﻰ ﻧﻅﺎﻓﺔ ﺍﻟﺟﻬﺎﺯ ﺍﻟﻘﺿﺑﺎﻥ ﺗﺗﻛﻭﻥ ﺍﺗﺳﺎﺧﺎﺕ ﻋﻧﻳﺩﺓ ﺣﺎﻓﻅ ﺩﺍﺋﻣﺎ ﻋﻠﻰ ﻧﻅﺎﻓﺔ ﺍﻟﺟﻬﺎﺯ ﻭﻗﻡ ﺑﺈﺯﺍﻟﺔ ﻛﻲ ﻻ .ﺗﺳﺧﺎﺕ ﻋﻠﻰ ﻭﺟﻪ ﺍﻟﺳﺭﻋﺔ ﺍﻻ ﻓﻙ ﺷﺑﻛﺎﺕ ﻗﺿﺑﺎﻥ ﺍﻟﺗﻌﻠﻳﻕ . ﺍ ﻟ ﻘ ﺿ ﺑ ﺎ ﻥ ﻧﺻﺎﺋﺢ ﺙ ﻧﻘﺎﻁ ﻋﻠﻰ ﺍﻟﺟﺩﺍﺭﻳﻥ ﻛﻝ...
- Page 30 ﺍﻟﻣﻧﻅﻔﺎﺕ ﺣﻅﺎﺕ ﻣﻼ :ﻣﻧﻅﻔﺎﺕ ﺍﻟﺯﺟﺎﺝ ﻟﻭﻣﻧﻳﻭﻡ ﺍﻷ ﺗﻧﺷﺄ ﻓﺭﻭﻕ ﻟﻭﻧﻳﺔ ﻁﻔﻳﻔﺔ ﺑﻭﺍﺟﻬﺔ ﺍﻟﺟﻬﺎﺯ ﺑﺳﺑﺏ ﺍﺳﺗﺧﺩﺍﻡ ﺧﺎﻣﺎﺕ ﻣﺧﺗﻠﻔﺔ ■ .ﻗﻡ ﺑﺎﻟﺗﻧﻅﻳﻑ ﺑﺎﺳﺗﺧﺩﺍﻡ ﻣﻧﺩﻳﻝ ﻧﺎﻋﻡ ﺳﺗﻳﻙ ﻭﺍﻟﺑﻼ .ﺳﺗﻳﻙ ﺃﻭ ﺍﻟﻣﻌﺩﻥ ﻣﺛﻝ ﺍﻟﺯﺟﺎﺝ ﺃﻭ ﺍﻟﺑﻼ .ﻣﺣﻠﻭﻝ ﺻﺎﺑﻭﻧﻲ ﺳﺎﺧﻥ ﻣﻭﺿﻊ ﺍﻟﻁﻬﻲ ﻝ ﺍﻟﻣﻭﺟﻭﺩﺓ ﻋﻠﻰ ﺃﻟﻭﺍﺡ ﺍﻟﺑﺎﺏ ﻭﺍﻟﺗﻲ ﺗﺑﺩﻭ ﻛﺎﻟﺧﻁﻭﻁ ﺗﺭﺟﻊ ﺇﻟﻰ ﺍﻟﻅﻼ...
- Page 31 ﺍﻟﻣﻧﻅﻔﺎﺕ ﻧﺗﻬﺎء ﺗﻐﻳﻳﺭ ﻭﻗﺕ ﺍﻻ ﺍﻟﻣﻧﻅﻔﺎﺕ ﺍﺿﻐﻁ ﺍﻟﺯﺭ ﺃﻭ ﻧﺗﻬﺎء ﺑﺎﺳﺗﺧﺩﺍﻡ ﺍﻟﺯﺭ ﻗﻡ ﺑﺗﻐﻳﻳﺭ ﻭﻗﺕ ﺍﻻ ﺍﻟﻌﻧﺎﻳﺔ ﺍﻟﺟﻳﺩﺓ ﺑﺟﻬﺎﺯﻙ ﻭﺗﻧﻅﻳﻔﻪ ﺑﺎﻫﺗﻣﺎﻡ ﻳﺣﺎﻓﻅ ﻋﻠﻰ ﺟﻣﺎﻟﻪ ﻭﻛﻔﺎءﺗﻪ . ﺍ ﻟ ﻣ ﻧ ﻅ ﻔ ﺎ ﺕ .ﻭﺑﻌﺩ ﺛﻭﺍﻥ ﻗﻠﻳﻠﺔ ﻳﺗﻡ ﺍﻋﺗﻣﺎﺩ ﺍﻟﺗﻐﻳﻳﺭ ﺍﻟﻭﻅﻳﻔﻳﻪ...
- Page 32 ﻭﻅﺎﺋﻑ ﺍﻟﻭﻗﺕ ﺍﻧﻘﺿﺎء ﻣﺩﺓ ﺍﻟﺗﺷﻐﻳﻝ ﻭﻅﺎﺋﻑ ﺍﻟﻭﻗﺕ . ﻳﺗﻭﻗﻑ ﺍﻟﻔﺭﻥ ﻭﻳﻧﻁﻔﺊ ﺍﻟﺭﻣﺯ ﺗﺻﺩﺭ ﺇﺷﺎﺭﺓ ﺻﻭﺗﻳﺔ. ﻳﻭﻣﺽ ﺍﻟﺭﻣﺯ ﻭﺃﺩﺭ ﻛﻝ ﻣﻥ ﻣﻔﺗﺎﺡ ﺍﺧﺗﻳﺎﺭ ﻭ ﻋﻥ ﺍﻟﺗﺳﺧﻳﻥ. ﺍﺿﻐﻁ ﻋﻠﻰ ﺍﻟﺯﺭ .ﻳﺗﻭﻓﺭ ﺑﺟﻬﺎﺯﻙ ﻭﻅﺎﺋﻑ ﻣﺧﺗﻠﻔﺔ ﺧﺎﺻﺔ ﺑﺎﻟﻭﻗﺕ .ﺍﻟﻭﻅﻳﻔﺔ ﻭﺍﻟﺛﺭﻣﻭﺳﺗﺎﺕ ﺇﻟﻰ ﻭﺿﻊ ﺍﻟﺻﻔﺭ. ﺍﻟﻔﺭﻥ ﻣﺗﻭﻗﻑ .
- Page 33 ﺍﺳﺗﻌﻣﺎﻝ ﺍﻟﺟﻬﺎﺯ ﺇﺧﺭﺍﺝ ﺍﻟﺳﻳﺦ ﺍﻟﺩﻭﺍﺭ ﺗﺭﻛﻳﺏ ﺍﻟﺳﻳﺦ ﺍﻟﺩﻭﺍﺭ !ﺻﺎﺑﺔ ﺑﺣﺭﻭﻕ ﺧﻁﺭ ﺍﻹ – ﺗﺣﺫﻳﺭ !ﺻﺎﺑﺔ ﺑﺣﺭﻭﻕ ﺧﻁﺭ ﺍﻹ – ﺗﺣﺫﻳﺭ .ﺳﻁﺢ ﺍﻟﺳﺎﺧﻧﺔ ﻟﺣﻳﺯ ﺍﻟﻁﻬﻲ ﺃﻭ ﻋﻧﺎﺻﺭ ﺍﻟﺗﺳﺧﻳﻥ ﺗﻘﻡ ﺃﺑﺩﺍ ﺑﻠﻣﺱ ﺍﻷ ﻻ .ﺳﻁﺢ ﺍﻟﺳﺎﺧﻧﺔ ﻟﺣﻳﺯ ﺍﻟﻁﻬﻲ ﺃﻭ ﻋﻧﺎﺻﺭ ﺍﻟﺗﺳﺧﻳﻥ ﺗﻘﻡ ﺃﺑﺩﺍ ﺑﻠﻣﺱ ﺍﻷ ﻻ...
- Page 34 ﺍﺳﺗﻌﻣﺎﻝ ﺍﻟﺟﻬﺎﺯ ﺍﻟﻔﺭﻥ ﺍﺳﺗﻌﻣﺎﻝ ﺍﻟﺟﻬﺎﺯ ﺍﺳﺗﻌﻣﺎﻝ ﺍﻟﻔﺭﻥ ﻥ ﻧﺷﺭﺡ ﺳﺗﻌﻣﺎﻝ ﻭﻁﺭﻳﻘﺔ ﺍﺳﺗﺧﺩﺍﻣﻬﺎ. ﻭﺍﻵ ﻟﻘﺩ ﺗﻌﺭﻓﺕ ﺑﺎﻟﻔﻌﻝ ﻋﻠﻰ ﻋﻧﺎﺻﺭ ﺍﻻ ﺗﺷﻐﻳﻝ ﻓﺭﻥ ﺍﻟﻁﻬﻲ . ﺍ ﺳ ﺗ ﻌ ﻣ ﺎ ﻝ ﺍ ﻟ ﺟ ﻬ ﺎ ﺯ ﻳﻘﺎﻑ ﻟﻙ ﻛﻳﻔﻳﺔ ﺿﺑﻁ ﺟﻬﺎﺯﻙ. ﺳﻭﻑ ﺗﺗﻌﺭﻑ ﻋﻠﻰ ﻣﺎ ﻳﺣﺩﺙ ﻋﻧﺩ ﺍﻟﺗﺷﻐﻳﻝ ﻭﺍﻹ .ﻭﻛﻳﻔﻳﺔ...
- Page 35 ﻭﻝ ﻣﺭﺓ ﺳﺗﺧﺩﺍﻡ ﻷ ﻗﺑﻝ ﺍﻻ ﺗﻧﻅﻳﻑ ﺍﻟﻛﻣﺎﻟﻳﺎﺕ ﻭﻝ ﻣﺭﺓ ﺳﺗﺧﺩﺍﻡ ﻷ ﻗﺑﻝ ﺍﻻ ﻗﺑﻝ ﺍﺳﺗﺧﺩﺍﻡ ﺍﻟﻛﻣﺎﻟﻳﺎﺕ ﻗﻡ ﺑﺗﻧﻅﻳﻔﻬﺎ ﺟﻳﺩﺍ ﺑﻣﺣﻠﻭﻝ ﺻﺎﺑﻭﻧﻲ ﺩﺍﻓﺊ ﻭﻓﻭﻁﺔ .ﺗﻧﻅﻳﻑ .ﻭﻝ ﻣﺭﺓ، ﻳﺟﺏ ﺇﺟﺭﺍء ﺑﻌﺽ ﺃﻭﺿﺎﻉ ﺍﻟﺿﺑﻁ ﻗﺑﻝ ﺍﺳﺗﺧﺩﺍﻡ ﺟﻬﺎﺯﻙ ﺍﻟﺟﺩﻳﺩ ﻷ . ﻭ ﻝ ﻣ ﺭ ﺓ ﺳ ﺗ ﺧ ﺩ ﺍ ﻡ ﻷ ﻗ ﺑ ﻝ ﺍ ﻻ .ﻭﻗﻡ...
- Page 36 ﺍﻟﻛﻣﺎﻟﻳﺎﺕ ﺑﺎﻟﺧﻠﻑ ﻭﻳﺷﻳﺭ ﺇﻟﻰ ﺃﺳﻔﻝ. ﻳﺟﺏ ﻟﻭﺍﺡ ﺃﻥ ﻁﺭﻑ ﺍﻟﺗﺛﺑﻳﺕ ﺗﺄﻛﺩ ﻋﻧﺩ ﺇﺩﺧﺎﻝ ﺍﻷ ﻁﻘﻡ ﺣﻭﺍﻣﻝ ﺗﻠﺳﻛﻭﺑﻳﺔ ‚ .ﻣﺎﻡ ﻓﻲ ﻣﻭﺍﺟﻬﺔ ﺑﺎﺏ ﺍﻟﺟﻬﺎﺯ ﻓﻲ ﺍﻷ ﺃﻥ ﺗﻛﻭﻥ ﺍﻟﺣﺎﻓﺔ ﺍﻟﻣﺎﺋﻠﺔ ﻟﻠﻛﻣﺎﻟﻳﺎﺕ ƒ ﺧﺭﺍﺝ ﻳﻣﻛﻥ ﺇﺧﺭﺍﺝ ﺍﻟﻛﻣﺎﻟﻳﺎﺕ ﺗﻣﺎﻣﺎ. ﻳﺭﺍﻋﻰ ﻋﻧﺩ ﺑﺎﺳﺗﺧﺩﺍﻡ ﺍﻟﻘﺿﺑﺎﻥ ﺍﻟﻘﺎﺑﻠﺔ ﻟﻺ ﺳﺗﺧﺩﺍﻣﺎﺕ...
- Page 37 ﺍﻟﻛﻣﺎﻟﻳﺎﺕ ﺍﻟﻛﻣﺎﻟﻳﺎﺕ ﺳﺗﺧﺩﺍﻡ ﺍﻻ ﻧﻭﻉ ﺍﻟﺗﺳﺧﻳﻥ ﺳﺗﻳﻙ ﺃﻭ ﻁﻌﻣﺔ ﺍﻟﻣﻔﺭﻭﺩﺓ ﻣﺛﻝ ﺍﻻ ﻟﺷﻭﺍء ﺍﻷ ﺍﻟﺷﻭﺍﻳﺔ ﺍﻟﻛﺑﻳﺭﺓ .ﺍﻟﺳﺟﻕ )ﺍﻟﻧﻘﺎﻧﻕ( ﺃﻭ ﺍﻟﺗﻭﺳﺕ ﺃﻭ ﻟﻠﺗﺣﻣﻳﺭ ﻣﺭﻓﻕ ﺑﺟﻬﺎﺯﻙ ﻛﻣﺎﻟﻳﺎﺕ ﻣﺗﻌﺩﺩﺓ. ﺗﺣﺻﻝ ﻫﻧﺎ ﻋﻠﻰ ﻧﻅﺭﺓ ﻋﺎﻣﺔ ﻋﻥ ﺍﻟﻛﻣﺎﻟﻳﺎﺕ . ﺍ ﻟ ﻛ ﻣ ﺎ ﻟ ﻳ ﺎ ﺕ .ﺍﻟﻣﺭﻓﻘﺔ...
- Page 38 ﺍﻟﺗﻌﺭﻑ ﻋﻠﻰ ﺍﻟﺟﻬﺎﺯ ﻁﺎﺭﺍﺕ ﺍﺳﺗﻌﻣﺎﻝ ﻣﻭﺍﺿﻊ ﺍﻟﻁﻬﻲ ﺳﺗﺧﺩﺍﻡ ﺗﻌﻠﻳﻣﺎﺕ ﺍﻻ ﺕ ﻏﺎﺯ ﺳﺗﻌﻣﺎﻝ ﻫﺫﻩ ﺿﺑﻁ ﻗﺩﺭﺓ ﺗﺳﺧﻳﻥ ﺷﻌﻼ ﻳﻣﻛﻧﻙ ﺑﺎﺳﺗﺧﺩﺍﻡ ﻁﺎﺭﺍﺕ ﺍﻻ ﺿﺭﺍﺭ ﺑﺄﻭﺍﻧﻲ ﺳﺗﺳﺎﻋﺩﻙ ﺍﻟﺗﻌﻠﻳﻣﺎﺕ ﺍﻟﺗﺎﻟﻳﺔ ﻋﻠﻰ ﺗﻭﻓﻳﺭ ﺍﻟﻁﺎﻗﺔ ﻭﺗﺟﻧﺏ ﺍﻹ .ﻣﻭﺍﺿﻊ ﺍﻟﻁﻬﻲ :ﺍﻟﻁﻬﻲ .ﺳﺗﻌﻣﺎﻝ ﺷﻌﻠﺔ ﺍﻟﻐﺎﺯ ﺍﻟﻣﻘﺎﺑﻠﺔ ﻭﺗﺑﻳﻥ ﻟﻙ ﺍﻟﺭﻣﻭﺯ ﺑﺄﻋﻠﻰ ﻁﺎﺭﺍﺕ ﺍﻻ ﺍﺳﺗﺧﺩﻡ...
- Page 39 ﺍﻟﺗﻌﺭﻑ ﻋﻠﻰ ﺍﻟﺟﻬﺎﺯ ﺳﻁﺢ ﺍﻟﻣﻭﻗﺩ ﻟﻛﺗﺭﻭﻧﻳﺔ ﺍﻟﺳﺎﻋﺔ ﺍﻹ .ﻟﻛﺗﺭﻭﻧﻳﺔ ﻳﻣﻛﻧﻙ ﺿﺑﻁ ﺍﻟﻣﺩﺓ ﺑﺎﺳﺗﺧﺩﺍﻡ ﺍﻟﺳﺎﻋﺔ ﺍﻹ !ﺻﺎﺑﺔ ﺑﺣﺭﻭﻕ ﺧﻁﺭ ﺍﻹ – ﺗﺣﺫﻳﺭ .ﺑﻌﺩ ﺍﻧﻘﺿﺎء ﺍﻟﻣﺩﺓ ﺍﻟﺯﻣﻧﻳﺔ ﺗﺻﺩﺭ ﺇﺷﺎﺭﺓ ﺻﻭﺗﻳﺔ ﺗﻠﻣﺱ ﺃﺑﺩﺍ ﻳﺗﺩﻓﻕ ﻣﻥ ﻓﺗﺣﺔ ﺍﻟﺗﻬﻭﻳﺔ ﺍﻟﻣﻭﺟﻭﺩﺓ ﺑﺳﻁﺢ ﺍﻟﻣﻭﻗﺩ ﻫﻭﺍء ﺳﺎﺧﻥ. ﻻ .ﻓﺗﺣﺔ...
- Page 40 ﺍﻟﺗﻌﺭﻑ ﻋﻠﻰ ﺍﻟﺟﻬﺎﺯ ﺍﻟﺗﻌﺭﻑ ﻋﻠﻰ ﺍﻟﺟﻬﺎﺯ ﺗﺗﻌﺭﻑ ﻫﻧﺎ ﻋﻠﻰ ﺟﻬﺎﺯﻙ ﺍﻟﺟﺩﻳﺩ. ﻛﻣﺎ ﺗﺟﺩ ﻫﻧﺎ ﺍﻟﻣﺯﻳﺩ ﻣﻥ ﺍﻟﻣﻌﻠﻭﻣﺎﺕ ﺣﻭﻝ . ﺍ ﻟ ﺗ ﻌ ﺭ ﻑ ﻋ ﻠ ﻰ ﺍ ﻟ ﺟ ﻬ ﺎ ﺯ .ﺳﺗﻌﻣﺎﻝ ﻭﺳﻁﺢ ﺍﻟﻣﻭﻗﺩ ﻭﺍﻟﻔﺭﻥ ﻭﺃﻧﻭﺍﻉ ﺍﻟﺗﺳﺧﻳﻥ ﻭﺍﻟﻛﻣﺎﻟﻳﺎﺕ ﻟﻭﺣﺔ...
- Page 41 ﺣﻣﺎﻳﺔ ﺍﻟﺑﻳﺋﺔ ﺣﻣﺎﻳﺔ ﺍﻟﺑﻳﺋﺔ ﻙ ﺍﻟﻁﺎﻗﺔ. ﺗﺟﺩ ﻫﻧﺎ ﻧﺻﺎﺋﺢ ﺟﻬﺎﺯﻙ ﺍﻟﺟﺩﻳﺩ ﺫﻭ ﻓﻌﺎﻟﻳﺔ ﻭﻛﻔﺎءﺓ ﺧﺎﺻﺔ ﻓﻲ ﺍﺳﺗﻬﻼ . ﺣ ﻣ ﺎ ﻳ ﺔ ﺍ ﻟ ﺑ ﻳ ﺋ ﺔ ﺣﻭﻝ ﻛﻳﻔﻳﺔ ﺍﻟﺗﻌﺎﻣﻝ ﻣﻊ ﺟﻬﺎﺯﻙ ﻭﺍﻟﺗﻭﻓﻳﺭ ﻓﻲ ﺍﻟﻁﺎﻗﺔ ﻭﺍﻟﺗﺧﻠﺹ ﻣﻥ ﺍﻟﺟﻬﺎﺯ .ﺑﻁﺭﻳﻘﺔ...
- Page 42 ﺿﺭﺍﺭ ﺃﺳﺑﺎﺏ ﺍﻷ ﺍﻟﻔﺭﻥ ﺿﺭﺍﺭ ﺃﺳﺑﺎﺏ ﺍﻷ !ﺗﻧﺑﻳﻪ ﺍﻟﻣﻭﻗﺩ ﻭﺍﻧﻲ ﻋﻠﻰ ﺍﻟﻛﻣﺎﻟﻳﺎﺕ ﺃﻭ ﺍﻟﺭﻗﺎﺋﻕ ﺃﻭ ﻭﺭﻕ ﺇﻋﺩﺍﺩ ﺍﻟﻣﺧﺑﻭﺯﺍﺕ ﺃﻭ ﺍﻷ ■ . ﺿ ﺭ ﺍ ﺭ ﺃ ﺳ ﺑ ﺎ ﺏ ﺍ ﻷ .ﺗﺿﻊ ﺃﻳﺔ ﻛﻣﺎﻟﻳﺎﺕ ﻋﻠﻰ ﺃﺭﺿﻳﺔ ﺣﻳﺯ ﺍﻟﻁﻬﻲ ﺃﺭﺿﻳﺔ...
- Page 43 ﻣﺎﻥ ﺍﻟﻣﻬﻣﺔ ﺇﺭﺷﺎﺩﺍﺕ ﺍﻷ ﺕ ﺃﻭ ﺃﺿﺭﺍﺭ ﺑﺎﻟﺟﻬﺎﺯ ﻳﻌﺗﺑﺭ ﺃﻣﺭﺍ ﺑﺎﻟﻎ ﻻ ﻭﺟﻭﺩ ﺍﺧﺗﻼ !ﺧﻁﺭ ﺍﻟﺻﻌﻕ ﺍﻟﻛﻬﺭﺑﺎﺋﻲ – ﺗﺣﺫﻳﺭ ■ ﺗﻘﻡ ﺃﺑﺩﺍ ﺑﺗﺷﻐﻳﻝ ﺟﻬﺎﺯ ﻣﻌﻁﻝ. ﻭﺍﻧﺯﻉ ﺍﻟﻘﺎﺑﺱ ﺍﻟﺧﻁﻭﺭﺓ. ﻻ .ﺡ ﻏﻳﺭ ﺍﻟﺳﻠﻳﻣﺔ ﻓﻧﻳﺎ ﻋﻠﻰ ﺃﺧﻁﺎﺭ ﺻﻼ ﺗﻧﻁﻭﻱ ﺃﻋﻣﺎﻝ ﺍﻹ ■ ﺍﻟﻛﻬﺭﺑﺎﺋﻲ...
- Page 44 ﻣﺎﻥ ﺍﻟﻣﻬﻣﺔ ﺇﺭﺷﺎﺩﺍﺕ ﺍﻷ ﻧﻘﺎﻁ ﻋﺎﻣﺔ !ﺻﺎﺑﺔ ﺑﺣﺭﻭﻕ ﺧﻁﺭ ﺍﻹ – ﺗﺣﺫﻳﺭ ﺳﻁﺢ ﺍﻟﺩﺍﺧﻠﻳﺔ ﺗﻠﻣﺱ ﺃﺑﺩﺍ ﺍﻷ ﻳﺻﺑﺢ ﺍﻟﺟﻬﺎﺯ ﺳﺎﺧﻧﺎ ﻟﻠﻐﺎﻳﺔ. ﻻ !ﺧﻁﺭ ﻧﺷﻭﺏ ﺣﺭﻳﻕ – ﺗﺣﺫﻳﺭ ■ ﻟﺣﻳﺯ ﺍﻟﻁﻬﻲ ﺃﻭ ﻋﻧﺎﺻﺭ ﺍﻟﺗﺳﺧﻳﻥ ﻭﻫﻲ ﺳﺎﺧﻧﺔ. ﺍﺣﺭﺹ ﺩﺍﺋﻣﺎ ﻣﺱ ﺑﻳﻥ ﻳﻧﺷﺄ ﺗﻳﺎﺭ ﻫﻭﺍﺋﻲ ﻋﻧﺩ ﻓﺗﺢ ﺑﺎﺏ ﺍﻟﺟﻬﺎﺯ. ﻭﻗﺩ ﻳﺣﺩﺙ ﺗﻼ ■...
- Page 45 ﺳﺗﻌﻣﺎﻝ ﺍﻟﻣﻁﺎﺑﻕ ﻟﻠﺗﻌﻠﻳﻣﺎﺕ ﺍﻻ ﻣﺎﻥ ﺍﻟﻣﻬﻣﺔ ﺇﺭﺷﺎﺩﺍﺕ ﺍﻷ ﺳﺗﻌﻣﺎﻝ ﺍﻟﻣﻁﺎﺑﻕ ﻟﻠﺗﻌﻠﻳﻣﺎﺕ ﺍﻻ ﺍﻟﺗﺻﺭﻑ ﻓﻲ ﺣﺎﻟﺔ ﺷﻡ ﺭﺍﺋﺣﺔ ﻏﺎﺯ – ﺗﺣﺫﻳﺭ ﺍﻗﺭﺃ ﻫﺫﺍ ﺍﻟﺩﻟﻳﻝ ﺑﻌﻧﺎﻳﺔ. ﻋﻧﺩﺋﺫ ﻓﻘﻁ ﺳﻳﻣﻛﻧﻙ ﺍﺳﺗﺧﺩﺍﻡ ﺍﻟﺟﻬﺎﺯ ﺑﺷﻛﻝ . ﻣ ﺎ ﻥ ﺍ ﻟ ﻣ ﻬ ﻣ ﺔ ﺇ ﺭ ﺷ ﺎ ﺩ ﺍ ﺕ ﺍ ﻷ .
- Page 46 ﺗﺟﺩ ﺍﻟﻣﺯﻳﺩ ﻣﻥ ﺍﻟﻣﻌﻠﻭﻣﺎﺕ ﺣﻭﻝ ﺍﻟﻣﻧﺗﺟﺎﺕ ﻭﺍﻟﻛﻣﺎﻟﻳﺎﺕ ﻭﻗﻁﻊ ﺍﻟﻐﻳﺎﺭ ﻭﺍﻟﺧﺩﻣﺎﺕ ﻭﻓﻲ ﺍﻟﻣﺗﺟﺭ :ﻧﺗﺭﻧﺕ ﻋﻠﻰ ﻣﻭﻗﻊ ﺍﻹ www.siemens-home.com ..... . ﻭﻝ ﻣﺭﺓ ﺳﺗﺧﺩﺍﻡ ﻷ...
- Page 48 õ檫°S ájQÉéàdG áeÓ©dG ¢ü«NôJ πªëjh z ¢ûJG ¢SG »H áYƒªéªd »fƒfÉ≤dG º°S’G{ ᣰSGƒH ™«æ°üàdG ºJ Siemens AG BSH Hausgeräte GmbH *9001160962* 9001160962 960501...
Need help?
Do you have a question about the HQ738357M and is the answer not in the manual?
Questions and answers