Table of Contents
Advertisement
Before using this product and document, please read the following document carefully.
Also, please keep this document to the place where you can see any time.
- Safety Precautions and Regulatory Notices for GT Series
Standard SIP Terminal
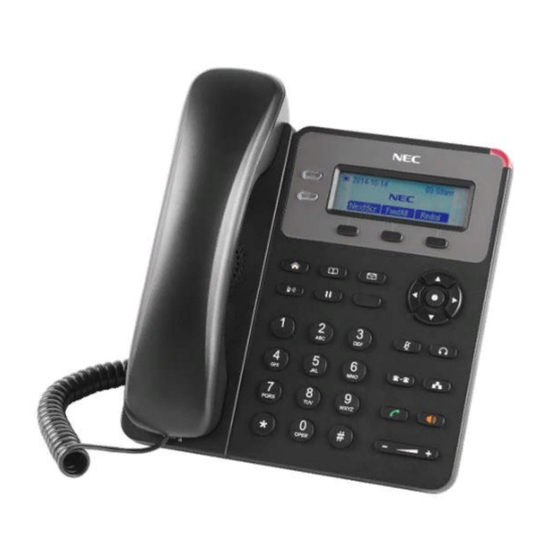
IP Phone GT210
User Guide
GVT-055600-001
Issue 3.0
April, 2020
Advertisement
Table of Contents

Related Manuals for NEC GT210


Summary of Contents for NEC GT210
- Page 1 Standard SIP Terminal IP Phone GT210 User Guide Before using this product and document, please read the following document carefully. Also, please keep this document to the place where you can see any time. - Safety Precautions and Regulatory Notices for GT Series GVT-055600-001 Issue 3.0...
-
Page 2: Table Of Contents
THE TERMS AND CONDITIONS OF SOFTWARE ............ 2 FIRMWARE VERSION CHECK ..................2 PRODUCT OVERVIEW ....................4 Model Line Up of GT210 Series ......................4 Feature Highlights ..........................4 Supporting Communication Servers ......................4 Technical Specifications (Firmware version 1.0.4.152) ................5 INSTALLATION ...................... -
Page 3: Document Purpose
DOCUMENT PURPOSE This user guide describes the basic concept and tasks necessary to use and configure your GT210 phone. This document covers the topics of phone installation, making basic calls and using basic call features. To learn the advanced features and configurations, please refer to “GT210 Administration Guide”. - Page 4 Caution: Changes or modifications to this product not expressly approved by NEC, or operation of this product in any way other than as detailed by this User Manual, could void your manufacturer warranty. Caution: User ID and password are important information. Be careful when handling them. Default password is given for initial maintenance and operational settings.
-
Page 5: Product Overview
PRODUCT OVERVIEW Model Line Up of GT210 Series Model Name Description ITX-1615-1W(BK)TEL IP Telephone with 2 line buttons (Black) Feature Highlights 132*48-pixel graphical LCD display. 2 dual-color line keys, 3 XML programmable context-sensitive soft keys, 3-way conference, multi-language support. -
Page 6: Technical Specifications (Firmware Version 1.0.4.152)
Technical Specifications (Firmware version 1.0.4.152) Protocols/Standards SIP RFC3261, TCP/IP/UDP, RTP/RTCP, HTTP/HTTPS, ARP/RARP, ICMP, DNS (A record, SRV, NAPTR), DHCP, PPPoE, SSH, TFTP/FTP/FTPS, NTP, STUN, SIMPLE, LLDP-MED, LDAP, 802.1x, SRTP, TLS. Network Interfaces Dual switched 10/100 Mbps ports, integrated PoE (IEEE802.3af class 1). Graphic Display 132*48 LCD display. -
Page 7: Installation
INSTALLATION Equipment Packaging VoIP Phone Handset Phone Cord Phone Stand LAN Cable Connecting Your Phone Slots for Phone Stand Cord Slot Slots for Phone Stand Slots for the phone stand if placing the phone on a flat surface PC Port 10/100M Ethernet to connect PC 10/100M Ethernet to connect LAN LAN Port... -
Page 8: Stand Installation
Stand Installation Insert the hooks on the top of the stand into the slots, you have option to use either upper slots OR lower slots. After both hooks are in the slots, firmly slide the entire stand upward to lock them in place. Wall Mount Installation Insert all 4 hooks into the slots. - Page 9 To set up the GT210, follow the steps below: Attach the phone stand or wall mount to the back of the phone where there are slots. Connect the handset and VoIP phone with the phone cord. Connect the LAN port of the phone to the RJ45 socket of a PoE switch using the Ethernet cable.
-
Page 10: Operation (Fw Version 1.0.4.152)
FW version 1.0.4.152 OPERATION (FW version 1.0.4.152) Idle Screen GT210 screen displays differently depending on whether the phone is idle or in use (active). User can show/hide softkeys and customize the main screen softkey by assigning a multi-purpose function 2017-12-31 09:15AM The following table describes the items displayed on the GT210 idle screen. - Page 11 FW version 1.0.4.152 Registration Status. Solid: Registered Blank: Unregistered Handset Status. OFF - handset on hook ON - handset off hook Speaker Status. OFF - speaker off ON - speaker on Headset Status. OFF - headset off ...
-
Page 12: Using The Keypad
FW version 1.0.4.152 Using the Keypad Switch between line 1 and line 2. Solid Green: Calling, Talking. LINE Key Flash Green: Call on hold. Flash Red: Incoming call. The softkeys are context sensitive and will change depending on Softkeys the status of the phone. MESSAGE Press to view messages. - Page 13 FW version 1.0.4.152 MENU/OK In Idle: Press to enter the main menu. Confirm a selection or the current information. Off hook: Press Menu to switch between an outgoing call or a paging call. MUTE To mute/unmute an active call. When DND is on: Enable/Disable DND when the phone is in idle. HEADSET Press to switch between headset and handset mode in an active call.
-
Page 14: Call Operation List
FW version 1.0.4.152 Call Operation List SV9500 SV9300 SV9100 SL2100 SL1000 SIP@NET Operation /1100 Making Phone Calls Handset, Speaker and Headset Mode SIP Accounts and Lines Completing Calls On hook dialing. Off hook and dial Predictive dialing Redial Via Call History Via Phonebook Speed Dial from Line Key Call Return... - Page 15 FW version 1.0.4.152 *6. The GT210 does not have internal hold tone. To provide the hold tone to the phone connected with the SV9100/SL2100/SL1000/SL1100 systems, it is required to change the setting of “Peer to Peer mode” to OFF. For details, contact the system administrator.
-
Page 16: Making Phone Calls
Incoming calls to a specific account will attempt to use its corresponding LINE if it is not in use. When the "virtually" mapped line is in use, the GT210 phone will flash the other available LINE in red. A line is ACTIVE when it is in use and the corresponding LED is red. - Page 17 FW version 1.0.4.152 display a list of matched numbers and the user could select the number using the Up/Down key and dial out. Redial. Redial the last dialed number. Take handset off hook; or Press SPEAKER key; or Press HEADSET key with headset plugged in; or Press an available LINE key to activate speaker;...
-
Page 18: Making Calls Using Ip Addresses
FW version 1.0.4.152 Via Paging/Intercom. Take handset off hook; or Press SPEAKER key; or Press HEADSET key with headset plugged in; or Press an available LINE key to activate speaker. You shall hear dial tone after off hook. Press MENU key to switch the call screen from "Dialing" to "Paging". Enter the number. -
Page 19: Quick Ip Call Mode
Quick IP Call Mode The GT210 also supports Quick IP Call mode. This enables the phone to make direct IP calls using only the last few digits (last octet) of the target phone's IP address. This is possible only if both phones are under the same LAN/VPN. -
Page 20: Answering Phone Calls
FW version 1.0.4.152 Answering Phone Calls Receiving Calls Single incoming call. Phone rings with selected ring tone. The corresponding LINE key will flash in red. Answer call by taking handset off hook, or using Speaker/Headset, or pressing the flashing LINE key. Multiple incoming calls. -
Page 21: During A Phone Call
Call Transfer GT210 supports Blind Transfer, Attended Transfer and Auto-Attended Transfer. Blind Transfer. During the first active call, press TRANSFER key and dial the number to transfer to. -
Page 22: Conferencing
The SV9300 cannot Cancel Auto-Attended Transfer because “Split” softkey is not available. Conferencing GT210 can host up to a 3-way conference call. Initiate a conference call. 1. Establish calls with 2 parties respectively. 2. While 1 call is active, the other call/calls will be put on hold with its LINE key blinking in green. - Page 23 Users could press the “EndCall” softkey or simply hang up the call to terminate the conference call. Easy Conference M ode GT210 supports Easy Conference Mode, which can be used combined with the traditional way to establish the conference. ...
-
Page 24: Voicemail
1Call SettingsTransfer on conference Hangup, check "Yes" and save the change. Voicemail A blinking red LED indicator on the top right corner of the GT210 indicates a message is waiting. Go to Web GUIAccountsAccount 1General Settings to configure Voice Mail Access Number. -
Page 25: Connecting To Devices
CONNECTING TO DEVICES EHS Headset The GT210 supports normal RJ9 headset and Plantronics EHS headset. To use Plantronics EHS headset, go to Web GUISettingsPreferencesAudio ControlHeadset Type. Select "Plantronics EHS" and reboot the phone to take effect. Connect EHS Headset (Plantronics) to GT210. Insert headset connector into the RJ9 headset port on the back of GT210. -
Page 26: Restore Factory Default Settings
Restoring the Factory Default Settings will delete all configuration information on the phone. Please backup or print all the settings before you restore to the factory default settings. NEC Corporation is not responsible for restoring lost parameters and cannot connect your device to your VoIP service provider. - Page 27 Standard SIP Terminal IP Phone GT210 User Guide GVT-055600-001 April, 2020 Issue 3.0 NEC Corporation...
Need help?
Do you have a question about the GT210 and is the answer not in the manual?
Questions and answers
how to enable call forwarding in nec gt210 serisl ip phone