Table of Contents
Advertisement
MANUAL DE INSTRUCCIONES
INSTRUCTION MANUAL
ESPACIO PARA LA ETIQUETA DE IDENTIFICACIÓN
235.0132.009 MANUAL Z- 450 380 V. 50 Hz 3F
POLIGONO INDUSTRIAL MONCADA III – CALLE DEL MOLÍ, Nº2
46113 MONCADA (VALENCIA) - ESPAÑA - TELEFONO: 34-961 301 251/FAX:34-961 301 255
Internet: www.zumex.com
E-mail: zumex@zumex.com
1/28
MANUAL DE INSTRUCCIONES - INSTRUCTION MANUAL
Advertisement
Table of Contents

Related Manuals for ZUMEX Z-450


Summary of Contents for ZUMEX Z-450
- Page 1 235.0132.009 MANUAL Z- 450 380 V. 50 Hz 3F POLIGONO INDUSTRIAL MONCADA III – CALLE DEL MOLÍ, Nº2 46113 MONCADA (VALENCIA) - ESPAÑA - TELEFONO: 34-961 301 251/FAX:34-961 301 255 Internet: www.zumex.com E-mail: zumex@zumex.com 1/28 MANUAL DE INSTRUCCIONES - INSTRUCTION MANUAL...
-
Page 2: Table Of Contents
3.2.3 DISASSEMBLY OF THE PEEL OUTLET ……………………....………… Pg. 39 3.3 MAINTENANCE …………………………...……………………………....……… Pg. 39 3.3.1 Z-450 JUICER HEAD UNIT ……………………………………………………. Pg. 40 3.3.2 Z-450 TRANSPORTER UNIT ……………......………………… Pg. 44 3.3.3 Z-450 LIFTING UNIT ……………………………………………....… Pg. 45 JUICER CHANGE KIT INSTRUCTIONS ………………………………..…………………… Pg. 45 SCHEMATIC DIAGRAM OF THE MACHINE................ -
Page 3: Technical Characteristics
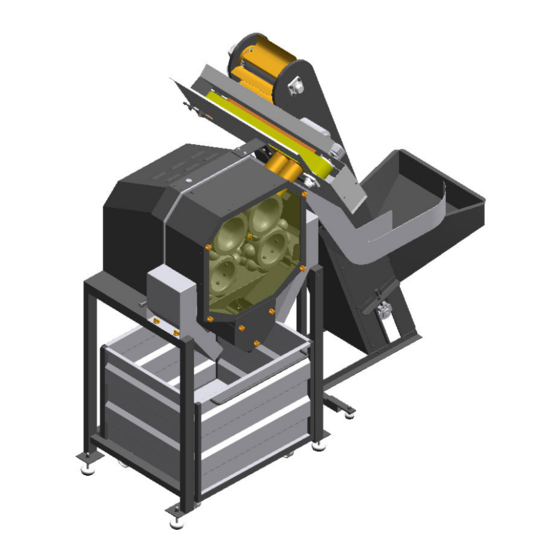
117 ORANGES / MINUTE 7 CAV. 2. GENERAL ASSEMBLY INSTRUCTIONS. The Zumex Z-450 unit comes in two wooden containers which contain all of the pieces for complete assembly. In order to remove the juicer, undo the upper clamping ring and the lower clamp of the machine's frame. -
Page 4: Lift Assembly
2.1. LIFT ASSEMBLY. Screw the lift supports into the lift as indicated in Figures 1 and 2 using the screws and washers which are located there. Figure 1 Figure 2 Once the lift supports are mounted, raise the unit onto its supports and level it by loosening the rubber support's lock nuts with a ratchet wrench. - Page 5 Once the hoses are hooked up as indicated in the above figure, connect the hose pins as shown. The hoses should be connected by the thread of the pins, while taking care to line up the numbering of the two pieces which make up each pair: 1-1, 2-2 and 3-3. 5/28 MANUAL DE INSTRUCCIONES - INSTRUCTION MANUAL...
-
Page 6: Hopper Assembly
2.2. HOPPER ASSEMBLY. Mount the fruit-holding hopper on the lift as shown in Figure 4. Attach the hopper to the lift with the six lock nuts and washers which are located on the lift. Figure 4 2.3. RETURN CHANNEL ASSEMBLY. Secure the fruit return channel to the hopper, as shown, with a screw and its corresponding lock nut and washers. -
Page 7: Transporter Assembly
2.4. TRANSPORTER ASSEMBLY. Connect the transporter unit as shown in the figures, using the screws located on the case of the machine and the transporter unit. First, mount the transporter support and secure it to the case with the four screws that are located on it (DIN-933 M8x20 mm + washer), as shown in Figure 4. - Page 8 Position the lifting unit sideways to the juicing head as shown in Figure 6. Make sure that the lift scoop does not touch the upper part of the transporter. Figure 6 CAUTION !! AFTER ALL OF THESE STEPS HAVE BEEN CARRIED OUT, THE ONLY OTHER THING TO DO IS TO FILL THE CASE WITH APPROXIMATELY 4.5 LITRES OF SAE 80W-90 OIL UP TO THE RED POINT OF THE LEVEL CHECKER 8/28...
-
Page 9: Instructions For Use
3. INSTRUCTIONS FOR USE. 3.1. OPERATION. 3.1.1. TURNING ON THE MACHINE. Once the machine has been assembled by following the steps described above, the position of the extractors should be checked to make sure that they are in accordance with the following figure . -
Page 10: Adjustment
CAUTION !! MAKE SURE THAT ALL OF THE PARTS TURN ACCORDING TO THE DIAGRAM BELOW. IF THEY DO NOT, THEN CHANGE THE PHASE ON THE CONTROL PANEL. Once the parts are checked to make sure that they are turning in the right direction, the machine is ready to be used. -
Page 11: Cleaning
3.2. CLEANING. The machine may be cleaned with pressurised water in the juicing area. In order to facilitate cleaning in the juicing area, remove the frontal protector. Once the protecting cover has been removed, turn the CLEANING switch to the ON position. Do not use substances which contain chlorine or chlorine compounds for cleaning as these substances produce corrosion marks on the stainless steel. -
Page 12: Disassembling The Blade And The Blade Support
BEFORE HANDLING AND DISASSEMBLING ANY PART, FOR EXAMPLE THE PRESSING UNITS OR THE BLADES, THE MACHINE SHOULD BE DISCONNECTED FROM ALL POWER SOURCES. 3.2.1. DISASSEMBLING THE BLADE AND THE BLADE SUPPORT. Unscrew and remove the plastic securing knob along with the washer and remove the blade in the direction of the arrow, as indicated in the figure. -
Page 13: Disassembly Of The Peel Outlet
Perform the same operation on the peel outlet located on the other side of the juicer (on the side of the transporter). 3.3. MAINTENANCE. Preventive maintenance of the Zumex Z-450 Juicer is divided into three different areas of the machine : 1. – Z-450 Juicer Head Unit ( Ref. 24.022.000 ). - Page 14 CAUTION ! BEFORE HANDLING OR DISASSEMBLING ANY PART, FOR EXAMPLE THE PRESSING UNITS OR THE BLADES, THE MACHINE SHOULD BE DISCONNECTED FROM ALL POWER SOURCES. 3.3.1. HEAD UNIT OF THE Z450 JUICER REF. 24.022.000. A) OIL CHANGE ( Fig. 7 ) : The oil in the case should be changed every six months with a 5- litre container of BESLUX GEAR-ATOX 220 (220 cST).
- Page 15 C) PRESSING UNIT AND BLADE AXLES ( Fig. 9 and 10 ) : The pressing unit-carrier axles of the retainers should be changed every two years. Periodically (every 6 months) check the state of the retainer lips Ref. 170.0003.001. Check the blade sharpness every 30 days Ref. 200.0092.002.
- Page 16 Figure 12 Figure 11 The retainer should be changed every 2 years. Pressing unit axles should also be changed every 2 years. Periodically (every 6 months) check the state of the retainer lips Ref. 170.0002.001. Procedure : Disassemble the axle by loosening the screw located in the rear part of the reducer, taking special care to not lose the control pin, take out the retainer and replace it with a new one Ref.
- Page 17 Figure 14 Use the tool supplied to remove the drums Pomegranate Version: In order to remove the female squeezing drums you have to disassemble peel ejectors 17/28 MANUAL DE INSTRUCCIONES - INSTRUCTION MANUAL...
- Page 18 The squeezing kit is composed by four drums and squeezing kits. Please use the correct feeding pipes.. Top peel ejectors Bottom peel ejectots F) MOTORS AND REDUCERS : Check to make sure that the reducers are not losing oil at the clamps.
- Page 19 G) CONNECTION PANEL AND CONTROL PANEL : Take off the connection cover and make sure that the different parts are in good condition. Also make sure that the case remains stopped and that the 3 fases + neutro + tierra Connections to the distributor case are not oxidised or defective.
- Page 20 3.3.2. Z - 450 TRANSPORTER UNIT ( REF. 24.021.002 ). Check the tension of the transporter belt as well as its condition Ref. 200.0080.001. For adjusting the tension of the belt, loosen the lock nuts and screws of the slack adjusters, tighten the belt with the screws located just in front of the support plate.
- Page 21 3.3.3. Z - 450 LIFTING UNIT ( REF. 24.020.001 ). Check the tension of the lift's chain as well as its condition Ref. 190.0001.001 . In order to tighten the chain, loosen the lock nuts, then adjust the chain by rotating the pins.
- Page 22 Remove the cover adjust the tensor Motor cover 22/28 MANUAL DE INSTRUCCIONES - INSTRUCTION MANUAL...
-
Page 23: Juicer Change Kit Instructions
4. JUICER CHANGE KIT INSTRUCTIONS. Two steps are necessary for carrying out the "Juicer change kit" operation. First, remove the two extractors, then disassemble the blade support (Fig 15). Remove the screws and washers located at the centre of the axles (Fig. 16) and remove the two pressing units (in male/female pairs), while pulling them forward. -
Page 24: Schematic Diagram Of The Machine
Once the pressing units are correctly positioned, they are held in place by the screws and washers that had been previously removed. Replace the blade support and extractors (both left and right) setting them with their corresponding screws, plastic knob and washer. Replace the feeding tube with the appropriate parts, screwing it in so that it will be positioned correctly. -
Page 25: Replacement And Parts List
Z-450 Right Extractor Kit 170.0004.001 V-Ring VA-120 (115-125) 200.0012.002 Axis drums MARK REFERENCE NAMES OF OPTIONAL KITS QUANTITY 35-38 33.040.000 Juicing Kit 9 CAV Z-450 35-38 33.009.001 Juicing Kit 7 CAV Z-450 2. TRANSPORTER UNIT MARK REFERENCE NAME QUANTITY 13.707.001 Transporter Slack Adjuster 13.719.000... - Page 26 140.0024.020 Support UCF204 + Cover 200.0039.002 Lift Motor Axle 190.0001.001 ¾" Chain 90º wing on one side C6/P 4. PEEL CART MARK REFERENCE NAME QUANTITY ---- 200.0069.001 Peel Cart ZUMEX Z- 450 43.130.009 26/28 MANUAL DE INSTRUCCIONES - INSTRUCTION MANUAL...
-
Page 27: Brief Preventive Maintenance Table
Preventive maintenance should be established according to a timetable which the customer considers appropriate for the amount of use. Nevertheless, ZUMEX considers minimum maintenance of the Z-450 citric fruit juicing machine to adhere to the following timetable, which is divided into four groups: JUICING UNIT - Oil change of the case with SAE 80W/90 oil every 6 months. -
Page 28: Guarantee
9. GUARANTEE. As per Article 12 (Guarantee and After-sales Service) of Spanish Law 7/1996, 15 January: ZUMEX guarantees this unit and its proper state of operation, by means of a strict factory quality control. - Any tampering with the machine’s Identification label will cancel this guarantee. - Page 29 F26_001 Pol. Ind. Moncada III Calle del Molí nº2 46113 Moncada (Valencia, España) Phone. +34 96 130 12 51 Company / customer Project description Armario control Z450 P&O drawing number 04-2019 Commission Manufacturer (company) Nº de serie: 0002 Path Comentario Project name Exprimidor granadas ZCE450 P&O V2 04-19-380 make...
- Page 30 / 3.0 / 5.0 / 4.0 / 3.0 Ir= 0.63-1A Ir= 0.63-1A I> I> I> I> I> I> 4Amp 2Q0.1 Δ 230V / 6.0 / 6.0 / 3.0 0,18KW 0,18KW FILTRO CINTA 2X1=CONECTOR ARMARIO 2X2=CONECTOR MAQUINA Date 12/04/2019 POTENCIA Pedro Armario control Z450 P&O Appr 04-2019...
- Page 31 / 2.9 / 2.9 / 4.0 10Amp VLT-51 3VFR1 Setup-1 VARIADOR 0-10=>9 0-11=>9 3-03=>65 Variador de frecuencia 5-11=>11 5-12=>23 6-14=>50.00 4K7Ω 6-15=>65.00 Setup-2 3-03=>10 3-10-0=>100 5-11=>11 5-12=>23 / 2.9 / 4.0 1,1KW EXPRIMIDOR 2X1=CONECTOR ARMARIO 2X2=CONECTOR MAQUINA Date 12/04/2019 POTENCIA EXPRIMIDOR Pedro Armario control Z450 P&O Appr...
- Page 32 / 2.9 / 3.9 / 5.0 10Amp VLT-51 4VFR1 1-20=>0,18 VARIADOR 1-24=>1,17 1-25=>1350 Variador de frecuencia 3-02=>30 3-03=>70 3-41=>4 4K7Ω 3-42=>0,5 4-14=>70 6-15=>70 / 3.9 / 5.0 0.18KW ELEVADOR 2X1=CONECTOR ARMARIO 2X2=CONECTOR MAQUINA Date 12/04/2019 POTENCIA ELEVADOR Pedro Armario control Z450 P&O Appr 04-2019 Page...
- Page 33 / 2.9 / 4.9 10Amp VLT-51 5VFR1 1-20=>0,18 VARIADOR 1-24=>0.65 1-25=>1350 Variador de frecuencia 3-02=>20 3-03=>50 3-41=>4 4K7Ω 3-42=>0,5 6-15=>50 / 4.9 0.18KW BARREDOR 2X1=CONECTOR ARMARIO 2X2=CONECTOR MAQUINA Date 12/04/2019 POTENCIA BARREDOR Pedro Armario control Z450 P&O Appr 04-2019 Page Modification Date Name...
- Page 34 / 2.3 6S2.1 6RS5 / 7.0 / 2.3 / 7.0 2 2.0 4 2.0 6 2.1 2X1=CONECTOR ARMARIO 2X2=CONECTOR MAQUINA Date 29/03/2019 MANIOBRA Pedro Armario control Z450 P&O Appr 04-2019 Page Modification Date Name Original Replaced by Replaced by Page...
- Page 35 / 6.9 / 6.9 2 2.4 2 2.6 4 2.5 4 2.7 6 2.5 6 2.7 2X1=CONECTOR ARMARIO 2X2=CONECTOR MAQUINA Date 29/03/2019 MANIOBRA Pedro Armario control Z450 P&O Appr 04-2019 Page Modification Date Name Original Replaced by Replaced by Page...
Need help?
Do you have a question about the Z-450 and is the answer not in the manual?
Questions and answers