
Related Manuals for La Crosse Technology CA74962


Summary of Contents for La Crosse Technology CA74962
- Page 1 5-in-1 * in/out temperature/humidity * wireless charger * projection display * alarm clock time & weather station * USB charging ports SET UP GUIDE Model: CA74962...
-
Page 2: Table Of Contents
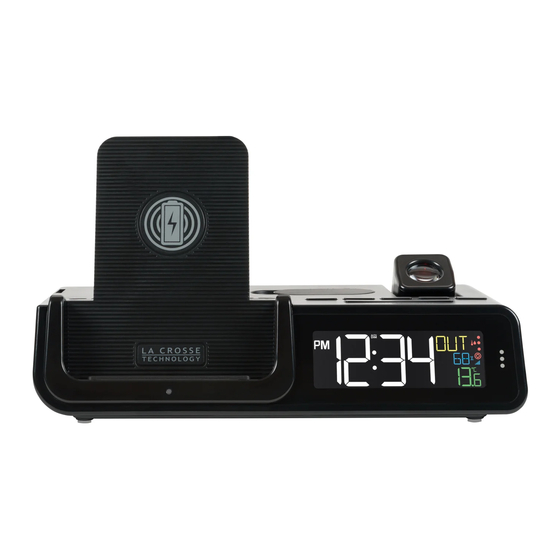
BASICS Table of Contents Initial Setup Power Up ALARM BASICS PROJECTION Insert 2 “AA” batteries into the Outdoor Sensor. Setting the Alarm Insert the 5V Power Adapter into an outlet, and then plug it into the Power Jack Initial Setup Projection Brightness on the bottom of the weather station. - Page 3 BASICS BASICS Buttons LCD Display Outdoor Auto Dim Display Temperature Time Indicator Modes Humidity Calendar AM/PM Indicator Temperature Alarm Alarm Indicator Auto-scroll all modes Low Battery Indicator Accessories Ports 1. DISPLAY OPTION 2. MINUS - Use,Organize & Store Press to decrease values, Hold to enter Settings Tap to select LCD display hold to change values quickly...
-
Page 4: Lcd Display Brightness
BASICS BASICS LCD Display Brightness Display Modes Adjusting the LCD Display Brightness Selecting the Display Mode SNOOZE/BACKLIGHT Press the button on the top of the station to adjust the Tap the button on the front of the station to backlight intensity. There are 4 brightness levels, plus an off option. select a display mode or automatically cycle through all of the available options. - Page 5 ALARM ALARM Time Alarm Time Alarm Setting the Alarm Activating & Deactivating the Alarm ALARM Press the button to ALARM Hold the button on activate/deactivate the alarm the top of the station to enter the (ON/OFF). Alarm Settings Menu. icon will appear on the normal time display when the Use the buttons to set your...
- Page 6 PROJECTION PROJECTION Adjusting the Projection Image Projection Options Projection Brightness Projection Image Options You can choose to see the (1) time, (2) outdoor Current Time temperature and humidity, or (3) cycle through both options. Selecting Your Projection Image outdoor When an outdoor sensor is connected, hold the PROJ.
- Page 7 CHARGING CHARGING 5W Wireless Charger Adjustable Charging Coil As phone sizes can vary greatly, simply slide Charging your Qi-Enabled Phone the Phone Charger Adjustment Handle up or down to best match your device and get it • Place your Qi-Enabled phone on the platform. charging correctly.
-
Page 8: Accessory Storage
CHARGING CHARGING Earbud Charging Smart Watch Stand The removable Smart Watch Stand is engineered to fit 1. Remove the Dock Cover from the top of the a variety of smart watch brands. Its open design allows station. for easy access to your device’s unique charging port location, for use with the included USB Charging Port. - Page 9 SENSOR SENSOR Search for Sensor Sensor Data Lost Connection The sensor’s data should then be viewable on your LCD and as an option to be projected. • If the sensor loses connection to the station for any reason, the station will show NO after 30 minutes of disconnection.
-
Page 10: Appendix
APPENDIX APPENDIX Specifications Button Cell Battery Weather Station CA74962 Charging: Replace the Coin Cell Battery Wireless Charger Power Output: 5 Watts Power Requirements: Input: 5.0VDC 3.5A Power Cord WARNING Use a coin to turn the battery cover to the left to remove it. -
Page 11: Recycling & Disposal
Warranty Canada Statement Caution! This device complies with the Canada Industry La Crosse Technology, Ltd. provides a 1-year Important: The manufacturer is not responsible for any radio or TV licence-exempt RSS stndards. Operation is subject limited time warranty (from date of purchase) - Page 13 5-en-1 * température et humidité int/ext * charger sans fil * affichage projeté * réveil station horaire & météo * ports de chargement USB GUIDE D’UTILISATION Modèle CA74962...
- Page 14 ÉLÉMENTS DE BASE Table of Contents Réglage initial Mise en marche FONCTIONS DE BASE ALARME PROJECTION Insérez 2 piles AA dans le capteur extérieur. Réglage initial Réglage de l’alarme Luminosité de la projection Insérer la fiche de l’adaptateur de courant 5 V dans une prise de courant de réveil Boutons Réglage de la projection...
-
Page 15: Boutons
ÉLÉMENTS DE BASE ÉLÉMENTS DE BASE Boutons Écran ACL Température/ Indicateur Modes Humidité Auto Dim Heure d’affichage extérieure Calendrier Indicateur AM/PM Température Alarm Alarme Indicator Défilement automatique de tous les Voyant de modes pile faible 1. OPTIONS D’AFFICHAGE ( ) 2. -
Page 16: Luminosité De L'écran Acl
ÉLÉMENTS DE BASE ÉLÉMENTS DE BASE Luminosité de l’écran ACL Modes d’affichage Pour régler la luminosité de l’écran à ACL Sélection du mode d’affichage Appuyer sur le bouton SNOOZE/BACKLIGHT situé sur le dessus du réveil pour Appuyer sur le bouton situé sur le devant du régler la luminosité... - Page 17 ALARME ALARME Heure de l’alarme Heure de l’alarme Activation et désactivation de l’alarme Réglage de l’alarme de réveil Appuyer sur le bouton pour activer ou désactiver l’alarme et Maintenir enfoncé le bouton pour voir l’heure de l’alarme. situé sur le dessus du réveil pour L’icône s’affiche à...
- Page 18 PROJECTION PROJECTION Options de projection Réglage de l’image projetée Projection Brightness Options de l’image projetée Vous pouvez choisir de voir (1) l’heure, Heure actuelle (2) la température et l’humidité extérieures, ou (3) faire défiler les deux options. Sélection de l’image projetée outdoor Lorsqu’un capteur extérieur est connecté, Appuyer sur le bouton...
-
Page 19: Recharge
RECHARGE RECHARGE Chargeur sans fil 5 W Chargeur réglable fonctionnant par induction électromagnétique Les tailles des téléphones pouvant varier Chargement d’un téléphone compatible Qi considérablement, le chargeur est facile à régler Placer le téléphone compatible Qi sur la en fonction de ce qui convient le mieux à votre •... - Page 20 RECHARGE RECHARGE Recharge des écouteurs boutons Installation du support de montre intelligente 1. Retirez le couvercle de la station d’accueil Le support de montre intelligente amovible a été situé sur le dessus de la station météo. conçu pour convenir à différentes marques de montres intelligentes.
-
Page 21: Capteur
CAPTEUR CAPTEUR Recherche du signal du capteur Données du capteur Connexion perdue Les données du capteur devraient s’afficher sur l’écran à ACL et peuvent aussi être vues par projection. • Si la station météo perd le signal du capteur pour quelque raison que ce soit, l’indication «... -
Page 22: Luminosité De La Projection
Pile bouton vers la gauche. 2. Tirez sur la goupille métallique et retirez délicatement la pile. Weather Station CA74962 Chargement: 3. Insérez une pile CR2032 neuve en plaçant le symbole + Remplacement des piles : Puissance du chargeur sans fil : Alimentation : Cordon d’alimentation... -
Page 23: Marques De Commerce Et
être installé et utilisé avec un minimum de 20 cm fonctionnement de cet appareil ou sa compatibilité avec les La Crosse Technology, Ltd. offre une garantie limitée normes de sécurité et réglementaires. Veuillez noter que entre le radiateur et votre corps.
Need help?
Do you have a question about the CA74962 and is the answer not in the manual?
Questions and answers