Table of Contents
Advertisement
For online video support:
http://bit.ly/327-1414W_QuickTips
Button Location ............................................
Initial Setup and Assembly .........................
Button Functions ...........................................
LCD Layout ...................................................
Backlight .......................................................
Settings ..........................................................
Color Wind Speed Graph ...........................
Top Wind Speed Number ...........................
Wind History .................................................
Current Wind Speed ....................................
Wind, Temperature, Humidity Alert ............
Arm and Disarm Alerts .................................
Heat Index and Dew Point ...........................
Forecast Information .....................................
Forecast Indicator .........................................
Wind Speed Weather Station
Table Of Contents
1
Atomic Time Signal ..................................
2
5
Additional Temp/Humidity Sensors .......
6
Channel Indicators ..................................
7
Position Wind Sensor ..............................
7
Position Add On Sensors ........................
9
Position Weather Station .........................
9
Restart .......................................................
9
Change Batteries .....................................
10
Care and Maintenance ..........................
10
Warranty and Support Information .......
1 1
Specifications ..........................................
1 1
FCC Statement .........................................
12
Canada Statement ..................................
12
Model: CA87092
Instructional Manual
DC: 100317
12
13
13
13
14
15
15
16
16
17
17
18
19
19
Advertisement
Table of Contents

Related Manuals for La Crosse Technology CA87092


Summary of Contents for La Crosse Technology CA87092
-
Page 1: Table Of Contents
Model: CA87092 Instructional Manual DC: 100317 Wind Speed Weather Station For online video support: http://bit.ly/327-1414W_QuickTips Table Of Contents Button Location ..........Atomic Time Signal ........Initial Setup and Assembly ......24 Hour MAX/MIN Temp/Humidity ... Button Functions ........... Additional Temp/Humidity Sensors .. -
Page 2: Button Location
Button Location Front Buttons Front View Alerts History Back View Top Buttons Heat/Dew Light (HI/LOW-OFF) Time Set Down AC 5.0V Page | 1 www.lacrossetechnology.com/ca87092 Model: CA87092... -
Page 3: Initial Setup And Assembly
2. Insert three AAA batteries into the weather station (optional). 3. After 15 minutes, mount the sensor outside (position Wind Sensor). Initial Setup and Assembly - TX141W Sensor Twist battery cover left to remove from sensor. Twist Left Model: CA87092 www.lacrossetechnology.com/ca87092 Page | 2... - Page 4 5. Insert pole into bottom of sensor and secure with two screws. Insert screws Do not Connect Screws into on each side over tighten the sensor to designated of the sensor screws the base holes Page | 3 www.lacrossetechnology.com/ca87092 Model: CA87092...
- Page 5 Do not over tighten. Sensor Dimensions 7.10 6.08 1.43 3.54 2.84 (Top View) 18.57 4.67 Full Sensor and Bracket (with cup) Dimensions: 18.57” T x 7.10” W x 7.10” D (inch dimensions) 2.32 6.74 1.23 2.42 2.88 Model: CA87092 www.lacrossetechnology.com/ca87092 Page | 4...
-
Page 6: Button Functions
ALERT ACTIVATION • Press ALERTS button to toggle between alerts HISTORY • Press to arm alerts • Press to view top wind speed history • Press to disarm alerts • Press ALERTS to confirm Page | 5 www.lacrossetechnology.com/ca87092 Model: CA87092... -
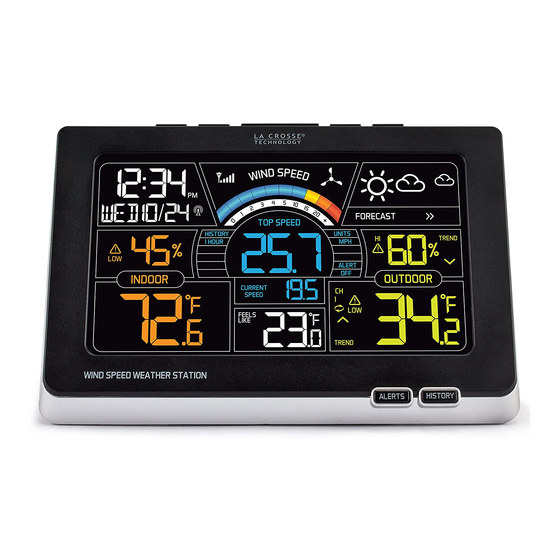
Page 7: Lcd Layout
(spins with wind speed) Wind Speed History Top Speed Reading (past 60 minutes) Wind Speed Unit (MPH or KMH) Wind Speed Alert Current Speed (30 second average) Feels Like, Heat Index and Dew Point Model: CA87092 www.lacrossetechnology.com/ca87092 Page | 6... -
Page 8: Backlight
Settings: • Hold the TIME SET button to enter settings menu. • Move through settings with the TIME SET button. • The buttons will adjust settings. • Exit at anytime with the LIGHT button. Page | 7 www.lacrossetechnology.com/ca87092 Model: CA87092... - Page 9 Hawaiian 5. Choose 12 (default) or 24 hour time 6. Set Hours 7. Set Minutes 8. Set Year 10. Set Date 9. Set Month 11 Select MPH or KMH 12. Select Fahrenheit / Celsius Model: CA87092 www.lacrossetechnology.com/ca87092 Page | 8...
-
Page 10: Color Wind Speed Graph
• 24-hour: Past 24 hour period, from last record. • Week: Past 7-day period, from last record. • Month: Defined by Calendar Month i.e. January 1 - January 31. • Year: Defined by Calendar Year i.e. January 1 - December 31. Page | 9 www.lacrossetechnology.com/ca87092 Model: CA87092... -
Page 11: Current Wind Speed
(1, 2, or 3) before setting alerts for a sensor. Outdoor HI Humidity Outdoor LOW Humidity Wind Speed High Alert Outdoor LOW Temperature Outdoor HI Temperature Indoor HI Humidity Indoor LOW Temperature Indoor LOW Humidity Indoor HI Temperature Model: CA87092 www.lacrossetechnology.com/ca87092 Page | 10... -
Page 12: Arm And Disarm Alerts
Dew Point is calculated at any temperature and will be the same or lower than outdoor temperature. Example: Outdoor temperature is 58.2F/14.9C and humidity 60%RH; Dew Point will be 45.0F/7.2C Page | 11 www.lacrossetechnology.com/ca87092 Model: CA87092... -
Page 13: Forecast Information
The atomic signal is engineered for use in the USA. The signal strength in Canada is not very strong. We recommend that you set the time and date of this unit manually if the atomic signal does not register after 24 hours. • For information about WWVB, visit: http://bit.ly/AtomicTime Model: CA87092 www.lacrossetechnology.com/ca87092 Page | 12... -
Page 14: Hour Max/Min Temp/Humidity
Note: If only one sensor is connected, the other channels will show dashes for temperature and humidity. Channel Indicator • Press the button to toggle between remote sensor channels when multiple sensors are used. Page | 13 www.lacrossetechnology.com/ca87092 Model: CA87092... -
Page 15: Position Wind Sensor
1. Insert your own mounting pole into the sensor. 2. Tighten screws 3. Mounting bracket would not be used. Note: Do not attempt to insert a pole into the hollow back of the mounting bracket. Model: CA87092 www.lacrossetechnology.com/ca87092 Page | 14... -
Page 16: Position Add On Sensors
3. Obstacles such as walls, windows, stucco, concrete, and large metal objects can reduce the range. 4. For best WWVB reception, orientate the weather station with the front or back of the station facing Ft. Collins, Colorado (facing south if you live in Canada). Page | 15 www.lacrossetechnology.com/ca87092 Model: CA87092... -
Page 17: Restart
1. Slide battery cover down and lift off sensor. 2. Remove old batteries and install fresh “AA” batteries. 3. Hold the button on the weather station for 5 seconds to search for the sensor. Model: CA87092 www.lacrossetechnology.com/ca87092 Page | 16... -
Page 18: Care And Maintenance
& workmanship. Before returning a product, please contact our friendly customer support with ques- tions or visit our online help (FAQS): Phone: 1-844-687-4040 Online Product Support: www.lacrossetechnology.com/CA87092 Product Registration: www.lacrossetechnology.com/support/register View full warranty details online at: www.lacrossetechnology.com/warranty_info.pdf Warranty Address: Springfield Instruments Inc. -
Page 19: Specifications
• Wind Station: 5.48” H x 8.34” L x 1.03” W (139.19 x 211.84 x 26.12 mm) Dimensions • TX141W Sensor: 18.57” H x 7.10” W x 7.10” D ( 471.68 x 180.34 x 180.34 mm) Model: CA87092 www.lacrossetechnology.com/ca87092 Page | 18... -
Page 20: Fcc Statement
L’exploitation est autorisée aux deux conditions suivantes : (1) l’appareil ne doit pas produire de brouillage; (2) l’utilisateur de l’appareil doit accepter tout brouillage radioélectrique subi, même si le brouillage est susceptible d’en compromettre le fonctionnement. Page | 19 www.lacrossetechnology.com/ca87092 Model: CA87092...
Need help?
Do you have a question about the CA87092 and is the answer not in the manual?
Questions and answers
At what maximum distance should I install my wind speed weather station
The maximum installation distance for the La Crosse Technology CA87092 wind speed weather station is over 300 feet (91 meters) in open air, not including walls or trees.
This answer is automatically generated
on my system where and what are the wifi sensors. My base unit looses the outside temp for a few days they it comes back. I have changes batteries in all units and to no avail. Thanks Ed
The La Crosse Technology CA87092 does not use WiFi sensors; it uses RF 433MHz sensors with a range of over 300 feet in open air. The base unit may lose the outside temperature reading intermittently if the sensors are too far from the base, if there is interference, or if the batteries are weak or depleted. Proper sensor placement (5–10 feet apart initially, then in shaded outdoor locations) and good battery condition help maintain a stable connection.
This answer is automatically generated
howtosetupanoldertimetem
To set up the time on the La Crosse Technology CA87092:
1. Hold the TIME SET button to enter the setting mode.
2. Use the buttons to adjust the values.
3. Press TIME SET to confirm each setting.
4. To search for the WWVB atomic time signal, press the TIME SET button.
This will update the time automatically if the signal is received.
This answer is automatically generated
setupanolderlacrosseetimeandtemp
To set up the La Crosse Technology CA87092 model, follow these steps:
1. Power On: Insert batteries or connect the AC adapter.
2. Adjust Settings:
- Hold the TIME SET button to enter the settings menu.
- Use the TIME SET button to navigate through options.
- Use the ▲ (up) and ▼ (down) buttons to adjust settings.
- Press LIGHT to exit at any time.
3. Set Preferences:
- Beep: ON (default) or OFF.
- Atomic Time: ON (default) or OFF.
- If Atomic Time is OFF, manually set:
- Time Zone (EST default)
- Daylight Saving Time (DST) ON (default) or OFF.
- 12-hour (default) or 24-hour time format.
- Hour, Minute, Year, Month, and Date.
- Select wind speed unit: MPH or KMH.
- Select temperature unit: Fahrenheit or Celsius.
4. Backlight Control:
- When using AC power: Adjust brightness (HI-LOW-OFF).
- When using battery power: Press the LIGHT button for a 10-second backlight.
For additional temperature/humidity sensors:
1. Remove the battery covers from all sensors.
2. Set additional sensors to Channel 2 and Channel 3.
3. Insert 2 AA batteries in each additional sensor.
4. Hold the button on the wind station for 5 seconds to search for sensors.
5. Press the TX button on each sensor.
6. When connected, the temperature & humidity readings will appear.
7. Install the battery covers.
8. Keep sensors and the wind station 5-10 feet apart for 15 minutes to establish a stable connection.
This completes the setup for the CA87092 model.
This answer is automatically generated
howtosetupmyoldlacrosseeweatherstation
To set up your La Crosse Technology CA87092 weather station, follow these steps:
1. Power On: Plug in the AC adapter or insert batteries.
2. Access Settings: Hold the TIME SET button to enter the settings menu.
3. Adjust Settings:
- Use the TIME SET button to navigate through options.
- Use the (+) and (-) buttons to adjust values.
- Set the time format (12-hour or 24-hour).
- Set the hours and minutes.
- Set the year, month, and date.
- Select the time zone (e.g., EST, CST, MST).
- Enable or disable Atomic Clock synchronization.
- Enable or disable Daylight Saving Time (DST).
- Choose the temperature unit (Fahrenheit or Celsius).
- Choose the wind speed unit (MPH or KMH).
4. Confirm Settings: Once all settings are adjusted, exit the menu.
5. Adjust Backlight: Press the LIGHT button to adjust the backlight (HI-LOW-OFF) when using AC power. On battery power, pressing the LIGHT button activates a 10-second backlight.
Your weather station is now set up and ready to use.
This answer is automatically generated
Can the one wind sensor transmit to 2 displays?