Advertisement
Quick Links
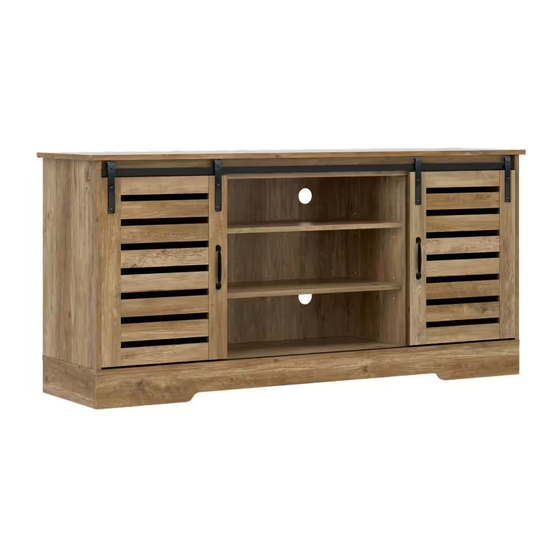
WOOD BARN DOOR TV STAND WITH REMOVABLE SHELVES
MUEBLE DE MADERA PARA TV CON PUERTA DE GRANERO CON
MEUBLE TV PORTE DE GRANGE EN BOIS AVEC ÉTAGÈRES
6531-881
Made in Malaysia
Hecho en Malaysia
Fabriqué en Malaysia
ESTANTES EXTRAÍBLES
AMOVIBLES
Examine all packaging material for small parts that may have come loose during shipment. Periodic checks are
recommended to ensure that a components are in proper position, tight and free from damage. Keep this
asembly instruction for future reference. Adult assembly is required.
Examine el material de embalaje en busca de piezas pequeñas que puedan haberse aflojado durante el
transporte. Se recomienda realizar verificaciones periódicas para asegurar que todos los componentes estén
en la posición correcta, apretados y libres de daños. Guarde estas instrucciones de ensamblaje para
referencias futuras. El ensamblaje debe ser realizado por un adulto.
Examinez tous les matériaux d'emballage por les petites pièces qui peuvent avoir été lâche pendant le
transport. Des contrôles périodiques sont recommandées afin d'assurer que tous les composants sont en
bonne position, tendu et sans dommages. Gardez ces instructions de montage pour référence future.
Assemblage par un adulte est requise.
Page 1
Advertisement

Related Manuals for Hillsdale Furniture Living Essentials 6531-881


Summary of Contents for Hillsdale Furniture Living Essentials 6531-881
- Page 1 WOOD BARN DOOR TV STAND WITH REMOVABLE SHELVES MUEBLE DE MADERA PARA TV CON PUERTA DE GRANERO CON ESTANTES EXTRAÍBLES MEUBLE TV PORTE DE GRANGE EN BOIS AVEC ÉTAGÈRES AMOVIBLES 6531-881 Examine all packaging material for small parts that may have come loose during shipment. Periodic checks are recommended to ensure that a components are in proper position, tight and free from damage.
- Page 3 DO NOT EXCEED RECOMMENDED LOAD. Use with products heavier than the maximum sizes and weights indicated may result instability causing possible injury. Do not allow children under 10 year to move unit. Manufactured for : HILLSDALE FURNITURE, LLC SKU# : 6531−881 Manufactured date :...
- Page 4 PARTS CONTENTS Before getting started, ensure the package contains the following components: CONTENIDO Antes de comenzar, asegúrese de que el paquete contenga los siguientes componentes: CONTENU Avant de commencer, assurez-vous que l'emballage contient les composants suivants: Page 4...
- Page 5 HARDWARE 1. Unitar Screw M6.3 x 50mm 2. Cam Bolt 3. Wooden Dowel M8 x 30mm 34 x 36 x 4. Screw M3.1 x 20mm 5. Screw M4 x 19mm 6. Screw M3.5 x 15mm 18 x 7. Screw M6 x 12mm 8.
- Page 6 HARDWARE FURNITURE TIPPING RESTRAINT 17. Safety Bracket 18. Restraint Strap 19. Screw 2" 20. Screw 5/8" 21. Wall Plug TOOLS REQUIRED FOR ASSEMBLY (NOT INCLUDED) 3.5m/12' DO NOT USE POWER TOOLS TO ASSEMBLE THIS PRODUCT. USE OF POWER TOOLS WILL INVALIDATE ANY CLAIM AND MAY DAMAGE THIS PRODUCT MAKING IT UNSAFE.
- Page 7 Assembly / Montaje / Assemblage STEP 1 / ETAPA 1 / ÉTAPE 1 18 x Page 7...
- Page 8 STEP 2 / ETAPA 2 / ÉTAPE 2 STEP 3 / ETAPA 3 / ÉTAPE 3 Page 8...
- Page 9 STEP 4 / ETAPA 4 / ÉTAPE 4 STEP 5 / ETAPA 5 / ÉTAPE 5 Page 9...
- Page 10 STEP 6 / ETAPA 6 / ÉTAPE 6 STEP 7 / ETAPA 7 / ÉTAPE 7 Page 10...
- Page 11 STEP 8 / ETAPA 8 / ÉTAPE 8 STEP 9 / ETAPA 9 / ÉTAPE 9 Page 11...
- Page 12 STEP 10 / ETAPA 10 / ÉTAPE 10 STEP 11 / ETAPA 11 / ÉTAPE 11 Page 12...
- Page 13 STEP 12 / ETAPA 12 / ÉTAPE 12 14 x STEP 13 / ETAPA 13 / ÉTAPE 13 Page 13...
- Page 14 STEP 14 / ETAPA 14 / ÉTAPE 14 TOP / CIMA / HAUT STEP 15 / ETAPA 15 / ÉTAPE 15 16 x Page 14...
- Page 15 STEP 16 / ETAPA 16 / ÉTAPE 16 STEP 17 / ETAPA 17 / ÉTAPE 17 Page 15...
- Page 16 STEP 18 / ETAPA 18 / ÉTAPE 18 STEP 19 / ETAPA 19 / ÉTAPE 19 Page 16...
- Page 17 STEP 20 / ETAPA 20 / ÉTAPE 20 Ensure the sliding track in between the wheel. Asegúrese de que la pista se deslice entre la rueda Assurer la piste de glissement entre la roue For smooth operation, keep the door plate in between tracks Para un funcionamiento suave, mantenga la...
- Page 18 STEP 22 / ETAPA 22 / ÉTAPE 22 STEP 23 / ETAPA 23 / ÉTAPE 23 12 x Page 18...
- Page 19 STEP 24 / ETAPA 24 / ÉTAPE 24 12 x STEP 25 / ETAPA 25 / ÉTAPE 25 18 x 18 x Page 19...
- Page 20 IMPORTANT: THIS UNIT MUST BE SECURE TO THE WALL TO HELP PREVENT TIPOVER. FOLLOW THESE INSTRUCTIONS TO INSTALL THE ANTI-TIPPING SAFETY BRACKET PROVIDED WITH THIS PRODUCT. IMPORTANTE: ESTA UNIDAD DEBE ESTAR SEGURA A LA PARED PARA AYUDAR A PREVENIR EL TIPOVER. SIGA ESTAS INSTRUCCIONES PARA INSTALAR EL SOPORTE DE SEGURIDAD ANTI-TIPPING PROPORCIONADO CON ESTE PRODUCTO.
- Page 21 STEP 26 / ETAPA 26 / ÉTAPE 26 Drywall anchor that supplied with this product is general purpose wall plug only. Consult your local hardware store for appropriate anchors for the type of wall you intend to securely attach the safety bracket. Ancla de paneles de yeso que se suministra con este producto es enchufe de pared de propósito general solamente.
- Page 22 OPTION 1: Attachment into a wall stud (preferred method) Using a stud finder, locate a stud in the wall. Place your unit against the wall, locate the position of another bracket on the wall, 2 inches below the bracket secured to the unit. Move your unit aside. Drive the screw through the smaller hole of the safety bracket into the wall stud.
- Page 23 STEP 27 / ETAPA 27 / ÉTAPE 27 STEP 28 / ETAPA 28 / ÉTAPE 28 Place the furniture into position so both safety brackets are vertically in line. Lace the end of the restraint strap through the larger hole in each safety bracket. Confirm that the strap is securely laced and locked.
- Page 24 STEP 29 / ETAPA 29 / ÉTAPE 29 88 lbs 25 lbs 25 lbs 25 lbs This product is designed to withstand the weight indicated on the plan. We are not responsible for the breakage of parts or any injury caused by failure to comply with this recommendation. Este producto está...
Need help?
Do you have a question about the Living Essentials 6531-881 and is the answer not in the manual?
Questions and answers