Table of Contents
Advertisement
Available languages
Available languages
Quick Links
PROJECT SOURCE and logo design are
trademarks or registered trademarks of LF, LLC.
All rights reserved.
ATTACH YOUR RECEIPT HERE
Serial Number
Questions, problems, missing parts? Before returning to your retailer, call our
customer service department at 1-866-389-8827, 8 a.m. - 8 p.m., EST, Monday - Sunday.
You could also contact us at partsplus@lowes.com or visit www.lowespartsplus.com.
SM21400
TUB AND SHOWER
Purchase Date
1
ITEM #3782639
FAUCET
MODEL #F301E706CP
Español p. 13
Advertisement
Table of Contents

Subscribe to Our Youtube Channel
Related Manuals for Project Source F301E706CP


Summary of Contents for Project Source F301E706CP
- Page 1 ITEM #3782639 TUB AND SHOWER FAUCET MODEL #F301E706CP PROJECT SOURCE and logo design are trademarks or registered trademarks of LF, LLC. Español p. 13 All rights reserved. ATTACH YOUR RECEIPT HERE Serial Number Purchase Date Questions, problems, missing parts? Before returning to your retailer, call our customer service department at 1-866-389-8827, 8 a.m.
-
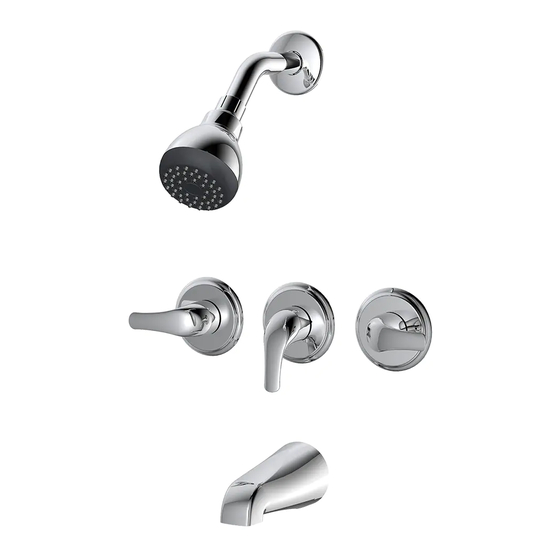
Page 2: Package Contents
PACKAGE CONTENTS PART DESCRIPTION QUANTITY Shower Arm Shower Arm Flange Shower Head Valve Body Handle Escutcheon Spout Plug Screen Washer... -
Page 3: Hardware Contents
HARDWARE CONTENTS Wrench Thread Tape SAFETY INFORMATION Please read and understand this entire manual before attempting to assemble, operate or install the product. NOISE AND WATER HAMMER IN PEX SYSTEMS As with all plumbing materials under some operating conditions, water hammer can occur in PEX plumbing systems. - Page 4 SAFETY INFORMATION • This product is engineered to meet the EPA WaterSense flow requirement. The flow rate is governed by the aerator or flow controller. If replacement is ever required, be sure to replace it with a WaterSense compliant aerator or flow controller to retain the water conserving flow rate of this product.
- Page 5 ASSEMBLY INSTRUCTIONS Note: Numbered arrows within steps indicate sequence of actions. 1. Shut off main water supply before installation. 2. Note the suggested installation distance between shower arm (A), handle (E), and spout (G). 3 0 i n . 4 8 i n . S h o w e r O n l y T u b &...
- Page 6 ASSEMBLY INSTRUCTIONS 4. Attach vertical shower pipe to the top of the middle elbow of valve body (D). 5. Attach vertical tub pipe to the bottom of the middle elbow of valve body (D). Note: Recommend 8 in. minimum distance to spout. For shower only installation attach plug (H) to the bottom of the middle elbow of valve body (D) using thread seal tape.
- Page 7 ASSEMBLY INSTRUCTIONS 7. Install shower arm (A) and shower arm flange (B) to vertical shower pipe elbow. 8. Install escutcheons (F) and handles (E) to valve body (D). Replace screws and install handle caps. 9. Turn on main water supply.
- Page 8 ASSEMBLY INSTRUCTIONS 10. Check for leaks at tub stub-out pipe. Next wrap stub-out pipe with thread seal tape and install spout (G). 11. Check for leaks at shower arm (A). Next divert water to the shower to flush out the water lines. 12.
- Page 9 REPAIR INSTRUCTIONS IN CASE OF LOW FLOW FROM SHOWER HEAD 1. Use a clean strap wrench (not included) to remove the shower head (C) from shower arm (A). 2. Use a flathead screwdriver (not included) to carefully remove the screen washer (I). 3.
-
Page 10: Repair Instructions
REPAIR INSTRUCTIONS 4. Reinstall the screen washer (I) and shower head (C). Hand tighten shower head. -
Page 11: Care And Maintenance
CARE AND MAINTENANCE • To protect and maintain the finish, clean only with a soft, damp cloth. • Do not use a detergent or cleanser that may harm the finish. TROUBLESHOOTING PROBLEM POSSIBLE CAUSE CORRECTIVE ACTION Leak from under handle. Retainer nut has come loose. -
Page 12: Replacement Parts List
REPLACEMENT PARTS LIST For replacement parts, call our customer service department at 1-866-389-8827, 8 a.m. - 8 p.m., EST, Monday - Sunday. You could also contact us at partsplus@lowes.com or visit www.lowespartsplus.com. PART DESCRIPTION PART # PART DESCRIPTION PART # Index Button A66D558 Stem Extension-Hot... - Page 13 ARTÍCULO #3782639 GRIFO PARA BAÑERA Y DUCHA MODELO #F301E706CP PROJECT SOURCE y el diseño del logotipo son marcas comericales o marcas registradas de LF, LLC. Todos los derechos reservados. ADJUNTE SU RECIBO AQUÍ Número de serie Fecha de compra ¿Preguntas, problemas, piezas faltantes? Antes de volver a la tienda, llame a nuestro Departamento de Servicio al Cliente al 1-866-389-8827, de lunes a domingo de 8 a.m.
-
Page 14: Contenido Del Paquete
CONTENIDO DEL PAQUETE PIEZA DESCRIPCIÓN CANTIDAD Brazo de la ducha Brida del brazo de la ducha Cabezal de ducha Cuerpo de la válvula Manija Escudo de bocallave Surtidor Enchufe Arandela con filtro... -
Page 15: Información De Seguridad
ADITAMENTOS Llave Cinta para roscas INFORMACIÓN DE SEGURIDAD Lea y comprenda completamente este manual antes de intentar ensamblar, usar o instalar el producto. RUIDO Y GOLPES DE ARIETE EN LOS SISTEMAS PEX Como en todos los materiales de plomería que están bajo ciertas condiciones de funcionamiento, pueden ocurrir golpes de ariete en los sistemas de plomería PEX. - Page 16 INFORMACIÓN DE SEGURIDAD • Este producto se diseñó para cumplir los requisitos de flujo Watersense de la EPA. El índice de flujo está regulado por el aireador o por el caudal de flujo. Si alguna vez se requiere reemplazo, asegúrese de reemplazarlo con el aireador de flujo o con el aireador que cumpla con la norma WaterSense para mantener el índice de flujo que conserva el agua de este producto.
-
Page 17: Instrucciones De Ensamblaje
INSTRUCCIONES DE ENSAMBLAJE Nota: las flechas con números dentro de los pasos indican la secuencia de las acciones. 1. Cierre el suministro principal de agua antes de la instalación. 2. Tenga presente la distancia de instalación entre el brazo de la ducha (A), la manija (E) y la boquilla (G). - Page 18 INSTRUCCIONES DE ENSAMBLAJE 4. Una el tubo vertical de la ducha a la parte superior del codo medio del cuerpo de la válvula (D). 5. Una el tubo vertical de la bañera a la parte inferior del codo medio del cuerpo de la válvula (D). Nota: se recomienda una distancia mínima 20 cm al surtidor.
- Page 19 INSTRUCCIONES DE ENSAMBLAJE 7. Instale el brazo de la ducha (A) y la brida (B) del brazo de la ducha en el codo de la tubería vertical de la ducha. 8. Instale los escudos de bocallave (F) y las manijas (E) en el cuerpo de la válvula (D).
- Page 20 INSTRUCCIONES DE ENSAMBLAJE 10. Revise que no haya fugas en la tubería saliente de la bañera. Luego cubra las tuberías salientes con cinta aislante para roscar e instale el surtidor (G). 11. Revise que no haya fugas en el brazo de la ducha (A).
- Page 21 INSTRUCCIONES DE REPARACIÓN EN CASO DE POCO FLUJO DESDE EL CABEZAL DE LA DUCHA 1. Use una llave de correa limpia para retirar el cabezal de ducha (C) del brazo de la du-cha (A). 2. Use un destornillador de cabeza plana (no se incluye) para retirar con cuidado la aran-dela con filtro (I).
-
Page 22: Instrucciones De Reparación
INSTRUCCIONES DE REPARACIÓN 4. Vuelva a colocar la arandela con filtro (I) y el cabezal de ducha (C). Apriete manualmente el cabezal de ducha. -
Page 23: Acción Correctiva
CUIDADO Y MANTENIMIENTO • Para proteger y mantener el acabado de su grifo, limpie sólo con un paño suave húmedo. • No use detergentes o limpiadores que puedan dañar el acabado. GUÍA DE SOLUCIONAR PROBLEMAS PROBLEMA CAUSA POSIBLE ACCIÓN CORRECTIVA Gotera debajo de la La tuerca de retención está... - Page 24 LISTA DE PIEZAS DE REPUESTO Para obtener piezas de repuesto, llame a nuestro Departamento de Servicio al Cliente al 1-866-389-8827, de lunes a domingo de 8 a.m. a 8 p.m., hora estándar del Este. También puede ponerse en contacto con nosotros en partsplus@lowes.com o visitar www.lowespartsplus.com PIEZA DESCRIPCIÓN PIEZA #...
Need help?
Do you have a question about the F301E706CP and is the answer not in the manual?
Questions and answers