Table of Contents
Advertisement
Quick Links
C H A P T E R O V E R V I E W
Operating Instructions
ECC - Electronic Compressor Control (if equipped)
Spare Parts Lists
..........................................................................................................................
Options (if equipped)
Attachment
....................................................................................................................................
Manufacturer in terms of 97/23/EC
The full name and address of the manufacturer is:
Lenhardt & Wagner GmbH
An der Tuchbleiche 39
68623 Hüttenfeld / Germany
Phone: +49 (0) 62 56 - 85 88 0 - 0
Fax: +49 (0) 62 56 - 85 88 0 - 14
E-Mail: service@lw-compressors.com
Internet: www.lw-compressors.com
..............................................................................................................
.................................................................................................................
.........................................................
A
B
C
D
E
Advertisement
Chapters
Table of Contents

Related Manuals for L&W Compressors LW 720 E


Summary of Contents for L&W Compressors LW 720 E
- Page 1 C H A P T E R O V E R V I E W ......................Operating Instructions ............ECC - Electronic Compressor Control (if equipped) Spare Parts Lists .......................... Options (if equipped) ......................... Attachment ............................ Manufacturer in terms of 97/23/EC The full name and address of the manufacturer is: Lenhardt &...
- Page 2 S E R V I C E I N F O R M A T I O N / W A R R A N T Y Compressor information Type designation Serial number Date of construction Purchase information Purchase date First commissioned on Warranty period Dealer's stamp...
- Page 3 Operating Instructions Breathing Air Compressor LW 720 E Version: 04/20...
-
Page 4: Table Of Contents
Switch off the compressor ......................31 Interstage pressure gauges ......................32 Oil pressure gauge and oil distributor block gauge ................. 33 Oil pressure monitoring ........................34 Remedying faults ......................36 - 39 LW 720 E Page A - 2 Version: 02.04.2020... - Page 5 Leak test ............................64 Pressure gas vessel test ........................65 Maintenance records ....................... 66 - 71 Storage Conservation / storage of the compressor / De-conservation, commissioning ......... 73 Transportation instructions / Disposal ..................... 74 LW 720 E Page A - 3 Version: 02.04.2020...
-
Page 6: General Information / Description Of Warning Symbols
Indicates a potentially hazardous situation which, if not avoided, could result in physical injury or damage to the product or environment. Note Indicates additional information on how to use the unit. LW 720 E Page A - 4 Version: 02.04.2020... -
Page 7: Scope Of Delivery
D E S C R I P T I O N Scope of Delivery The industrial compressor LW 720 E is suitable for brathing air applications and for large capacities. Low speed ensures continuous operation for long service intervals and reduced maintenance costs. -
Page 8: Technical Data
D E S C R I P T I O N Technical Data Technical Data LW 720 E Capacity [l/min]: Max. Operating Pressure [bar]: 350 (Optional 420) RPM [min 1,100 Number of Pressure Stages: Cylinder Bore 1st Stage [mm]: Ø 115 Cylinder Bore 2nd Stage [mm]: Ø... -
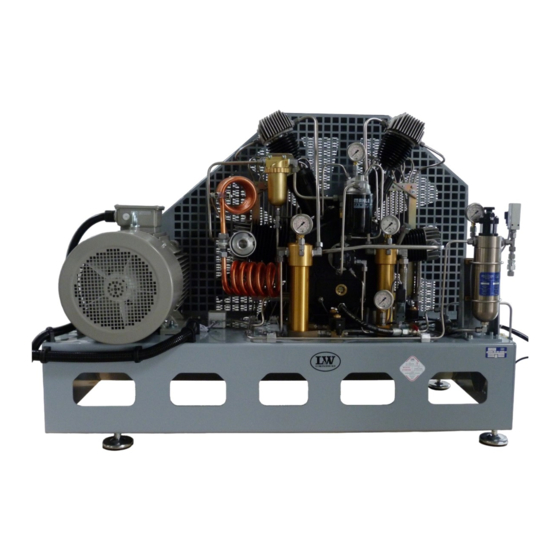
Page 9: Unit Assembly
D E S C R I P T I O N Unit Assembly Designation Gastight Inlet Filter Housing Oil Pressure Monitoring Intermediate Pressure Gauges Breathing Air Filter Housing Safety Valve Outlet (10L) LW 720 E Page A - 7 Version: 02.04.2020... -
Page 10: Switchboard
D E S C R I P T I O N Switchboard Designation Emergency shut-off switch Hour counter ON button OFF button Drain test button LW 720 E Page A - 8 Version: 02.04.2020... -
Page 11: Flow Chart
D E S C R I P T I O N Flow chart LW 720 E Page A - 9 Version: 02.04.2020... -
Page 12: Safety Precautions
S A F E T Y P R E C A U T I O N S... -
Page 13: Intended Use / Operators
Only trained personnel are permitted to work on the unit! Warning Work on the electrical equipment on / with the machine / unit may only be carried out by qualified electricians. LW 720 E Page A - 11 Version: 02.04.2020... -
Page 14: Safety Instructions On The Unit
Safety instructions on the unit Importance of notes and warning signs that are affixed to the compressor according to the applica- tion or its equipment. Warning Note High voltage! Ensure correct direction of rotation! LW 720 E Page A - 12 Version: 02.04.2020... -
Page 15: General Safety Precautions
• Do not use the product in areas prone to explosion or in the presence of flammable gases. The product is not designed for these applications. An explosion might be the result if certain conditi- ons apply. LW 720 E Page A - 13 Version: 02.04.2020... -
Page 16: Unit Customised Safety Notices
• Soundproofing equipment on the compressor has to be activated in safety function during ope- ration. • When handling with fats, oils and other chemical agents, observe the note for the product- related safety. LW 720 E Page A - 14 Version: 02.04.2020... -
Page 17: Maintenance Instructions
• Only personnel with particular knowledge and experience with pneumatics may carry out work on pneumatic equipment. • Only personnel with particular knowledge and experience in gas equipment may carry out work on gas equipment. LW 720 E Page A - 15 Version: 02.04.2020... -
Page 18: Transportation Instructions / Safety Regulations
• Inspections according to legal and local obligatory regulations regarding accident prevention are carried out by the manufacturer or by authorised expert personnel. No guarantees whatsoever are valid for damage caused or favoured by the non-consideration of these directions for use. LW 720 E Page A - 16 Version: 02.04.2020... -
Page 19: Installation
I N S T A L L A T I O N... -
Page 20: Installation In Closed Rooms
• When locating the compressor in rooms of less than 30 m³ space where natural ventilation is not ensured or other systems having high radiation are operating in the same room, measures must be taken to provide artificial ventilation. • Observe the specified operating temperature (see "Technical Data")! LW 720 E Page A - 18 Version: 02.04.2020... -
Page 21: Dimensions
I N S T A L L A T I O N Dimensions Fig. Dimensions LW 720 E Page A - 19 Version: 02.04.2020... -
Page 22: Minimum Distances
Front side min. 1500 mm, sides and rear side min. 500 mm, distance to the ceiling min. 500 mm. Avoid anything in this area which can restrict the cooling air flow. 1500 Fig. Minimum distances LW 720 E Page A - 20 Version: 02.04.2020... -
Page 23: Ventilation
• The fan capacity for fresh air and warm air must meet at least the required cooling air flow. The fans must have the same capacity. Fig. Ventilation through facade Fig. Ventilation via ventilation stack LW 720 E Page A - 21 Version: 02.04.2020... -
Page 24: Electrical Installation
(see chapter "Maintenance" -> Check turning direction). • Fuse the motor correctly (see table; use slow-blow fuses). Fig. Compressor name plate Designation Circuit diagram number Compressor type Power supply Frequency Motor current consumption Nominal motor power LW 720 E Page A - 22 Version: 02.04.2020... - Page 25 Contactor supply Motor S/D 18.5 Recommended fuses for 220 - 240 V operating voltage Nominal motor power Fusing start A Connection in mm² [kw] Direct Star/Delta Contactor supply Motor S/D 18.5 LW 720 E Page A - 23 Version: 02.04.2020...
-
Page 26: Operation
O P E R A T I O N... -
Page 27: Important Operation Instructions
Important operation instructions Note Ensure that all persons handling the compressor are familiar with function and operation of the unit. Wear hearing protection When working on a running machine, always wear hearing protection. LW 720 E Page A - 25 Version: 02.04.2020... -
Page 28: First Commissioning
- Drain test - press the test button - If correct, air escapes Stop the compressor by pushing the OFF button. 10. Open all lever filling valves carefully to vent the air completely. (at the external filling panel) LW 720 E Page A - 26 Version: 02.04.2020... - Page 29 Check V-belt tension The V-belt could lose tension during transportation. Please check the V-belt tension before starting the compressor. Tension V-belt / Correct V-belt tension See chapter "Service and Maintenance" -> "Tension V-belts" LW 720 E Page A - 27 Version: 02.04.2020...
- Page 30 Furthermore, cooling air flow will not be sufficient. Fig. 1 - Rotary direction arrow (motor) Fig. 2 - Rotary direction arrow (protective fan cover) LW 720 E Page A - 28 Version: 02.04.2020...
-
Page 31: Daily Commissioning
Prior to daily operation observe the following: • Ensure cooling air can flow freely. • Check compressor oil level by the oil sight glass. • Check if filter cartridge is in place / observe filter cartridge life! LW 720 E Page A - 29 Version: 02.04.2020... -
Page 32: Filling Procedure
When the filling pressure gauge increases, open the filling valves slowly. Fill compressed air cylinders to the desired pressure, subsequently close the filling valves slowly. Close and vent all filling valves. Disconnect all compressed air cylinders from filling valves. LW 720 E Page A - 30 Version: 02.04.2020... -
Page 33: Switch Off The Compressor
During filling process, you can shut down the system at any time by pushing the red button (OFF) or the emergency stop (only in case of emergency!). Note After automatic or manual switching off, all pressure vessels and filter housings of the compressor will be automatically vented. LW 720 E Page A - 31 Version: 02.04.2020... -
Page 34: Interstage Pressure Gauges
1st stage: approx. 4.2 bar (g) 2nd stage: approx. 17 bar (g) 3rd stage: approx. 70 bar (g) 4th stage: approx. end pressure Fig. 2 - Interstage pressure gauges in SILENT HOUSING LW 720 E Page A - 32 Version: 02.04.2020... -
Page 35: Oil Pressure Gauge And Oil Distributor Block Gauge
If oil pressure remains outside the range of tolerance, it can be adjusted at the oil pump. Increasing oil pressure • Turn adjusting screw clockwise Reduce oil pressure • Turn adjusting screw anti-clockwise Adjusting the oil pressure LW 720 E Page A - 33 Version: 02.04.2020... -
Page 36: Oil Pressure Monitoring
• Oil intake hose damaged / defective • Oil temperature below +5 °C - lubrication not possible • Oil temperature higher than +120 °C - oil viscosity too low • Oil pump defective LW 720 E Page A - 34 Version: 02.04.2020... -
Page 37: Remedying Faults
R E M E D Y I N G F A U L T S... - Page 38 Clean, replace if necessary Cylinder(s), piston(s) or piston ring(s) used up Replace V-belt slips Tension V-belt See chapter "Final pressure can not be reached" See chapter "Final pressure can not be reached" LW 720 E Page A - 36 Version: 02.04.2020...
- Page 39 Cause of fault Remedy Mole carbon filter cartridge saturated Replace Compressor oil unsuitable Use prescribed oil quality Filter cartridge unsuitable Use prescribed filter type Cylinder(s), piston(s) or piston ring(s) defective Replace LW 720 E Page A - 37 Version: 02.04.2020...
- Page 40 Fuse / circuit breaker has tripped Check fusing of the power supply / observe reg- Valid only for E models ulations Emergency stop switch has tripped Unlock emergency stop switch, close compressor housing door correctly LW 720 E Page A - 38 Version: 02.04.2020...
- Page 41 Operating temperature too high Observe prescribed operating temperatures Oil leak at the compressor block Tighten corresponding mounting screws, if nec- essary replace corresponding paper sealing / o- ring / shaft seal LW 720 E Page A - 39 Version: 02.04.2020...
-
Page 42: Maintenance And Service
M A I N T E N A N C E A N D S E R V I C E... -
Page 43: Service, Repair And Maintenance
Carry out maintenance or service work when the unit is switched off and protected against unexpected restart. Warning Risk of burns! Carry out maintenance or service work when the unit has cooled down. LW 720 E Page A - 41 Version: 02.04.2020... - Page 44 Oil change 000001 Replace oil filter 003928 Every 3 months or as required Maintenance work Type Quantity Order No. Check automatic condensate drain, open manual condensate taps Check/Retorque all connections and bolts LW 720 E Page A - 42 Version: 02.04.2020...
- Page 45 500 operating hours) Check all connections for leakage Every 500 operating hours Maintenance work Type Quantity Order No. Clean intake filter 000170 Check pressure maintaining/non-return valve Check V-belt tension and condition 001412 LW 720 E Page A - 43 Version: 02.04.2020...
- Page 46 Replace back-up rings of the final filter housing 001285 Replace o-rings of filter housing (0.8 litre) 004221 Replace filter element of filter housing (0.8 litre) 003980 Replace back-up ring of the filter housing 004222 (0.8litre) LW 720 E Page A - 44 Version: 02.04.2020...
- Page 47 1st, 2nd, 3rd and 4th stage o-ring 001296 Replace shaft seal 010175 010176 Replace needle bearings for conrod 2nd, 3rd and 2nd stage 003281 4th stage 3rd / 4th stage 006698 LW 720 E Page A - 45 Version: 02.04.2020...
-
Page 48: Check V-Belt Tension
Settings Motor Type Initial Installation Operation after running in Electric motors 50Hz 600 N 450 N Electric motors 60Hz 500 N 400 N LW 720 E Page A - 46 Version: 02.04.2020... -
Page 49: Compressor Lubrication / Check Oil Level
Never start the compressor with a too low oil level. Refill new compressor oil at least when the oil level reached the middle of the indicated area. Oil sight glass LW 720 E Page A - 47 Version: 02.04.2020... -
Page 50: Oil Change
• All further changes after each 1,000 operating hours. Oil and oil capacity Approx. 4,200 ml synthetic compressor oil is necessary for one oil change. Only use synthetic com- pressor oil which is recommended as suitable from L&W. LW 720 E Page A - 48 Version: 02.04.2020... -
Page 51: Oil Sieve Change
Maintenance intervals • We recommend cleaning or replacing the oil sieve every 1,000 working hours. • 009545 - Oil sieve, 009546 - oil pump cover gasket Correct oil sieve mounting direction LW 720 E Page A - 49 Version: 02.04.2020... -
Page 52: Final Pressure Switch
Max. Operating Pressure 225 bar 215 bar 250 bar 240 bar 330 bar 320 bar 330 bar 320 bar 365 bar 350 bar 420 bar 400 bar 450 bar 420 bar LW 720 E Page A - 50 Version: 02.04.2020... -
Page 53: Automatic Condensation Dump System
The collected condensate can contain oil and has to be disposed according to regulations. The LW 720 E comes as standard with an automatic condensation dump system. Solenoids drain all condensate separators every 15 minutes. To test the system, press the blue condensate test drain button on the operating panel. -
Page 54: Oil / Water Separators 1St, 2Nd And 3Rd Stage - Maintenance
The oil / water separator maintenance is now completed. Fig. 2 - Change sinter filter Sinter filter Fig. 5 - Sinter filter Fig. 3 - Change o-ring Fig. 4 - Bottom part LW 720 E Page A - 52 Version: 02.04.2020... -
Page 55: Oil / Water Separator Final Stage - Maintenance
• Tighten pipe connections and mounting screws. The oil / water separator maintenance is now completed. Fig. 1 - Loosen ring nut Fig. 2 - Change sinter filter Fig. 3 - Change o-ring LW 720 E Page A - 53 Version: 02.04.2020... -
Page 56: Filter Element Change 0.8Ltr Filter Housing
Filter cover c/w safety val- ve, o-ring, back-up ring and connections Filter element Filter housing Filter back-up Fig. 3 - Open filter cover Fig. 4 - 0.8ltr Filter housing parts LW 720 E Page A - 54 Version: 02.04.2020... -
Page 57: Pneumatic Condensate Valve - Maintenance
• Mount pneumatic condensate valve. • Tighten pipe connections and mounting screws. Pneumatic Condensate Valve Pneumatic condensate valve maintenance is now completed. Fig. 2 - Loosen connection Fig. 3 - Change sinter filter LW 720 E Page A - 55 Version: 02.04.2020... -
Page 58: Filter Housing / Filter Cartridge
For models with 2.3 ltr Filter housings Maintenance intervals Filter cartridges should be changed at the following intervals, at +20°C or more often, depending on humidity and ambient temperature: 56 hours LW 720 E Page A - 56 Version: 02.04.2020... -
Page 59: Filter Cartridge Change
Ensure that the old filter cartridge is disposed cor- rectly at an approved waste point. Fig. 3 - Pull the cartridge out of the hou- sing. LW 720 E Page A - 57 Version: 02.04.2020... -
Page 60: Filter Housing - Maintenance
The filter housing maintenance is now completed. Fig. 2 - Change o-ring and back-up Fig. 3 - Loosen u-clamps and pipe Fig. 4 - Change o-ring and back-up rings connections rings LW 720 E Page A - 58 Version: 02.04.2020... -
Page 61: Inlet Filters / Inlet Filter Cartridge Change
• Change inlet filter cartridge and o-ring. • Refit cover. The inlet filter cartridge change is now completed. connection Filter housing filter cartridge intake filter o-ring cover circlip Inlet filter housing LW 720 E Page A - 59 Version: 02.04.2020... -
Page 62: Cylinder Heads And Valves / Important Torque Rates For Bolts
Important torque rates for bolts Zylinderkopf 3.Stufe Cylinder heads Stage Tightening torque Thread 1st Stage 55 Nm 2nd Stage 30 Nm 3rd Stage 30 Nm 4th Stage 30 Nm Zylinderkopf 2.Stufe LW 720 E Page A - 60 Version: 02.04.2020... -
Page 63: Safety Valves
If a safety valve blows off, it indicates problems with either inlet or outlet valve of the following stage. Note Replace defective safety valves immediately! Safety valve 4th stage LW 720 E Page A - 61 Version: 02.04.2020... -
Page 64: Pressure Maintaining / Non Return Valve
The value of the opening pressure of the pressure maintaining valve can be read at the final pressure gauge. When opening pressure is reached, the pressure gauge value increases within a few seconds. LW 720 E Page A - 62 Version: 02.04.2020... -
Page 65: Safety Valve Test
• Mount the cover of the switch box. • Connect the compressor to the electrical power supply. The safety valve test is now completed. Safety valve test switch (up) LW 720 E Page A - 63 Version: 02.04.2020... -
Page 66: Leak Test
• Switch off the leak test switch (solenoids will be acti- vated!). • Mount the cover of the switch box. • Connect the compressor to the electrical power supply. The leak test is now completed. Leak test switch (lower) LW 720 E Page A - 64 Version: 02.04.2020... - Page 67 2. Examination after 10 years by a qualified person or authorized organisations. Visual inspection, inside and outside. In addition, a water pressure test is carried out at 1.5 times of the permissible vessel operating pres- sure. LW 720 E Page A - 65 Version: 02.04.2020...
-
Page 68: Maintenance Records
M A I N T E N A N C E R E C O R D S... - Page 69 By adding themselves to this list, the person that signs it confirms having been given a yearly introduction/instruction about the function and operation of the compressor unit.Furthermore, they have be informed about the relevant safety rules and regualtions (TRG, DGRL, BetrSichV, GSG, GSGV). LW 720 E Page A - 67 Version: 02.04.2020...
- Page 70 M A I N T E N A N C E R E C O R D S Top up oil, oil change Date Operating hours Oil quantity [l] Name LW 720 E Page A - 68 Version: 02.04.2020...
- Page 71 M A I N T E N A N C E R E C O R D S Cartridge change Date Operating hours Difference Name LW 720 E Page A - 69 Version: 02.04.2020...
- Page 72 M A I N T E N A N C E R E C O R D S Maintenance work Description Date, signature LW 720 E Page A - 70 Version: 02.04.2020...
- Page 73 M A I N T E N A N C E R E C O R D S Replaced Parts Designation Part number Date, signature LW 720 E Page A - 71 Version: 02.04.2020...
- Page 74 S T O R A G E...
- Page 75 Check safety valve relief pressure of final stage and/or pressure switch setting. • Check all connections and pipe work for leaks. Once all above steps are completed, compressor unit is now ready for use. LW 720 E Page A - 73 Version: 02.04.2020...
-
Page 76: Transportation Instructions / Disposal
The device can be returned to L&W. Please do not hesitate to contact us if you have any further questions on this issue. LW 720 E Page A - 74 Version: 02.04.2020... - Page 77 Operating Instructions ECC - Electronic compressor control Version: 11/12-E...
- Page 78 T A B L E O F C O N T E N T S General Information General Information ......................... 3 Description of Warning Symbols ....................... 3 Description Specifications / Options ........................4 Switchboard ............................. 5 Operation and Function Main Menu ............................6 Selection Menu (M100) ........................
-
Page 79: General Information
G E N E R A L I N F O R M A T I O N General Information We strongly recommend reading this manual thoroughly prior to operation and follow all the safety precautions precisely. Damage resulting from any deviation from these instructions is excluded from warranty and liability for this product. -
Page 80: Specifications / Options
D E S C R I P T I O N Specifications and Options All L&W compressors can be optionally equipped with the all-electrical computer supported control system "ECC". It is easy to operate and allows multiple and individual settings. Specifications •... -
Page 81: Switchboard
D E S C R I P T I O N Switchboard Description LCD Display Key Pad LED Display (Compressor OFF) LED Display (Power) LED Display (Compressor ON) Version: 271012-001 E ECC - Electronic compressor control Page B - 5... -
Page 82: Operation And Function
O P E R A T I O N A N D F U N C T I O N Main Menu Immediately after the compressor has been connected to power, the ECC-display shows the following Main Menu:: Charging 0 min Present filling time in minutes Total 0,0 h... -
Page 83: Selection Menu (M100)
O P E R A T I O N A N D F U N C T I O N Selection Menu (M100) After typing the * key in the Main Menu the following Selection Menu appears. Selection: Display Key 2 leads to submenu “Display” Settings Key 3 leads to submenu “Settings”... -
Page 84: Display Menu (M200)
O P E R A T I O N A N D F U N C T I O N Display Menu (M200) Pushing key 2 in the Selection Menu leads to Submenu “Display”. Display I: Press. Stage 1 Key 2 shows current pressure of the 1st stage* Press. -
Page 85: Display Ii (M270)
O P E R A T I O N A N D F U N C T I O N Display II (M270) Pushing key 7 in the Selection Menu leads to Menu “Display II”. Display II: Press. Temp. This display shows further customer specific pressure and temperature values. -
Page 86: Settings Menu (M300)
O P E R A T I O N A N D F U N C T I O N Settings Menu (M300) Pushing key 3 in the Selection Menu leads to the Settings Menu. Settings: Automatic Stop pressure Key 2 leads to submenu „Set Stop Pressure” Key 3 leads to submenu „Set Restart Pressure”... -
Page 87: Set Stop Pressure - Automatic Mode (M320)
O P E R A T I O N A N D F U N C T I O N Set Stop Pressure - automatic mode (M320) Only valid in automatic mode, see menu M700. Stop Pressure: Actual: 330 bar Current restart pressure New Value: Key 7 if restart pressure should be changed... -
Page 88: Test Menu (M400)
O P E R A T I O N A N D F U N C T I O N Test Menu (M400) Pushing key 4 in the Selection Menu leads to the Test Menu. Test: Solenoids Key 2 leads to submenu “Test Solenoids” Key 3 leads to submenu “Test Safety Valve”... -
Page 89: Test Safety Valve (M430)
O P E R A T I O N A N D F U N C T I O N Test safety valve (M430) Pushing key 3 in the Test Menu leads to Submenu “Test Safety Valve”. Note Prior to starting the Test, close all filling connections (also connected filling panels if necessary). -
Page 90: Statistics Menu (M500)
O P E R A T I O N A N D F U N C T I O N Statistics Menu (M500) Pushing key 5 in the Selection Menu leads to Submenu “Statistics”. Statistics Operation Hours: 0,0 h Total operation hours of compressor unit Start cycles: Total number of compressor starts Max Press... -
Page 91: Maintenance Menu (M600)
O P E R A T I O N A N D F U N C T I O N Maintenance Menu (M600) Pushing key 6 in the Selection Menu leads to the "Maintenance Menu". Hours remaining Oil change 14 h Shows remaining hours of listed components (i.e. -
Page 92: Confirm Maintenance (M680)
O P E R A T I O N A N D F U N C T I O N Confirm Maintenance (M680) Confirm Maintenance Key 2 receipts oil change Oil change Key 3 receipts change of sinter filters Sinter filters Silencer Key 4 receipts change of silencer Key 5 receipts change of valves... -
Page 93: Operation Mode (M700)
O P E R A T I O N A N D F U N C T I O N Operation Mode (M700) Pushing key 7 in the Selection Menu leads to the menu "Operation Mode". Activated modes are always displayed in bolt letters (above example: Semi-Automatic). Further settings can be made in the Settings Menu (M300). -
Page 94: Adjusting Display Backlight
O P E R A T I O N A N D F U N C T I O N Adjusting Display Backlight The brightness of the display can be adjusted with an adjusting screw on the back of the control. Software Update Software updates can only be carried out by L&W. -
Page 95: Spare Part Lists
S P A R E P A R T L I S T S Best.-Nr. / Order No. Benennung Description 002141 1. Stufe Druckaufnehmer 0-10 bar 1st stage pressure sensor 0-10 bar 002142 2. Stufe Druckaufnehmer 0-60 bar 2nd stage pressure sensor 0-60 bar 003888 3. -
Page 96: Manufacturer In Terms Of 97/23/Ec
L E N H A R D T & W A G N E R G M B H Manufacturer in terms of 97/23/EC The full name and address of the manufacturer is: Lenhardt & Wagner GmbH An der Tuchbleiche 39 68623 Hüttenfeld / Germany Phone: +49 (0) 62 56 - 85 88 0 - 0 Fax: +49 (0) 62 56 - 85 88 0 - 14... - Page 97 E R S A T Z T E I L L I S T E N / S PA R E PA R T S L I S T S D E TA I L A N S I C H T E N / D E TA I L E D V I E W S...
- Page 98 I n h a l t s v e r z e i c h n i s Kompressorblock - Compressor Block - Microsoft Publisher ............1 Kurbelwelle - Crankshaft - Microsoft Publisher ................5 Kolben 1. Stufe - Piston 1st Stage ....................7 Kolben 2.
- Page 99 Zylinderschraube M8x65mm DIN912 8.8 Allen Bolt M8x65mm DIN912 8.8 ZN 001091 Zylinderschraube M10x75mm DIN912 Hexagon Bolt M10x75mm DIN912 8.8 ZN 8.8 ZN 001101 Sechskantschraube M10x35mm DIN933 Hexagon Screw M10x35mm DIN933 8.8 8.8 ZN Version: 13.08.2020 LW 720 E C - 1...
- Page 100 Öleinfüllrohr, Edelstahl, Ø18 mm Oil filler tube, S/S, Ø18 mm 010766 Kurbelgehäuse LW 720, ab: 01.2019 Crankcase LW 720, since: 01.2019 010767 Lagerdeckel Kurbelgehäuse Bearing Cover Crankcase LW720 010773 Wellendichtringdeckel Shaft Seal Cover Version: 13.08.2020 LW 720 E C - 2...
- Page 101 O-Ring 128 x 2,0 - NBR70 010786 O-Ring 165 x 2,0 - NBR70 O-Ring 165 x 2,0 - NBR70 010840 Ölrohr für Wellendichtring - Kurbelwelle Oil Tube - Crankshaft 010994 Zylinderrollenlager NJ-306-C3 Cylindrical Roller Bearing NJ-306-C3 Version: 13.08.2020 LW 720 E C - 3...
- Page 102 D E T A I L A N S I C H T / D E T A I L E D V I E W Kompressorblock / Compressor Block Version: 13.08.2020 LW 720 E C - 4...
- Page 103 Sprengring für Aufnahme Wellendicht- Snap Ring ring 010842 Wellendichtring Ölversorgung Kurbel- Shaft Seal Oil Supply welle 010843 Kurbelwelle, mit Gegengewicht 003428 Crank shaf c/w counter balance 003428 010997 Anpressscheibe Kurbelwelle Thrust Washer Crankshaft Version: 30.03.2020 LW 720 E C - 5...
- Page 104 D E T A I L A N S I C H T / D E T A I L E D V I E W Kurbelwelle / Crankshaft Version: 30.03.2020 LW 720 E C - 6...
-
Page 105: Kolben 1. Stufe - Piston 1St Stage
Piston Ø115mm, LW 720 1st stage 003809 Kolben Ø115mm inkl. Kolbenringe, Kol- Piston Ø115mm c/w Rings & Piston Pin benbolzen 004604 Kolbenringe Ø115mm, Satz Set of Piston Rings Ø115mm 006655 Kolbenbolzen Piston Pin Version: 23.11.2018 LW 720 E C - 7... - Page 106 D E T A I L A N S I C H T / D E T A I L E D V I E W Kolben 1. Stufe / Piston 1st Stage Version: 23.11.2018 LW 720 E C - 8...
-
Page 107: Kolben 2. Stufe - Piston 2Nd Stage
Circlip I22 DIN472 003146 Kolben Ø55mm, ohne Kolbenringe Piston Ø55mm, w/o piston rings 003988 Kolbenbolzen für Kolben Ø55 mm Piston Pin, for piston Ø55mm 006159 Kolbenringe Ø55mm, unbeschichtet Set of Piston Rings Ø55mm, uncoated Version: 23.11.2018 LW 720 E C - 9... - Page 108 D E T A I L A N S I C H T / D E T A I L E D V I E W Kolben 2. Stufe / Piston 2nd Stage Version: 23.11.2018 LW 720 E C - 10...
- Page 109 Circlip, I 22 DIN472 002374 Kompressionskolben Ø25mm, Stahl Piston Ø25mm, steel 002682 Führungskolben 3.+4. Stufe Guide Piston 3rd + 4th Stage 002683 Kolbenbolzen Ø22x62mm Piston Pin Ø22x62mm 005766 Haltesegment Saug- / Führungskolben Clamp Guide Piston Version: 13.08.2020 LW 720 E C - 11...
- Page 110 D E T A I L A N S I C H T / D E T A I L E D V I E W Kolben 3. Stufe / Piston 3rd Stage Version: 13.08.2020 LW 720 E C - 12...
- Page 111 Kompressionskolben, Ø14mm, Stahlau- Piston, 3rd Stage, Ø14mm, steel version sführung 002682 Führungskolben 3.+4. Stufe Guide Piston 3rd + 4th Stage 002683 Kolbenbolzen Ø22x62mm Piston Pin Ø22x62mm 005766 Haltesegment Führungskolben Clamp Guide Piston Version: 13.08.2020 LW 720 E C - 13...
- Page 112 D E T A I L A N S I C H T / D E T A I L E D V I E W Kolben 4. Stufe / Piston 4th Stage Version: 13.08.2020 LW 720 E C - 14...
- Page 113 000369 Saug-Druckventil Ø122mm In-&Outlet Valve Ø122mm 000370 Saug-Druckventil inkl. Dichtungen Upper Alloy including gaskets 000549 Saug-Druckventil , komplett In- & Outlet Valve, complete 000550 Saug-Druckventil , komplett In- & Outlet Valve, complete Version: 23.11.2018 LW 720 E C - 15...
- Page 114 E R S A T Z T E I L L I S T E / S P A R E P A R T L I S T Saug– und Druckventil 1. - 4. Stufe / In– and Outlet Valve 1st - 4th Stage Version: 23.11.2018 LW 720 E C - 16...
- Page 115 Halteblech Ölverteilerblock Edelstahl Bracket Oil Distributor Block s/s 011088 Öldruckleitung Ø8 LW 720 E Oil Pipe LW 720 E 011089 Ölleitung Kurbelwelle Ø8 LW 720 E Oil Pipe crankshaft LW 720 E Version: 30.03.2020 LW 720 E C - 17...
- Page 116 D E T A I L A N S I C H T / D E T A I L E D V I E W Ölverteilerblock / Oil Manifold Block Version: 30.03.2020 LW 720 E C - 18...
- Page 117 Oil drain hose c/w ball valve 006417 Ölablassschlauch Oil drain hose 008655 Linsenflanschschraube mit Innensechs- Lens Head Screw M6x12 mm, DIN 7380F, kant M6x12 mm, DIN 7380F, 10.9 10.9 009772 Halter Öl-Ablassschlauch Holder Oil drain hose Version: 23.11.2018 LW 720 E C - 19...
- Page 118 D E T A I L A N S I C H T / D E T A I L E D V I E W Baugruppe: Ölablassschlauch / Assembly: Oil Drainage Tube Version: 23.11.2018 LW 720 E C - 20...
- Page 119 Sintered Filter, Water Separator Base 003347 Unterer Ring, Wasserabscheider Base Ring, water separator 003348 Verschraubung Connection 005229 Manometer, 0-1 MPa, Ø 63mm Pressure Gauge, 0-1 MPa, Ø 63mm 007134 Wasserabscheider - Oberteil Top Cap Water Separator Version: 13.08.2020 LW 720 E C - 21...
- Page 120 D E T A I L A N S I C H T / D E T A I L E D V I E W Wasserabscheider 1. Stufe / Water Separator 1st Stage Version: 13.08.2020 LW 720 E C - 22...
- Page 121 Sintered Filter, Water Separator Base 003347 Unterer Ring, Wasserabscheider Base Ring, water separator 003348 Filterverschraubung Connection 005228 Manometer, 0-4 MPa, Ø 63mm Pressure Gauge, 0-4 MPa, Ø 63mm 007134 Wasserabscheider - Oberteil Top Cap Water Separator Version: 30.03.2020 LW 720 E C - 23...
- Page 122 D E T A I L A N S I C H T / D E T A I L E D V I E W Wasserabscheider 2. Stufe / Water Separator 2nd Stage Version: 30.03.2020 LW 720 E C - 24...
- Page 123 Sintered Filter, Water Separator Base 003347 Unterer Ring, Wasserabscheider Base Ring, water separator 003348 Filterverschraubung Connection 005229 Manometer, 0-10 MPa, Ø 63mm Pressure Gauge, 0-10 MPa, Ø 63mm 007134 Wasserabscheider - Oberteil Top Cap Water Separator Version: 13.08.2020 LW 720 E C - 25...
- Page 124 D E T A I L A N S I C H T / D E T A I L E D V I E W Wasserabscheider 3. Stufe / Water Separator 3rd Stage Version: 13.08.2020 LW 720 E C - 26...
-
Page 125: Filter 0,8L - Filter 0.8Ltr
U-Clamp Filterhousing 0.8 ltr 006364 Halteschalen Filtergehäuse 0,8 l Bracket Filter Housing 0.8 ltr 006374 Blechhalter Filterbehälter 0,8l Bracket Filter Case 0.8l 007447 Sicherheitsventil 280 bar, mit CE Safety Valve TÜV 280 bar, c/w CE Version: 23.11.2018 LW 720 E C - 27... - Page 126 D E T A I L A N S I C H T / D E T A I L E D V I E W Filter 0,8l / Filter 0.8ltr Version: 23.11.2018 LW 720 E C - 28...
-
Page 127: Filtergehäuse 2,3 L - Filter Housing 2.3 Ltr
Filterschlüssel 1,7 & 2,3 Liter Behälter Filter tool 1,7 & 2,3 Litre 002147 Haltebügel für Filtergehäuse (ES) U-Clamp for filter housing ES 002426 Filtergehäuse, kompl. Filter housing 003077 Entwässerungsventil G1/4" AG, konisch Drain Valve G1/4" male Version: 23.11.2018 LW 720 E C - 29... - Page 128 D E T A I L A N S I C H T / D E T A I L E D V I E W Filtergehäuse 2,3 l / Filter Housing 2.3 ltr Version: 23.11.2018 LW 720 E C - 30...
- Page 129 Pneum. Condensate Valve LW720, com- plette Baueinheit plete 010944 Reparatursatz pneum. Kondensatventil Repair Kit pneumatic condensate valve 010946 Düsenschraube mit O-Ring, pneum. Inlet Jet Screw c/w o-ring, pneumatic con- Kondensatventil densate valve Version: 23.11.2018 LW 720 E C - 31...
- Page 130 D E T A I L A N S I C H T / D E T A I L E D V I E W Pneum. Kondensat-Ablassventil / Pneumatic Condensate Valve Version: 23.11.2018 LW 720 E C - 32...
-
Page 131: Druckhalteventil - Pressure Maintaining Valve
Plastic Seal Piston PMV, black til, schwarz 000520 Hohlschraube, DHRV Inlet Jet PMV 000765 Schneidring PSR 08 LX Olive Seal PSR 08 LX 000767 Mutter 08 S Union Nut 08 S 001023 Zylinderschraube Allen Bolt Version: 23.11.2018 LW 720 E C - 33... - Page 132 D E T A I L A N S I C H T / D E T A I L E D V I E W Druckhalteventil / Pressure Maintaining Valve Reparatursatz 003548: Bestehend aus: Gelbmarkierte Bestellnummern Repair kit 003548: Consists of: Yellow marked P/N´s 000514 000516 000517 000519 000508 000520 Version: 23.11.2018 LW 720 E C - 34...
-
Page 133: Kondensatabscheider Endstufe - Condensate Separator Final Stage
O-Ring 68x3 001431 Klemmring Wasserabscheider Lock Ring Water Separator 002466 Kondensatbehälter für Abscheider Condensate Bowl Separator 002563 Wasserabscheider Oberteil PN 15 bar Water Separator, upper comp. PN15 bar 005856 Winkeleinschraubverschraubung Elbow Hose Connection Version: 23.11.2018 LW 720 E C - 35... - Page 134 D E T A I L A N S I C H T / D E T A I L E D V I E W Kondensatabscheider Endstufe / Condensate Separator Final Stage Version: 23.11.2018 LW 720 E C - 36...
-
Page 135: Ölabscheider - Oil Separator
Water Separator, upper comp. PN15 bar 003708 Behälter Oelabscheider PN 15, G 1/4" IG Container Oil Separ. PN 15 bar, G 1/4" IG inkl. Verschraubung 000783 incl. Connection 000783 004638 Halter Ölabscheider Bracket oil separator Version: 23.11.2018 LW 720 E C - 37... - Page 136 D E T A I L A N S I C H T / D E T A I L E D V I E W Ölabscheider / Oil Separator Version: 23.11.2018 LW 720 E C - 38...
-
Page 137: Magnetventil 1. & 2. Stufe / Solenoid Valve 1St & 2Nd Stage
10L R ED 001546 Aludichtring für Magnetventile, Alloy Seal Ring for solenoid, 18 x 13,2 x 2,5mm 18 x 13,2 x 2,5mm 003573 Wellenscheibe, Magnetventil Shaft washer, solenoid valve 004002 Magnetventil Solenoid Valve Version: 23.11.2018 LW 720 E C - 39... -
Page 138: Magnetventil 3.+4. Stufe - Solenoid Valve 3Rd + 4Th Stage
18 x 13,2 x 2,5mm 003573 Wellenscheibe, Magnetventil Shaft washer, solenoid valve 004002 Magnetventil 40/80 bar, NC 2x 1/4", Solenoid Valve 40/80 bar, NC 1.2 G1/4" , Gehäuse: Messing, ohne Spule housing: brass, w/o coil Version: 23.11.2018 LW 720 E C - 40... -
Page 139: Motor - Motor
Flywheel LW 720 Atex 004465 Lüfterrad Fan Wheel 005153 Riemenscheibe SPA 212-3 Pulley SPA 212-3 005687 Antriebsmotor 18,5 kW E-Motor 18,5 kW 006097 Sechskantschraube M6x35mm - Hexagon Bolt M6x35mm - DIN933, ZN DIN933, ZN Version: 23.11.2018 LW 720 E C - 41... - Page 140 D E T A I L A N S I C H T / D E T A I L E D V I E W Motor / Motor Version: 23.11.2018 LW 720 E C - 42...
- Page 141 A T T A C H M E N T Version: 11/12-E...
- Page 142 OPERATING INSTRUCTION FOR SAFETY VALVE Lenhardt & Wagner GmbH An der Tuchbleiche 39 D-68623 Lampertheim – Hüttenfeld www.lw-compressors.com Operating Instruction Safety valve Typ: SiV2 BKZ 989 TÜV.SV.12-989.5.G.V.P CE 0091 AlMgSi1 F31 1100* Lenhardt & Wagner SiV BKZ TÜV.SV.14-1140.5.G.V.p CE 0091 AlMgSi1 F31 1100* Lenhardt & Wagner Set pressure: see mark (hand wheel on top of valve) Maximum outflow:...
- Page 143 OPERATING INSTRUCTION FOR SAFETY VALVE In order to prevent manipulation of the set pressure, all safety valves are factory fitted with a seal. A safety valve on which the seal has been removed, must be returned to the manufacturer for repair / adjustment before further use.
- Page 144 OPERATING INSTRUCTION FOR SAFETY VALVE Manufacturer: Lenhardt & Wagner GmbH An der Tuchbleiche 39 D-68623 Lampertheim – Hüttenfeld Contact: E-Mail: service@lw-compressors.com Web: www.lw-compressors.com Tel.: +49 (0) 6256 – 85880 0 Fax: +49 (0) 6256 – 85880 14 Note: Only use safety valves which are in a technically perfect condition, for its intended purpose, safety and danger awareness, in compliance with the operating instructions! Faults which could affect safety must be rectified immediately! Notes:...
- Page 145 INFORMATION ON THE SERVICE LIFE OF L&W HIGH PRESSURE HOSES...
- Page 146 CONTENTS Testing hose lines Testing hose lines ............................3 Testing after assembly and before commissioning ................3 Recurring test ............................... 4 Procedure for hose lines found to be "defective" ................. 4 Test intervals ..............................4 Persons qualified to test hose lines ......................5 Maintenance Replacing hose lines ...........................
-
Page 147: Testing Hose Lines
TESTING HOSE LINES Testing hose lines An essential factor in ensuring operational safety when handling L&W compressors is the proper testing of the hose lines used. Tests are necessary: After assembly and before commissioning the hose line. After accidents, changes (modifications) to the compressor system, longer periods of non- ... -
Page 148: Recurring Test
TESTING HOSE LINES Recurring test Since hose lines are subject to influences that cause damage during operation and can lead to dangerous situations, they must be tested recurrently at fixed intervals. The aim of recurring tests is to detect and repair damage in good time. The objective is to ensure that the system remains in a safe condition. -
Page 149: Persons Qualified To Test Hose Lines
TESTING HOSE LINES Persons qualified to test hose lines A qualified person is a person who, through his or her professional training, professional experience and recent professional activity, has the necessary specialist knowledge required for testing work equipment - in this case for testing hose lines. These requirements are defined in the Technical Rules for Industrial Safety TRBS 1203 "Qualified persons - general requirements"... -
Page 150: Replacing Hose Lines
MAINTENAN Replacing hose lines As a general rule, even when stored properly and subjected to permissible stress during use, all hose lines are subject to natural aging, which changes the material and composite properties and reduces the performance of the hose lines. This limits the service life of a hose line and the operator must ensure that hose lines are replaced at appropriate intervals. -
Page 151: Service Life
SERVICE LIFE Service life of L&W high pressure hoses When determining the service life or the replacement interval of the individual hose lines, the concrete specifications and recommendations of the hose line or machine manufacturer must be observed. Furthermore, empirical values resulting from previous tests done under the prevailing operating conditions on site are also relevant. -
Page 152: Storage
STORAGE Storing hose lines When storing hose lines, storage conditions must be aimed at minimizing the natural aging that occurs over time and the associated change in material and composite properties. For this purpose, the following information must be provided: ... - Page 153 ANNEX...
- Page 154 ANNEX SCOPE OF TESTING; TEST CRITERIA Recommended scope of testing "visual inspection" (before initial commissioning or recommissioning) Is all user information required for safe operation of the system available (e.g. flow chart, operating instructions)? Do the hose lines comply with the flow chart or parts list? ...
- Page 155 ANNEX SCOPE OF TESTING; TEST CRITERIA Recommended scope of testing "Functional test" (before initial or recommissioning) Note: Visual inspection must be carried out before the functional test All parts of the system must be tested at least at the maximum working pressure that could be achieved taking into account all intended applications:...
Need help?
Do you have a question about the LW 720 E and is the answer not in the manual?
Questions and answers