Table of Contents
Advertisement
Quick Links
Advertisement
Table of Contents

Related Manuals for Jasic L20701


Summary of Contents for Jasic L20701
- Page 1 INVERTER CUTTER OPERATOR’S MANUAL MODEL: CUT40(L20701) /CU 0(L208)
- Page 3 FORWARD Thank you for JASIC inverter cutter. In order to ensure your safety and correct operation, please read this manual carefully before operation. Keep this manual properly for future references. This product is designed and manufactured according to relevant national...
- Page 4 SAFETY Precautions for installation Beware of electric shock! Install grounding device according to application standard. Do not touch live parts with naked skin, wet gloves or wet clothes. Be sure you are insulated from ground and workpiece. Cover the cover plate of the machine before power on to avoid an electric shock.
- Page 5 When trouble strikes in installation and operation, please inspect according to related contents in this manual. If you still cannot understand fully, or you still cannot solve the problem, please contact the dealer or the service center of JASIC to obtain professional support. Precautions for discard...
-
Page 6: Table Of Contents
3. OPERATION ............. . 9 3.1 Panel functions of L20701 . -
Page 7: General Description
Code for rated output current Inverter air plasma cutter Figure 1 1: Model coding 1.2 Technical parameters Table 1 1: General technical parameters Models Items CUT40(L20701) CUT30(L208) Single phase Single phase Rated input power supply AC115V/230V AC240V 50/60Hz 50/60Hz Rated input capacity KVA 6. -
Page 8: Size And Weight
1.3 Size and weight Table 1-2: Overall size and weight of the machine CUT40(L20701) CUT 0( Model L208 Overall size (L*W*H) 415*155*315 460*160*320 Weight Kg 10.3 11.6 Figure 1-2: Appearance and size of the machine Unit: mm... -
Page 9: Composition And Configuration Of The Cutting Machine System
Cutting machine CUT30 Cutting torch Standard configuration 300A-6mm ² -KDP16D-3m Earth clamp Standard configuration Operator’s manual Standard configuration CUT series Table 1-3: Configuration of CUT40(L20701) Specification Quantity pcs Name Material code Remark Standard configuration Cutting machine CUT40(L20701) Cutting torch PT-31 Standard configuration 300A-6mm ²... -
Page 10: Functions And Characteristics Of The Cutting Machine
1.5 Functions and characteristics of the cutting machine CUT series are inverter cutting machines made by our company with advanced inverter technology. They are more mature products with stable performance. With PWM technology and high power component IGBT, it inverts the DC voltage, which is rectified from 50Hz/60Hz input AC voltage, to 30K~100KHz AC high voltage. -
Page 11: System Characteristics
Q(%) ① CUT30(L208) ② CUT40(L20701) CUT100 ( L201) ③ ③ ② ①... -
Page 12: Installation And Connection
2. INSTALLATION AND CONNECTION 2.1 Installation requirements 1) Connection of input cable In order to ensure personal safety and avoid electric shock, please ground the machine reliably by connecting the ground wire of the machine to the grounding device in the switching box. -
Page 13: Precautions
3) Installation and operation of the reducer valve Pressure control knob Connecting frame Pressure gauge reducer valve Gas hose Drain knob Figure 2-1: Installation of the reducer valve Steps for reducer setting are as follows: start the gas flow; lift the pressure control knob upward; adjust the gas pressure to the desired value by rotating the knob (rotate to “+”... - Page 14 Overcurrent/overvoltage/overheating protection circuit is installed in this machine. When the mains voltage, output current or inner temperature exceeds the set standard, the machine will stop automatically. However, excessive use (e.g. too high voltage) of machine may also damage the machine, so please note: This cutting machine can create powerful cutting current and has strict cooling requirements that cannot be met with natural ventilation.
-
Page 15: Operation
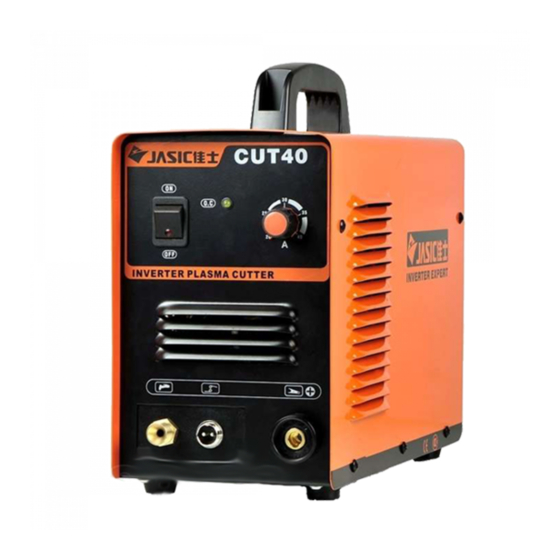
Overcurrent in To indicate the machine is under ov -dicator -ercurrent protection status when it illuminates. Figure 3-1: Front panel of L20701 Part name Function Power switch To control the ON/OFF of the input power of the machine. Cable For power supply input. -
Page 16: Panel Functions Of L208
3.2 Panel functions of L208 Part name Function The power ight To indicate the machine work properly. As the exit for air duct, for ventilation and Plastic shutter heat dissipation. plasma torch To connect the cutting torch connection “+” output To connect the earth clamp. -
Page 17: Operation Method
3.3 Operation method 1) Turn on the power switch of the machine, and the power indicator illuminates. 2) Select proper working mode and proper function. There are two working modes available on the machine panel: 2T and 4T. There are two functions available: normal cutting and metal mesh cutting. -
Page 18: Cutting Parameters Table
The workpiece is not cut fully. This may be caused by: The cutting current is too low. The cutting speed is too high. The electrode and nozzle of the torch are burned. The workpiece is too thick. Molten slag drops from the bottom of workpiece. This may be caused by: The cutting speed is too low. -
Page 19: Replacement Of Electrode And Nozzle
3.6 Replacement of electrode and nozzle When the phenomena below occur, the electrode and nozzle should be replaced. Otherwise, there will be strong arc in the nozzle, which will break down the electrode and the nozzle, or even burn the torch. Nozzles of different models are different, so ensure the nozzle is of the same model when replacing it. -
Page 20: Maintenance
2) Do daily checking according to the table below, and clean or replace components when necessary. 3) In order to ensure the high performance of the machine, please choose components provided or recommended by Shenzhen Jasic Technology Co., Ltd. when replacing components. Table 4-1: Daily checking of the cutting machine... - Page 21 4.2 Periodic check WARNING Periodic check should be carried out by qualified professionals to ensure safety. Thepower of the switching box and the cutting machine should be shut down before periodic check to avoid personal injury accidents such as electric shock and burns.
-
Page 22: Troubleshooting
5. TROUBLESHOOTING The abnormity indicator on the front panel would illuminate in case of any failures inside the cutting machine. Cause and Solution Malfunction Phenomena Turn on the machine, the power Overvoltage protection occurs: Shut down the machine, indicator illuminates, the fan does and restart it after a few minutes. - Page 24 SHENZHEN JASIC TECHNOLOGY CO., LTD. No. 3, Qinglan 1st Road, Pingshan District, Shenzhen, Guangdong, China www.jasictech.com...
Need help?
Do you have a question about the L20701 and is the answer not in the manual?
Questions and answers