Advertisement
Quick Links
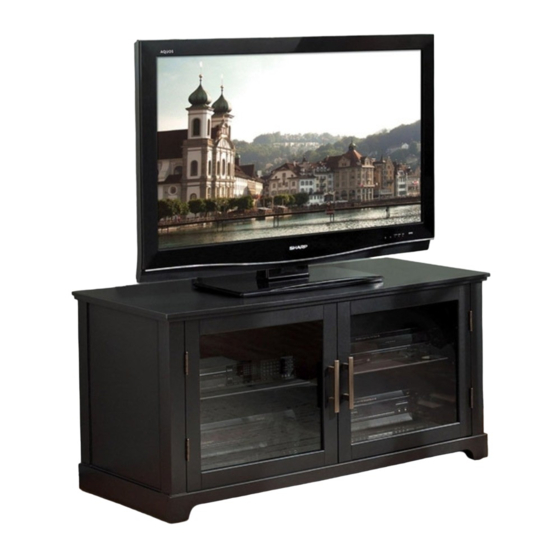
WAVS321
WOOD AUDIO VIDEO CABINET
ARMOIRE AUDIO-VIDÉO EN BOIS
MESA DE MADERA PARA AUDIO Y VIDEO
ASSEMBLY INSTRUCTIONS
INSTRUCTIONS D'ASSEMBLAGE
INSTRUCCIONES DE ENSAMBLAJE
A SMALL AMOUNT OF PANEL FLEX IS COMMON IN WOOD PRODUCTS.
UN PETIT DEGRÉ DE FLÉCHISSEMENT DES PANNEAUX EST COURANT DANS LES PRODUITS EN BOIS.
ES NORMAL QUE LOS PRODUCTOS DE MADERA SE DOBLEN UN POCO.
Patent pending / Brevet en instance / Patent pendiente
Made in China / Fabriqué en Chine / Hecho en China
Italian designed / De design italien / De diseño italiano
SH-3_071309v1T
Do not discard these instructions / Ne pas jeter ces instructions / Conserve estas instrucciones
Advertisement

Related Manuals for Bell'O WAVS321


Summary of Contents for Bell'O WAVS321
- Page 1 WAVS321 WOOD AUDIO VIDEO CABINET ARMOIRE AUDIO-VIDÉO EN BOIS MESA DE MADERA PARA AUDIO Y VIDEO ASSEMBLY INSTRUCTIONS INSTRUCTIONS D’ASSEMBLAGE INSTRUCCIONES DE ENSAMBLAJE A SMALL AMOUNT OF PANEL FLEX IS COMMON IN WOOD PRODUCTS. UN PETIT DEGRÉ DE FLÉCHISSEMENT DES PANNEAUX EST COURANT DANS LES PRODUITS EN BOIS.
- Page 2 ! NE PAS GRIMPER NI MARCHER SUR LE MEUBLE. ! NE PAS TAPER NI S’APPUYER SUR LES PLATEAUX. Bell'O International Corps décline toute responsabilité en cas d'assemblage non conforme aux instructions ou pour l'assemblage, l'utilisation ou la manutention incorrects de ce meuble.
- Page 3 PARTS LIST / NOMENCLATURE DES PIÈCES / LISTA DE PIEZAS Quantity Quantity Part / Pièce / Pieza Part / Pièce / Pieza Quantité Quantité Cantidad Cantidad...
- Page 4 ASSEMBLY INSTRUCTIONS INSTRUCTIONS D’ASSEMBLAGE INSTRUCCIONES DE ENSAMBLAJE NOTE: 2 PEOPLE ARE RECOMMENDED TO ASSEMBLE THIS FURNITURE. TO AVOID DAMAGE DURING ASSEMBLY, IT SHOULD BE ASSEMBLED ON A SOFT SURFACE. REMARQUE : IL EST CONSEILLÉ D’ÊTRE À DEUX POUR ASSEMBLER CE MEUBLE. POUR ÉVITER LES DOMMAGES, EFFECTUER L'ASSEMBLAGE SUR UNE SURFACE DOUCE.
- Page 5 Fig. 2 LEVELING FOOT. TURN TO ADJUST. PIED DE NIVEAU. TOURNEZ POUR AJUSTE. PIE NIVELADORE. GIRE PARA AJUSTAR. 2. SCREW the Center Leg (7) tightly into the center of the underside of the Cabinet Bottom Panel (4). 3. INSERT four Dowels (9) into each hole in the sides of the Cabinet Bottom Panel (4). 4.
- Page 6 Fig. 3 6. TURN the cabinet upright with the help of an assistant. INSERT two Dowels (9) into the holes in the bottom edge of the Vertical Panel (3) and ATTACH the Bottom Vertical Panel into the Cabinet Bottom Panel (4) as shown. TOURNER le meuble à...
- Page 7 Fig. 4 7. PLACE eight Dowels (9) into the holes in the top edges of the Back and Side Panels (1) and Vertical Panel (3) as shown. ALIGN the Cabinet Top (2) with the Dowels and press Cabinet Top down firmly to attach. 8.
- Page 8 Fig. 5 9. TILT the cabinet on its back with the help of an assistant. PLACE eight Dowels (9) into the predrilled holes in the front edges of the cabinet as shown. 10. ALIGN the Cabinet Front (5) with the Dowels and press Cabinet Front forward firmly to attach. 11.
- Page 9 Fig. 6 12. TURN the cabinet upright with the help of an assistant. SCREW eight Shelf Support Posts (8) into the prethreaded holes in the inside of the cabinet at the desired height. ANGLE the Shelves (6) and CAREFULLY PLACE them into the cabinet and down onto the Shelf Support Posts.
- Page 10 This warranty gives you specific legal rights. You may also have other rights, which vary from state to state. BELL'O INTERNATIONAL CORPORATION, 711 Ginesi Drive, Morganville, NJ 07751-1235 Phone: (732) 972-1333 Fax: (732) 536-6482 Web: www.bello.com E-mail: sales@bello.com...
- Page 11 Garantie limitée un (1) an Ce produit Bell'O International Corporation est garanti, à l’exception du verre, à l’acheteur initial au moment de l’achat et pour une durée d’un (1) an à compter de cette date. Le verre est garanti à l’acheteur initial au moment de l’achat et pour une durée de trente (30) jours à...
- Page 12 Nuestra garantía está expresamente limitada a la reposición de piezas y componentes del soporte para TV. Durante un (1) año a partir de la fecha de la compra, Bell'O International Corporation repondrá cualquier pieza defectuosa en material o fabricación de las que están enumeradas en la lista de piezas adjunta.
Need help?
Do you have a question about the WAVS321 and is the answer not in the manual?
Questions and answers