Table of Contents
Advertisement
Quick Links
User Manual
Lobby Camera Phone DRC-701LC/RF1
• Thank you for purchasing COMMAX products.
• Thank you for purchasing COMMAX products.
• Thank you for purchasing COMMAX products.
• Please carefully read this User's Guide (in particular, precautions for safety) before using a product and follow
• Please carefully read this User's Guide (in particular, precautions for safety) before using a product and follow
• Please carefully read this User's Guide (in particular, precautions for safety) before using a product and follow
instructions to use a product exactly.
instructions to use a product exactly.
instructions to use a product exactly.
• The company is not responsible for any safety accidents caused by abnormal operation of the product.
• The company is not responsible for any safety accidents caused by abnormal operation of the product.
• The company is not responsible for any safety accidents caused by abnormal operation of the product.
56
Advertisement
Table of Contents

Related Manuals for Commax DRC-701LC/RF1


Summary of Contents for Commax DRC-701LC/RF1
- Page 1 User Manual Lobby Camera Phone DRC-701LC/RF1 • Thank you for purchasing COMMAX products. • Thank you for purchasing COMMAX products. • Thank you for purchasing COMMAX products. • Please carefully read this User’s Guide (in particular, precautions for safety) before using a product and follow •...
-
Page 2: Table Of Contents
7. Retrieving Unit Password ..........................13 8. Building number and Lobby Phone Number Registration at Public Entrances..........14 9. Using RF Card Keys (Product Model : DRC-701LC/RF1) ................16 10. Surveillance Monitor Setting ........................22 11. Setting the Entrance Access Log Forwarding Function(to SecuMAX) ............23 12. -
Page 3: Safety Warning & Caution
2. Safety Warning & Caution Please follow the things described below in order to prevent any danger or property damage. Prohibition. Warning It may cause a serious damage or No disassembly injury if violated. No touch Must follow strictly. Caution Shows plugging out the power cord It may cause a minor damage or without an exception... - Page 4 Warning Please don’ t disassemble, If an abnormal sound, burning Please don’t insert any Please use only the designated repair or rebuild this product smell or smoke is coming out metallic or burnable materials batteries for the products of of the product, please plug out arbitrarily (please contact the into the ventilation hole.
-
Page 5: Before Use
3. Before Use ✽ Wiring Lobby phone and Security Station Phone : 1. For 481 System (Coaxial Cable) : Common 8 wires that are 3 channels + 1 channel with "Balance Type". 2. For Gateview System (UTP Cable) : Common 4 wires with 1 channel. ✽... -
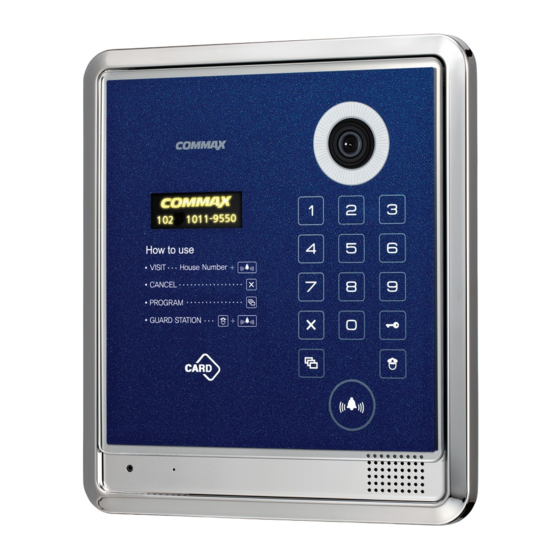
Page 6: Part Names And Features
4. Part names and Features 4-1. Part names Number Content Number Content Call Button Camera - c alling households and also used for program setting Program Button OLED Display - used for program mode settings Canc el Button RF- ID Card Rec eiver - to c anc el a proc ess or func tion being progressed Mic rophone... - Page 7 4-2. Essentials ✽ Initial LCD Display (when power on) ✽ RF/ID Receiver ③(Optional) For an access by RF Card, when RF Card is brought nearby the OLED display shows a message, "Access granted", with an icon and the door is open. ✽...
- Page 8 ✽ Electronic Key Button ⑦(K : Key) For an access to the entrance by password. (Only if the access by password is set to be enabled) ✽ Security Paging Button ⑨(G : Guard) To call a security station when an interphone is installed at the security center. ✽...
- Page 9 <Reference> Below information will be displayed. 1) Welcome! COMMAX Lobbyphone DRC-701LC Ver x.x. (Greetings) 2) Lobby Number: XXXX-XXXX ex) 0101-0901 3) Unit paging: x wire method ex) 4 wire method 4) Camera Impedance: low or high 5) Entrance Access Information is being stored at SecuMAX.
-
Page 10: Various Password Types
5. Various Password Types 5-1. Password for the Management Office ("Management Password") A password for the Manager Factory default for the Manager Password is 4321. 5-2. Password for any buildings ("Building Password") A common password for a corresponding building. Factory default for the Building Password is 1234. 5-3. -
Page 11: Password Settings
6. Password Settings 6-1. Setting up Management Password "P" - Previous Management Password - "E" - 0 (number zero) - "E" - New Management Password - "E" Management Password must be set to 4 digits. "0000", "1234", "4321" shall not be used. ①... - Page 12 6-2. Setting up Building Password "P" - Management Password - "E" - 1(number one) - "E" - New Building Password - "E" Building Password must be set to 4 digits. "0000", "1234", "4321" shall not be used. ① Press "P" button. ②...
- Page 13 6-3. Setting up Household Unit Password "K" - 20 - "E" - Household Unit Number - "E" - Previous Unit Password - "E" - New Unit Password - "E" Unit Password must be set to 4 digits. "0000", "1234", "4321" shall not be used. Unit Password may not be changed depending on the monitors installed (In case that the password change is enabled at the monitor) ①...
-
Page 14: Retrieving Unit Password
7. Retrieving Unit Password 7-1. Method to identify Unit Password "P" - Management Password - "E" - 16 (number sixteen) - "E" - Household Unit Number - "E" ① Press Program Button "P". ② Enter Management Password. ③ Press Call Button "E". ④... -
Page 15: Building Number And Lobby Phone Number Registration At Public Entrances
8. Building number and Lobby Phone Number Registration at Public Entrances This function is essential to automatically set a building number and a lobby phone number at the public entrance when calling a household unit and/or a security station. Up to 99 lobby phones can be installed at public entrances. 8-1. - Page 16 8-2. Registration of lobby phone number at the public entrance "P" - Management Password - "E" - 3(number three) - "E" - Lobby Phone Number - "E" ① Press Program Button "P". ② Enter Management Password. ③ Press Call Button "E". ④...
-
Page 17: Using Rf Card Keys (Product Model : Drc-701Lc/Rf1)
9. Using RF Card Keys (Product Model : DRC-701LC/RF1) 9-1. Test method for RF Card Key "P" - Management Password - "E" - 9 (number nine) - E" - Place the card key nearby the RF Receiver for testing - "X"(Cancel) This function is to test the functionality of RF Card and to check the registration status of the RF Card. - Page 18 9-2. RF Card Registration "P" - Management Password - "E" - 10 (number ten) - "E" - Place the card key nearby the RF Receiver for registration - "X"(Cancel) <References> Registration is complete." : Newly Registered Card (number of registered card increases) "...
- Page 19 9-3. Deleting an individual RF Card Key "P" - Management Password - "E" - 12 (number twelve) - "E" - Place the card key nearby the RF Receiver for deletion - "X"(Cancel) ① Press Program Button "P". ② Enter Management Password. ③...
- Page 20 9-4. Checking RF Card registration status "P" - Management Password - "E" - 13 (number thirteen) - "E" - Place the card key nearby the RF Receiver to check registration status - "X"(Cancel) ① Press Program Button "P". ② Enter Management Password. ③...
- Page 21 9-5. Initializing All RF Card Key registrations "P" - Management Password - "E" - 11 (number eleven) - "E" - "E" When initializing is performed all of the registered RF Card Keys will be deleted. Please be cautious to perform this function. ①...
- Page 22 9-6. Changing RF Card Key registration limit "P" - Management Password - "E" - 19 (number nineteen) - "E" - 0 (number zero) - "E" : up to 2,048 RF Cards can be registered. "P" - Management Password - "E" - 19 (number nineteen)- "E" - 1 (number one) - "E" : use this setting when SecuMAX is integrated (RF Card Key registration is unlimited).
-
Page 23: Surveillance Monitor Setting
10. Surveillance Monitor Setting "P" - Management Password - "E" - 4 (number four) - "E" - 0 (number zero)- "E" : Surveillance mode disabled. "P" - Management Password - "E" - 4 (number four) - "E" - 1 (number one) - "E" : urveillance mode enabled. -
Page 24: Setting The Entrance Access Log Forwarding Function(To Secumax)
11. Setting the Entrance Access Log Forwarding Function(to SecuMAX) "P" - Management Password - "E" - 22 (number twenty-two) - "E" - 0 (number zero) - "E" : Log forwarding to SecuMAX disabled. "P" - Management Password - "E" - 22 (number twenty-two)- "E" - 1 (number one) - "E" :Log forwarding to SecuMAX enabled. -
Page 25: Setting The Voice Message Of Unit Number
12. Setting the Voice Message of Unit Number "P" - Management Password - "E" - 17 (number seventeen) - "E" - 0 (number zero) - "E" : Voice Confirmation of Unit Number enabled. "P" - Management Password - "E" - 17 (number seventeen) - "E" - 1 (number one) - "E" : Voice Confirmation of Unit Number disabled. - Page 26 13. Setting the Door Release Duration "P" - Management Password - "E" - 5 (number five) - "E" - Door Release Duration - "E" This function adjusts the duration of door release. ① Press Program Button "P". ② Enter Management Password. ③...
-
Page 27: Setting The Call By Unit Line
14. Setting the Call by Unit Line. "P" - Management Password - "E" - 21 (number twenty-one) - "E" - 0 (number zero) - "E" : Calling all units enabled (not a simultaneous call). "P" - Management Password - "E" - 21 (number twenty-one) - "E" - Unit Line - "E" : Calling only the registered unit line enabled. -
Page 28: Setting The Automatic Security Call Or Emergency Call Option
15. Setting the Automatic Security Call or Emergency Call Option. "P" - Management Password - "E" - 27 (number twenty-seven) - "E" - 0 (number zero) - "E" : Automatic Security Call in case that RF Card Key recognition failure or Password failure for more than 3 times. -
Page 29: Selecting Call Ring Option
16. Selecting Call Ring Option "P" - Management Password - "E" - 7 (number seven)- "E" - 0 (number zero) - "E" : MELODY selected "P" - Management Password - "E" - 7 (number seven)- "E" - 1 (number one) - "E" : Phone ring selected This function sets the call ring when a call is made at the public entrance. -
Page 30: Setting The Number Of Call Ring Repetitions
17. Setting the Number of Call Ring Repetitions "P" - Management Password - "E" - 25 (number twenty-five) - "E" - 0 (number zero) - "E" : Continuous call ring enabled until connected. "P" - Management Password - "E" - 25 (number twenty-five) - "E" - 1 (number one) -"E" : 1 time Call ring enabled. -
Page 31: Setting The Voice Message Function
: Voice message enabled. "P" - Management Password - "E" - 26 (number twenty-six) - "E" - 1 (number one) - "E": Voice message disabled. This function enables/disables the Voice Message Function of DRC-701LC/RF1. ① Press Program Button "P". ② Enter Management Password. -
Page 32: Setting The Notice Forwarding Function To Secumax When The Door Released From Outside
19. Setting the Notice Forwarding Function to SecuMAX when the door released from outside "P" - Management Password - "E" - 18 (number eighteen) - "E" - 0 (number zero) - "E" : Sending a signal to SecuMAX disabled. "P" - Management Password - "E" - 18 (number eighteen) - "E" - 1 (number one) - "E" : Sending a signal to SecuMAX enabled. -
Page 33: Setting Force Open Via Secumax
20. Setting Force Open via SecuMAX "P" - Management Password - "E" - 29 (number twenty-nine) - "E" - 0 (number zero) - "E" : Force open by SecuMAX disabled. "P" - Management Password - "E" - 29 (number twenty-nine) - "E" - 1 (number one) - "E" : Force open by SecuMAX enabled. -
Page 34: Setting The Forced Entry Notice Forwarding To Secumax
21. Setting the Forced Entry Notice Forwarding to SecuMAX "P" - Management Password - "E" - 24 (number twenty-four) - 0 (number zero) - "E" : Disabled "P" - Management Password - "E" - 24 (number twenty-four) - 1 (number one) - "E" : Enabled: Set time (1 second longer than normal door opening duration). -
Page 35: Selecting The Wiring Method
22. Selecting the Wiring Method "P" - Management Password - "E" - 6 (number six) - "E" - 1 (number one) - "E" : Gateview method (UTP) "P" - Management Password - "E" - 6 (number six) - "E"- 4 (number four) - "E" : Common 4 Wire Method (Common 12 Wire). -
Page 36: Video Out Impedance Adjustment Setting
23. Video Out Impedance Adjustment Setting "P" - Management Password - "E" - 8 (number eight) - "E" - 0 (number zero) - "E" : Short distance transmission. "P" - Management Password - "E" - 8 (number eight) - "E" - 1 (number one) - "E" : Long distance transmission. -
Page 37: Registration Of Household Unit Number
24. Registration of Household Unit Number "P" - Management Password - "E" - 15 (number fifteen) - "E" - Call Security from the monitor - Unit number - "E" - 0 (number zero or corresponding lobby phone number) - "E" This method applies to the case that there is no security station installed. - Page 38 ① Press Program Button "P". ② Press Management password. ③ Press Call Button "E". ④ Press "15" (number fifteen). ⑤ Press Call Button "E". ⑥ From a household unit, call security. The factory default household unit number appears on the OLED display of the lobby phone. Please Press the actual unit number. ⑦...
-
Page 39: Checking Videophone Status Of Household Units
25. Checking Videophone Status of Household Units "P" - Management Password - "E" - 14 (number fourteen) - "E" - Unit Number- "E" - 0 (number zero as Master lobby phone or enter a corresponding lobby phone number) - "E" This function is to check the status of videophones installed in each household unit. - Page 40 ① Press Program Button "P". ② Press Management Password. ③ Press Call Button "E". ④ Press "14"(number fourteen). ⑤ Press Call Button "E". ⑥ Enter the Unit Number and press Call Button "E". ⑦ Enter "0"(number zero as Master lobby phone or enter a corresponding lobby phone number) and press Call Button "E".
-
Page 41: Activation Of Electronic Key (Password) Function
26. Activation of Electronic Key (Password) Function "P" - Management Password - "E" - 31 (number thiry-one) - 1 (number one) - "E" : Electronic Key (Password) enabled. "P" - Management Password - "E" - 31 (number thiry-one) - 0 (number zero) - "E" : Electronic Key (Password) disabled. -
Page 42: Setting The Keypad Led Option
27. Setting the Keypad LED Option "P" - Management Password - "E' - 20 (number twenty) - 0 (number zero) - "E" : Automatic brightness control by proximity sensor enabled (LED gets brighter gradually as an object is getting closer to the lobby phone). "P"... -
Page 43: Setting The Volume Of Voice And Beep Sound
28. Setting the Volume of Voice and Beep Sound "P" - Management Password - "E" - 30 (number thirty) - "E" - Beep Volume (1~2) - Voice Volume (1~7) - "E" This function enables the adjustment of Beep & Voice volume. ①... -
Page 44: Setting The Door Release By Building Password
29. Setting the Door Release by Building Password "P" - Management Password - "E" - 28 (number twenty-eight) - 1 (number one) - "E" : Door release by Building Password enabled. "P" - Management Password - "E" - 28 (number twenty-eight) - 0 (number zero) - "E" : Door release by Building Password disabled. - Page 45 29-2. Using a door release by Building Password function.
-
Page 46: How To Make A Unit-To-Unit Call
30. How to make a Unit-to-Unit Call 31. How to make a call to Security Station... -
Page 47: Door Release By Unit Password (Refer To 4-3)
32. Door Release by Unit Password (Refer to 4-3) 33. Door Release by Building Password or Management Password... -
Page 48: Supplement (Programming Summary)
34. Supplement (Programming Summary) Setting Passwords 1. P–Previous Management Password–E–0–E– New Management Password–E : Management Password Registration. 2. P-Previous Management Password-E-0-E-New Management Password-E : Managementpassword Registration. 3. P-Previous Building Password-E-1-E-New Building Password-E : Building Password Registration 4. K-20-E-Household Unit Number-E-Previous Unit Password-E-New Unit Password-E : Unit Password Registration 5. - Page 49 How to make a unit call and security station call from a lobby phone 1. Enter unit number - E 2. Press G - E SecuMAX Setting 1. P-Management Password-E-18-E : Entrance from external reported to SecuMAX (00: disabled, 01: enabled) 2.
-
Page 50: Wiring Method
35. Wiring Method 1) Security Station Phone CDS-481L CDS-4GS... - Page 51 2) Lobby Phone (DRC-701L Series) Security ① Power Source : DC 12V. ② When not in use, must be connected. ③ When the door is forced open, the access notice will be sent to the designated security center (SecuMAX). <Caution> If installed outdoor, it requires extra molding for water-proof and rainshield.
- Page 52 3) System Diagram...
-
Page 53: Miscellaneous
4) Wiring Method for CCTV and Sensor Connection 36. Miscellaneous ※ Please carefully read this User’s Guide before calling service man After checking the entire check list, please contact customer service center. We will do our best to make you satisfy with our services. -
Page 54: Part List
STICKER (BRAILLE) Number 5 button (Braille type) 38. Specifications and Features Installation Flush Mount Type installation Model DRC-701LC, DRC-701LC/RF1 Gateview System (UTP Cable) Household unit monitor (8 wires-common 6 wires+video 2 Wiring wires), Security station phone (common 4 wires) Power Source... -
Page 55: Rf-Id Model (Optional)
Public Lobby Phone RFID/USN Wireless Device (13.56MHz Freq.) Certified Company Commax Co., Ltd. (CMX) (Identification Code) Manufacturer / Origin Commax Co., Ltd. / Republic of Korea Manufacturing Date Marked on the exterior Communication Device Certification(RF Option) Model Name DRC-701LC/RF1 Frequency 13.56MHz... - Page 56 513-11, Sangdaewon-dong, Jungwon-gu, Seongnam-si, Gyeonggi-do, Korea Int’l Business Dept. Tel. : +82-31-7393-540~550 Fax. : +82-31-745-2133 Web site : www.commax.com PM10701LCR10 Printed In Korea / 2014.04.104...
Need help?
Do you have a question about the DRC-701LC/RF1 and is the answer not in the manual?
Questions and answers